Last week we told the story of how our back gate was transformed from a horrible and rotting Greek inspired door...
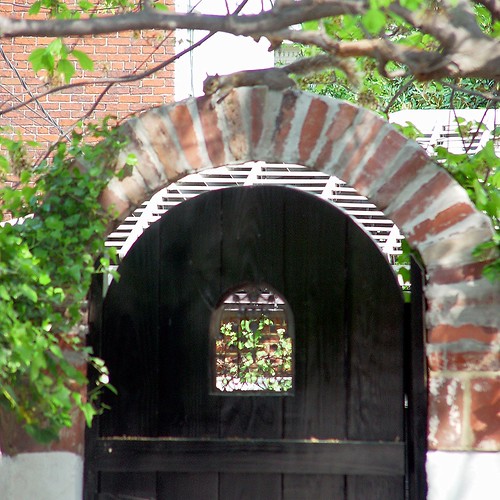
...To an attractive and custom arched top gate with antique cast iron grated window.
The project only took a few days but truly changed our backyard from a Port-o-Let eyesore to an area just a tad closer to Wendy's dream of a secret garden. But there's one aspect of the project that we completed and loved but left out of the description because it's no longer with us. (Sniffle.) Let me explain.
One of the things Wendy had hoped to include in our project was a brick archway over top of our new door. She had talked about this feature for years, planned for it, and even sketched out what she wanted it to look like so I could build the gate of her dreams.
Using doors and brick arches found on other homes and properties in Old Town as inspiration, we had hoped to put our complete lack of masonry skills to use and create a self supported brick archway. Yes, you read that right. Neither of us had any experience in laying brick, we had never laid a block to a line, constructed even the smallest wall, or so much as placed a single brick in wet mortar (except for possibly doing it on a grade school field trip as part of a "learning experience"). So we decided to go ahead and give it our best shot to build one of the more difficult things you can do in masonry as our "first try." Yep, sounds like a great plan, no?
We started the project in the middle of the door build. If you noticed a wood form behind the door and bag of cement on the ground in one of the photos from last week you may have picked up on this effort.
We knew we'd need a form to lay the brick in place so we built two arches, one for the interior of the door, and one for the exterior.
After leaning them in place, I kerf cut a piece of plywood, screwed some blocking to the back of the plywood, and curved the wood over the arch and screwed into the blocking to secure it.
Before we started laying any brick, we picked out all of the bricks we wanted for the arch, laid them all out on the ground in the order we wanted them to go up, then mixed some Portland cement for the project.
Then it was just a matter of putting the bricks in place, one after another, left, right, left, right, until we reached the final brick in the middle. We also put some plastic over the newly painted door to protect it from the cement. In retrospect, this was a good move as working with masonry is filthy.
After a nerve wracking cure time, we carefully removed the form from under our delicate DIY arch.
To say we were proud of our accomplishment was an understatement. At first, I couldn't believe it didn't fall right away. Later, I couldn't believe it didn't fall the first night. How we had successfully constructed a self supported arch was beyond us, but we thought it looked great.
The squirrels even cast their vote of approval and used it as the perfect spot for obtaining a sun tan.
All was wonderful. We began training the ivy over our beautiful (but fragile) arch. After it made it through a year my confidence that it was going to make it for the long haul grew. We had built a (fragile) arch! The arch was officially checked off of our to do list in May 2005.
Over the next few years the ivy grew in nicely over the top of the arch. It was a slow go, but it really made it look complete. Our little backyard was becoming Wendy's secret garden, even in the winter months.
But then tragedy struck. On December 31, 2008, a rather massive and unexpected wintertime wind storm swept through the DC metro area. It seemed to be a metaphor for blowing away the worries and troubles of 2008 and making way for the promise of 2009. Unfortunately, in all its blowing, it also turned the ivy that was attached to our (fragile) arch into a bit of a sail. At some point during the day, the wind became severe enough to blow the little arch right over. When I returned home from work, I found the arch in multiple pieces in our parking area and still attached to parts of the ivy, as if the Big Bad Wolf himself had paid our home a visit. Here's the last known photo of the arch as it was a beautiful backdrop to my metal cutting efforts while working on our DIY Server Rack.
The carnage occurred before we owned iPhones and before we launched our blog, so we have no photos of the unfortunate aftermath. I can tell you though there is a small planter with a little tree that really took the brunt of the impact. This little tree has since bounced back.
In a project where we learned a lot about both how to make our back gate look better, and also how to build a better gate the next time around, this minor destruction was our final point of education. If we were doing this aspect of the project over again we would do one of two things a little different.
First, we might change the configuration of the arch to lay the bricks on their side. This would make the whole structure more sturdy and would ultimately help the arch stand up to high winds.
The second change would be to possibly reinforce the whole structure with rebar. By using bricks with holes in the center and bending the rebar to the curve, we could use the cement to reinforce the whole thing, and the rebar would essentially create a solid and single structure that would be less susceptible to the wind and elements.
We've yet to rebuild our failed arch, but we're quite happy with how it turned out for the short time we had it. We may end up putting up a simple metal frame arch that we can train the ivy to grow on, but who knows? One thing's for sure, we're just glad no one was near or under the arch when it came tumbling down, and that our car was parked elsewhere.
It's been years since our arch came tumbling down, and therefore all current photos where our gate appears is shockingly sans arch. That makes me a sad panda.
Do you have any projects you were very happy with but lost due to an unexpected situation? Do you like the gate better with or without the brick archway? Maybe you have an idea for us to try if we rebuild the arch someday. We'd love to hear your input.