We all love the drama of the big reveal. It's the light at the end of the tunnel, the fruits of your hours, days, weeks, and months of labor, and the goal you've been striving for since the idea of your project first popped into your head. Everyone gafaws at the before and after photos that show the tremendous progress and upgrades made to a room, and I doubt there's many people who wouldn't rather enjoy the end result of a job well done than the dirt and grime that often comes in the midst of a significant bit of DIY construction. All that being said, you can't get to the finish line of your race without taking everything one step at a time.
Yes, the individual and often "insignificant" steps of a project, no matter how mundane or simple, are what ultimately make a project. Many times these steps require a fair amount of detail, patience, and thought to be successful, even if they will ultimately be hidden within walls, beneath the floor, or in the case of the item I've been working on of late, within the ceiling.
A while back I touched on some of the prep work we've been doing in the attic to get the HVAC duct work functioning to the best of its ability. I was back at it this week, but I've been working on some duct work that will ultimately serve a much different purpose.
The bathroom exhaust fan is a critical component of any functional bathroom. It helps to reduce the humidity and odor that can occur in a bathroom, keeping the place in good shape regardless of how heavily the room gets used. In our master bathroom we're planning to use a super quiet inline exhaust fan. This means the fan will not be seen when you look up in the bathroom, but it will be located in the attic, never heard, and will be fed by a few duct boots positioned strategically, one above the shower door, and one above the toilet.
To mimic the other vent/register covers in the house, we'll be using 8" x 8" Reggio Register decorative vent covers. The exterior of these covers are 8" x 8" but the interiors are 6" x 6". Unfortunately, I was unable to locate any good 6" x 6" duct boots that would allow me to mount the decorative vent covers to them. However, I was able to find an 8" x 8" duct boot that I figured I could make work.
One of the things I hate about duct boots like this that they are not a rigid square, they are just flexible metal. My plan to make this work would not only allow us to mount the vent cover to the duct, bit it would provide a rigid edge to the duct boot, give the drywall an area to screw to, and ultimately provide a solid backing that the vent cover itself could screw to.
The first thing I did was to cut several pieces of 4/4 (true 1" thick) wood that would act as an interior frame for the structure. I had two duct boots to do this one, so I cut several 6" and several 8" lengths of wood.
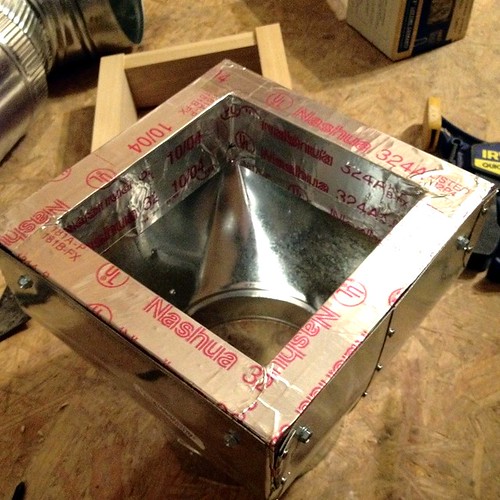
I assembled the cut pieces of wood into two squares using clamps and exterior decking screws (screws suitable for damp conditions).
My plan for these squares of wood is to mount them on the inside of the boots, then to seal them to make the square essentially an extension of the duct boot itself.
Once assembled I wanted to ensure the wood would not become compromised by any moisture the fan is responsible for moving. To protect the wood I wrapped the frame in foil tape rated for air ducts. This is the same tape that we wrote a Toolbox Tuesday post about a while ago, and it works great in situations such as these.
With the frames constructed and protected, I had to snip the corners of the duct boot to allow the frames to fit inside of them. It seems that an 8" x 8" duct is actually slightly smaller. In spite of measuring before making the squares, I still didn't have it a right fit. Oh well, nothing a few tin snips can't fix.
Once the corners were cut I was able to slip the frame inside of the boot. Then, using self taping sheet metal screws, I screwed the duct boots directly to the foil tape-covered wood frame. I used two screws on each side of the boot, and this gave an extremely sturdy frame and structure to the boot.
The final step of this project within a larger project was to cover the exterior seams and cuts of the duct boot with foil tape to ensure the fan is pulling only air from within the bathroom and not air or insulation and dirt from the attic.
In all, each duct boot took about two hours to fabricate. Luckily, our friend Colin actually helped assemble the second one while I was hanging out in the attic trying to drag some of the flexible insulated ductwork into place. Yes, it was a lot of effort for such a seemingly insignificant part of an overall and much larger bathroom renovation, and yes I probably could have purchased a 6" x 6" boot somewhere that would have worked, but this solution offers several advantages over the proper sized boot.
This solution provides structure to something that is typically flimsy, and it also provides a solid backing to screw the vent cover and drywall to. Down the road, when we actually get to the point of installing the fan and duct boot, the work we've done in the custom fabrication will save more time than what we spent creating it. We'll be able to easily position the new duct boot and screw it into place without needing to bend sheet metal, create holes, or wrestle with an out of square opening.
As you can see, we expended a significant amount of effort on a seemingly insignificant element of an overall project. But when we eventually get to the end of the tunnel and turn on our whisper quiet bathroom fan, I'll remember this step and will be able to give this baby step of the project the nod for maintaining an efficient bathroom exhaust system. And when our mirror remains fogless and any foul odors are quickly removed from the air, all bathroom users will be able to appreciate the level of effort we put into custom fabrication of a 6" x 6" duct boot as a retrofit of an 8" x 8" duct boot.
Yes, it is not a sexy before and after photo series, and it's not some glamorous room reveal that we'll share all over to the Internet (don't think this one's going to make it on Pinterest), but it's a critical step that had to be completed to ensure we are doing everything we can to do the job once and do the job right.
What do you do when it comes to these little tasks that you know will never been seen once they're completed? Do you cut corners, or do you try to play the role of the perfectionist with all that you do? I'd love to hear how you would handle something similar.