I can barely type this post because my fingers and arms are blistered and sore. And I'm writing this because I'm in better shape between the two of us. No joke, it was one heck of a weekend working on our front flower bed, but I'm happy to say that in spite of some major obstacles, we came out on top.

Because we live in an urban setting, our opportunities to improve curb appeal through flowers, plants and grass are extremely limited. In fact, our only chance to make an impact are via our two cast iron urns and the area surrounding our newly planted city tree

Last weekend I planted flowers in the urns, and am happy to say the plants are thriving! (Phew, no deaths yet.)

So this past weekend, on a very beautiful Saturday, we turned our attention to the barren, weed-peppered "flower bed" out front. I'll use that term loosely as there isn't a flower in sight. 

But there were plenty of large tree roots in sight. Large...menacing...gnarly...difficult tree roots.

We've been on the fence -- no pun intended -- as to the style of flower bed border to install. We scouted other flower beds around town and have our minds made up that we'd like to do a cast iron/metal border. We think it will be a nice complement to our cast iron stairs and urns. Though we haven't found the right fence just yet, we didn't want to delay our efforts any further since the current tree box is a pretty significant eye sore. 

Therefore we opted to turn our attention to preparing the area for flowers and plants, which meant tackling the hidden beast that lies in the bed itself -- a nasty tangle of roots. "Roots?" you may wonder. Unfortunately yes, not from our current sapling of a tree, but instead left as a reminder of the majestic old beauty that once stood in this spot. 

When our rotted and diseased tree was taken down two years ago, a mess of huge roots was left behind. The location of a water meter in the bed made for precarious root removal (especially when using a stump grinder), and therefore the city workers decided to play it safe and leave many of the old roots intact. 

While I appreciate their conservative style (no one wants a broken water line after all), it certainly presented an added layer of obstacles when readying our bed for future plantings. And so we set out to remove these blasted roots, once and for all.

We had a few methods to try to whip these bad boys into submission. First we started with the tried and true chop with an axe (actually a cutter mattock) method. So in sexy attire, we set out. Chopping. Chopping again. And still chopping, even while our blisters burst and band aids flew off of Alex's double gloved hands. We're still not sure how that happened. 


The exhaustion was really setting in, and some of these stubborn roots still weren't budging. When we'd splinter off enough to mark just a bit of progress, we'd give our arms and backs a rest to collect some sticks and claim a splinter of victory.

After much exhausting effort, we tried drilling holes with a flat boring bit. The goal here was to drill enough holes in the root, that when we went back with the axe, it would be more easily removed. Also, anything we couldn't actually remove would have enough holes to allow moisture into the roots and ultimately (over a very long time) let them naturally decay. After much effort, and several dead drill batteries later, we were making some progress. 

At this point in the day, we were elated when our friend Colin showed up, eager to lend a hand. Colin brought his cordless circular saw and attempted to slice grooves in the larger roots to ease the chopping process. The work was slow going, but proved to be an effective technique.

With the roots weakened, we went back to chopping to try to remove additional sections of root.

 
After what seemed like hours (wait, actually it was) and drop by visits from friends, neighbors and pedestrians that gave us a chance to rest our weary bodies, we were finally satisfied with the state of the bed. It wasn't the prettiest "after," but it sure felt good to get that stuff taken out. 

The roots had been removed to a satisfactory point and we felt we could begin filling the area with good planting soil. The process consisted of: 

  • Removing any large debris from the area
  • Tilling the existing soil
  • Adding a layer of fertilizer
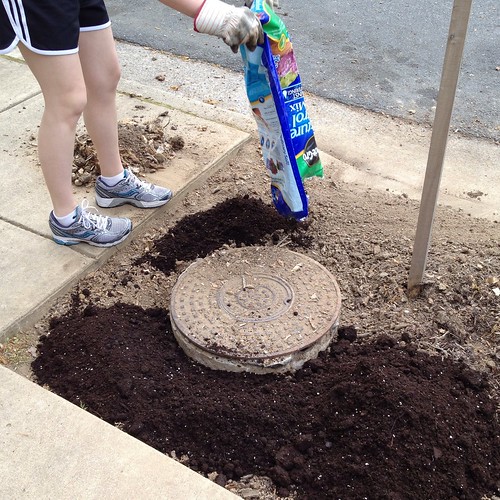
  • Adding several bags of moisture control soil

Have your eyes recovered yet from the shocking glare of my winter white legs? You may need to take a moment before reading on. Don't worry, I'll wait...

After some clean up (ourselves included), we called it a day. We didn't have quite enough dirt this first go round, but we just didn't have it in us to go to the store to buy more. Instead we went inside, took a good Saturday nap, then headed out to Hard Times Cafe with Colin for some chili and beer. You really can't get a much better dinner after a ridiculously hard day of work.

It was truly a back breaking kind of day, but I speak for both of us when I say how relieved we are to check off "remove old tree roots" from the project list. Now the fun can really start when we move on to selection and purchase of our new plants, flowers and metal fencing.

So, what were you up to this weekend? Do you have any tips for root removal that we should have tried? You know Alex wanted to burn it out, something I'm sure the city and nearby car owners would not have been happy with. Anyone else tackling garden projects that made you long for a chaise lounge from which you could supervise your full time gardener? I'd love to hear all about it.

Comments 23

Comments

4/25/2012 at 10:47 AM
Oooooh gosh. We have a row of huge old ugly scrubby cedars that we plan on cutting down either this summer or next, and I am absolutely dreading this. Guh!
Wendy
4/25/2012
Not gonna lie. This was one bear of a project. Good luck!
Margie
4/25/2012 at 12:25 PM
Never call soil "dirt" or the gardening gods will seek their revenge. Margie
Wendy
4/25/2012
Ruh roh. I must have broken the cardinal rule of gardening. I think I can hear my plants dying now. ;-)
Nick
4/25/2012 at 12:35 PM
Have you guys landed on an iron fence yet? I'm doing a similar project in my "front yard" and am having a tough time locating a reasonably-priced option outside of the custom fence route... Looking good so far!
Wendy
4/25/2012
Hi Nick,

We have one lead so far on a really nice looking iron option, although it will likely be custom due to our uncommon dimensions. Alex has sent the measurements in for an estimate, but we've yet to hear back. We'll keep everyone posted.
4/25/2012 at 12:42 PM
I feel your pain. No, really I do. We're intalling brick borders on all our trees and beds and I've seen too many roots to count. But its worth it in the end!!!!
Wendy
4/25/2012
Thanks for the encouragement! Your brick borders sound lovely!
Threadbndr (Karla)
4/25/2012 at 2:46 PM
Have you decided on the edging for the bed yet? Since the curb side is so much lower than the sidewalk side (esp the corner at the drive), it looks to me like you 'll need to put in something to bring the entire bed level to the sidewalk before you install the fence or the first heavy rain is going to wash all your topsoil into the storm gutter. I'm working with the boy at his house where his front yard is migrating rainstorm by rainstorm onto the sidewalk because the neighbor re-graded his yard to drain into JCs!

May I suggest one or two courses of brick painted to match your house on the sidewalk side and then courses around the other three sides to that same level. It will function as a raised bed that way, and will keep your soil and mulch inside the bed.
Wendy
4/25/2012
Hi Karla,

Thanks for pointing out the "weakness" in our garden. We had a crazy rain storm on Sunday, the day after we put down the new soil, and I was glued to the window with fingers crossed that it wouldn't all wash away. (Luckily it didn't.) We do have a plan to help combat this. Alex doens't know it yet, but it's on our itinerary for the night. ;-)
Alex
4/25/2012
:-/
4/25/2012 at 3:03 PM
The mattock is my tool of choice, but I have found that a reciprocating saw gets it done.

Also, the City of Alexandria gives away mulch to residents. The pick-up is located out Eisenhower Ave past the water park, near the animal shelter.
Wendy
4/25/2012
Well all be darned. I wish I had known that before we bought all those bags of mulch! I'll definitely keep this in mind for next year. Thanks for the tip!
4/25/2012 at 3:47 PM
That was definitely back breaking labour you both entailed. It had to be done, and it looks good so far! It will be a cute little urban garden when you are all finished.

By the way, the planters look stunning.
Wendy
4/25/2012
Thanks so much Antonella!
cara
4/25/2012 at 6:44 PM
I was definitely one of those neighbors who dropped by when Alex was axing (is that a verb?) away. You guys looked just so miserable in the heat that I nearly just kept on walking, because I felt so bad for you. But, that said, the misery was clearly worth it, because the end result looks really good, and it will only get better with time! Much nicer than the landscaping (or lack thereof) that I have in my front yard, but then I am definitely 100x lazier than you both.
Wendy
4/25/2012
We're so glad you dropped by, Cara! It was a pretty miserable job but we're happy we did it. It was worth the effort.
Karin K
4/25/2012 at 8:47 PM
Oh, I feel for you guys! But I love the chili and beer afterburner treat! You totally deserved it. I saw some concoction online years ago that you can make at home and pour over the stump that will effectively cause it to rot, but I think it takes months, and that won't get you anywhere for Spring planting season. Can't wait for the final result! Did I mention I was on team "wrought iron"? Or should that be ROT iron?
Wendy
4/25/2012
ROT iron. Good one!

It's looking like your team is going to be the winner...assuming we can get the company to call us back! :-)
4/25/2012 at 9:28 PM
We just finished having a 120 foot tall oak taken out that was killed by a lightning strike a few years ago. Had we known you needed mulch, you would have been more than welcome to some of it! We had enough for the whole neighborhood's outdoor projects.

As always, that little garden space will look great! It's amazing how a little color can brighten up a barren stretch of concrete and dirt.
Wendy
4/27/2012
We're only about halfway through "fixing it up" and already can't believe the difference. You're right, a little color can really brighten up a nasty space!
gaylemae
2/5/2013 at 7:06 PM
I ran a circular saw across the edge of where the majority of the roots were, and then pulled towards the thinner ends. It's easier after some rain. It took about 12 years for the 'sinkhole' to happen where the roots were, and lost several trees and bushes planted above it. It must cause a change in the comp of the soil, and it didn't stop until we filled the bottom of the hole with rocks, and added landscape fabric. Home Depot or Lowe's has rubber tire mulch (shredded, chunk) and light/dark colors, that doesn't wash away or decompose. We use it on top of bark mulch, to keep it in place and it's lasted 4 years now. We scrape it off in the spring, add fertilizer/soil/new bark mulch and sprinkle on Schultz's granular fertilizer, and then put it back on top. You can also put down that perforated weedblock fabric to keep the junky soil contained, adding fresh soil on top. I use a mix of vermiculite, water-holding granules, peat moss and a good potting soil. Once a month, I use Schultz's instant in the water.
Wendy
2/6/2013
Great tips! Thanks so much for sharing, and we'll have to take a look at this come spring. I'm already looking forward to planting flowers in the space. :-)
Since you've not signed in yet, you will need to fill in your name and email below. If you have a Facebook account, save yourself a step and use Connect to login.

Denotes a required field.

Please enter full URL, including http://

You can use Markdown syntax in your comment. And you can also use lots of Emoji!
  • Search

  • Login
  • Follow
  • Advertising

If you're looking for information on advertising and sponsorships, head on over to our sponsorships page. You can purchase site sponsorships in a few easy clicks. 

Toolbox Tuesday
Open Housing
  • We're Featured!

Old Town Home has been featured in the following places and publications:

The Washington Post
 
Washingtonian Magazine
 
Domino
 
Old House Journal
 
 
Apartment Therapy House Tour
 
Washington Post Express Feature
 
Home & Garden Blogs
 
© 2024 OldTownHome.com. - Privacy Policy

Unexpected Error

Your submission caused an unexpected error. You can try your request again, but if you continue to experience problems, please contact the administrator.

Working...

Working...