By now many of you know what a serious salvaged hardware obsession I proudly lay claim to. In my book, the right hardware will make or break a home of any age, and this is even more true in an older home.

When we moved into our 1880's home, the door hardware throughout our house had been replaced with flimsy and odd looking 1980's brass hardware. Right decade, wrong century. Luckily we were still able to see what was once there. Through lock catch notches left in the door casings, hole patterns on the doors, and wear marks/outlines in the original doors, we determined that our house had been outfitted with rim locks throughout. 

With the knowledge of correct hardware we set out on what has become an almost nine year journey to find matching door and lock hardware for all of our interior doors. Through searches in salvage yards, scouring eBay, and stumbling on a few in junk shops, we've been able to slowly put together a collection to outfit our home, but it hasn't been easy.

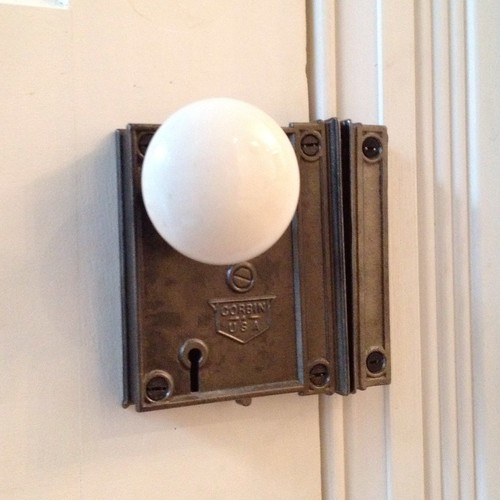
The lock we chose is a medium sized Corbin USA cast iron lockset with four screw hole pattern. It matched the size and hole patterns found on several of our doors, and it wasn't overly decorative for our relatively simple home.

The biggest problem with most of the locks we found over the years was the fact that they were all in various states of decay or malfunction. Each lock has required varying levels of restoration to get them into full working order. To accomplish this we had to open up each lock, take it apart, clean/restore (and sometimes replace) each piece, and reassemble it all.

Many of the locks we've obtained look good on the outside, but looks can be deceiving. They've typically been stripped of paint through some sort of a caustic soak or bath and then washed on the outside. Externally them seem to be in great shape. But when we open it up (by way of the single screw in the center of the lock) we have been met with a rusted and malfunctioning lock with the harder residue of stripped paint, spiders nests, and 100 plus years of dirt and grime.

Note: Many of the technical terms I use in this description like "spindle collar" and "latch bolt" are completely made up by me and my best guess for what they would be called. Beyond "rim lock" I really don't have much actual knowledge of terms. 

Our job has been to take the whole lock apart to begin the cleaning process that would result in a restored and working rim lock.

It's best to take out all of the internal parts and pieces and set them aside. (If you're trying this on hardware of your own, take a photo of the fully assembled lock before you start. It will help if you're not 100% sure where a slide bolt or spring goes, or how it could possibly fit back in.) I then clean each piece on the wire wheel to get as much of the rust and grime off as possible. It's my preference to clean both the pieces that are visible from the outside, as well as the pieces that will never see the light of day.

After all of the elements are clean you can begin reassembling the whole mechanism one element at a time.

The first step is to is to assemble and install the knob and latch mechanism in the upper part of the rim lock.

The knob and latch mechanism is usually made up of about four pieces. Two pieces surround the knob spindle hole and have small levers on either side. These levers push and pull the latch bolt in and out as you turn the knob. Additionally a spring (just a flat piece of metal) sits on the top of the assembly and forces the knob spindle and latch both back to a resting position if you're not turning the handle. This is why the knob turns back and latch bolt comes back out when you let go of the knob.

Next I install the lock and slide bold assembly with the lock mechanism and lock spring.

The lock is actually very simple, and quite easy to pick. Similar to the latch bolt, the latch spring keeps the dead bolt in its current position (either locked or unlocked). When you insert the key and begin to turn it, the key catches the bolt and pushes up on the mechanism, allowing the bolt to either slide in or out to lock or unlock the door. The key's pattern isn't particularly advanced, but it needs to have the right depth slot in the middle of the key for it to work.

This particular style lock also has an internally operated slide bolt that allows you to quickly lock the door from the inside. This is considered a "privacy bolt" since it keeps the door locked even if you have a key. I'm guessing it's the first thing that parents removed from children's doors.

Finally, place the cover and center screw back into the lock.

Do you see that little slide thing at the top of the lock?

That little device is there to allow you to change the orientation of the latch bolt on the lock if you need it to switch from being a right hand lock to a left hand lock, all without opening up the lock. If you pull that slide tab up it frees the latch and allows you to unhook it from the spindle collar, flip it around, and then hook it back on. This effectively changes the orientation of the lock, then you just push the slide tab back down and put the last screw in place in the door and the lock is securely in place. It's a very cool and very utilitarian design. So functional.

I don't typically use any WD-40 or lubricant in the lock because I sort of like the creak of the lock as you turn the knob, but it's all just personal choice. If you spray a little WD-40 on the interior of the lock before putting it back together you'll have a nice and quiet lock as perfectly operational as the day its first owner bought it.

The only thing left is to install it on the door and claim your prize as a restorationist (no cash value).

It's a bit of a tedious process, and quite a bit of effort, but I feel quite good in knowing that we've slowly restored our old home to a point a little bit closer to its original state. What do you think? Is it worth the effort or should be just get a reproduction and call it a day?

I know some of you have restored these types of locks as well. Any tips you can pass along or things we shouldn't do?

Comments 41

Comments

3/8/2012 at 12:25 PM
Beautiful lock! Yours is much more sophisticated inside (and complete) than mine was. We have a different brand on the original front door, so I may have to refer to your post for making it functional again!
3/9/2012
If you run into any difficulty, be sure to post photos and let me know. I tend to be somewhat decent at figuring out those sorts of things.
3/8/2012 at 2:52 PM
Those look like they were made for your doors. Much better than the '80s junk that was there before. If you hadn't have shown it, most people would probably think those locks were there from the start. Good work!
Alex
3/9/2012
Thank you! That is precisely the look we were going for. My hope is that people will walk through our house and comment on how cool it is that we still have our "original hardware."
Tee
3/8/2012 at 10:16 PM
We have rim locks on all our exterior doors. The lock operate with a regular key and are dead bolt, which saved us when someone tried to kick in our back door open. I have had to repair all three and learned early on, you take a photo of the inside before moving any parts. I was able to find one replacement lock, but put it up as a reference for future repairs on our existing locks. We have thumb latches in addition to the lock on the exterior doors, but just the latches on our interior doors rather than knobs. When we built our house 35 years ago the latches were dirt cheap. That's no longer the case. Your lock is much more complicated than ours, with many more parts, I'm not sure I would have tackled that restoration. Great job on the repair and restoration. I must agree photos are a must.
3/9/2012
It sounds like the lock you have is similar to our front door rim lock. It has a normal key for the exterior and a skeleton key for the interior.
3/9/2012 at 9:39 AM
This is great!!! We kept all interior doors when we demo'ed (the only thing we kept...) and they have these locks on them. I can't imagine getting rid of them, or replacing them because I love them so much. I am totally using this blog to clean them up and get em in working order. Thanks for posting!!
Dean
3/9/2012 at 10:25 AM
You've done a great job restoring it back to its original form. Up here, in Boston, there's a TONNE of antique dealers. My parents house is considered a historic house and they find many of their "accessories" from the consignment and antique shops that litter this area.

Have you looked in Leesburg? They have a lot of antique shops there as well. If I had to do it all over again, I'd def. try and find a house where you are in old town, such a nice area (when not flooding ;) ) with a great breeze and decent night life.

As always, good luck!!
Dean
3/14/2012 at 8:38 AM
Alex,

Have you checked out "Vandyke's Restorers"? (www.vandykes.com). Great resource for you!

- Dean
Linda Casey
10/14/2013 at 11:20 PM
I was under the impression from cleaning some of these old locks from out 1856 farmhouse that the exteriors may have originally been painted black. I like the look of yours. Did you put anything on the exterior of the case? Did you use old hinges as well, and how did you finish those?
Alex
10/15/2013
Hi Linda,

Yes, you're absolutely correct, most were painted black. I've seen it referred to in old hardware literature as being "Japanned." As I stripped the paint off I've seen the original black finish, and it was usually either a gloss or satin style paint. It looks almost as if it was baked right on.

Once we had them as raw iron, we just liked the look of it, so we went with it. If we're mounting the locks in an area that gets any moisture, either on an exterior door, or humid location like the bathroom or the vestibule, we've applied a low luster oil polyurethane. This has worked well in keeping rust away.

We've been using original and salvaged cast iron hinges around the house and they're finished in the same way. Raw iron, and if in a damp/humid location, coated in the same poly.

I'm willing to bet your farmhouse is pretty special. 1820-1860 is pretty much my dream era for a home.
Linda Casey
10/16/2013 at 6:36 AM
Thanks for the info. The farmhouse doesn't seem "special" right now - kind of a big mess. Hopefully it will be worth it all!
Linda Casey
11/4/2013 at 3:16 PM

All the rim locks I found on our premises operate with skeleton keys from both sides. I am concerned that these would not provide adequate secutity on exterior doors. Do you have any suggestions?

11/22/2013 at 10:34 AM

Linda, I would just keep the original handles on the exterior doors and add a modern deadbolt. You can probably find them in a matte black finish that will blend in well enough. Historical accuracy may not be perfect but I think it's a reasonable concession to reality that we need secure locks on our doors. Alternatively, maybe you could find a deadbolt with a keyhole cover.

Alex, it's great to see such detailed information. I'm glad to know that I'm not the only one who's so persnickety about accurate hardware. Just bought a rim lock for my bathroom door because the salvaged door I got is too thin for the mortise lock that my house would have had originally. I know a guy who will restore the lock for me and find a key that fits for a reasonable price; do you think it's worth having a key for the bathroom door, or is the privacy pin good enough? (Also, we have nearly identical woodwork; I love it!)

John
3/15/2015 at 8:23 PM

These are great locks, I have an 1860 house with one on each door. If you lubricate the mechanism, you may want to use a graphite spray instead of WD-40 which leaves a film to prevent future rusting but will be a magnet to dirt and dust. The graphite spray is an acetone base which once evaporated will leave the lock nicely lubricated in graphite. Be careful though as the acetone may damage the paint on the face of the lock.

Linda French
8/21/2015 at 1:34 PM

I have a house full of these, and don't think you're correct on one point. The thing that sticks out of the top is a lock button. You can't really reverse these boxes unless you want the back of the box to face outward, or the box upside down, with the bottom at the top so that the keyhole is above the handle instead of below it where it belongs.

roger cook
10/31/2015 at 8:13 PM

These locks are indeed reversible

Barbara Ann
3/9/2016 at 5:10 AM

Interesting. My house has them on 9 doors still working. Left and right opening. Do you know the year of invention or use began. 1820's - 1900 maybe? Very durable as there has been 20+ children living in our house sence 1825. Thanks for the repair instructions. I will print for the new owner - house for sale.

Beth
6/16/2016 at 8:04 PM

I'm looking for "flat spring" metal to replace some broken ones in an old lock. Do you have any suggestions on what material I could use to make it myself? Thanks for any help you can give!

Alex
6/17/2016

Hi Beth. I'm not sure where you can find it other than finding similar salvaged locks and borrowing some spare parts from them. I did see another blog post where the owner had cut a small piece of wire hanger and used it as the flat spring. I think it may work for the handle but not as easily as for the lock.

Amber
8/11/2016 at 8:42 AM

Just wanted to say thanks for this post. I've just bought an 1856 brick house, and it seems like every lock and knob in the house is loose and odd. This is a great post. I'm sure I'll be poking around the rest of your blog. I've never been a buff of old houses...what makes 1820-1860 your dream home age? Curious to learn more.

Don Saucier
8/17/2016 at 12:20 PM

I have a barn full of rim locks , ranging from the simple one pictured to beautiful James Carpenter locks which were made in England in 1860s but almost all shipped to the US colonies or Australia .
Cheap spring material can be had from your local lawnmower repair shop . The discarded spring from a weed eater is usually the correct diameter ,just cut to the length you need.
I am disposing of many locks ,so contact me if you are in need of such .

Mike spencer
1/21/2017 at 5:48 PM

Do you still have some? If so, what kind and how much?
Thanks, Mike

Doug Dennison Jr
12/23/2019 at 6:12 PM

I'm currently rebuilding an older (1863-1880) Branford rim lock and am looking for the deadbolt slide as the ear of mine is broke off. Also looking for a key copy....as I understand all the blw keys were the same for the plain rim lock...3 notched brass tip

Marc Slis
8/24/2016 at 3:47 PM

Excellent post and photos. I'm in the process of restoring my second circa late 1800's Corbin rim lock set. I was stuck on the striker reversing latch, thinking it was a lock and I was missing a piece, but your explanation set me straight. THANKS!

Cindy
9/17/2017 at 2:56 PM

Thanks for the info. Best I have found to help me get my locks cleaned and working!!!

Dan
11/30/2017 at 4:55 PM

Do you know when these locks stopped being used?

jim
12/9/2017 at 6:10 AM

Nice information

12/9/2017 at 9:48 AM

Wonderful knowledge about the rim locks , you have explained each single part in detail of the rim locks. I am glad to have such brilliant information.

Larry
4/13/2018 at 2:35 PM

Hi.
In an old house with rim locks, I am afraid of young children locking themselves into their rooms, or, worse, setting the lock and locking themselves out! Is there an easy (and reversible) way of jamming the rim locks. I'm tempted to just jam a nail into the top sliding/rotating switch, but would like to find a more elegant way. If I take the back off the lock to look for a way, will a dozen or so parts fall out? Thanks in advance - Larry

William Lantz
12/21/2021 at 4:35 PM

I just found this thread, but as these locks are pretty easy to remove, perhaps you can remove the locking latch and flat spring. The door handle will still open the door.

Larry
4/13/2018 at 2:36 PM

Hi.
In an old house with rim locks, I am afraid of young children locking themselves into their rooms, or, worse, setting the lock and locking themselves out! Is there an easy (and reversible) way of jamming the rim locks. I'm tempted to just jam a nail into the top sliding/rotating switch, but would like to find a more elegant way. If I take the back off the lock to look for a way, will a dozen or so parts fall out? Thanks in advance - Larry

Alex
1/9/2019

In most of them you can take the mechanism for the safety latch off of the lock, and the slide out of the device.

Whitney
1/9/2019 at 2:48 PM

Hi, do you know if the box part of the lock is located on the inside or outside of the door? Trying to use a few of these original brass rim locks in our renovated apartment and cannot figure out how they go now that they are no longer on the door. Thanks!

Alex
1/9/2019

Hi Whitney,

The locks we're describing mount on the face of the door, on the interior side of the door.

Whitney Burke
1/9/2019 at 10:34 PM

Great, thank you! So the box component goes on the interior side (surface mounted) and the simple handle goes on the exterior, how you would enter the room?

James Brewster
4/15/2019 at 3:19 PM

Excellant information!

Marilyn
3/17/2020 at 10:31 AM

So happy to find this blog. I have a 1857 house in Richmond, VA. Each room (10) has a rim lock. I am one by one restoring them. I'm happy to learn I can reverse the latch for proper function rather than search for a different lock. I'll revisit you when I have other rim lock questions. Thanks.

RITU
12/2/2021 at 5:33 AM

Dear Valuable Customer

We are Manufacturer & Exporter of the same commodities of your deals like Builders Hardware & Handicrafts products for Home Decor and construction, furnishing and renovation of all types of Buildings. And Light Fittings, decorations and furniture.

Relevant to these items if you have any other specific product which would like to develop. Please share your requirement to us.

Awaiting your valuable reply.

Best Regards
Ritu Singh
RH Crafts India
Email : [email protected]

William Lantz
12/21/2021 at 4:37 PM

Thanks for the commentary, Alex. Do you (or anyone else) know of a source of spring steel for the springs? I can find a source and purchase 80' in a roll or individual salvaged springs for half the price of the roll. I'm thinking I'll cut and grind pieces of hacksaw blades. Have you replaced any broken springs?

David Pound
3/6/2022 at 7:50 AM

I have a rim lock which must be 20+ years old on my shed. I have had to dismantle it today because it had jammed, and I am now having a little problem putting it back together again (I failed to take a photograph before I started!!)

The problem is that the spring seems to be misplaced as it doesn't put any pressure on the mechanism for what should be the spring loaded part of the lock. Any advice would be appreciated.

Can I attach any photos to this message as that might make things easier to see?

Since you've not signed in yet, you will need to fill in your name and email below. If you have a Facebook account, save yourself a step and use Connect to login.

Denotes a required field.

Please enter full URL, including http://

You can use Markdown syntax in your comment. And you can also use lots of Emoji!
  • Search

  • Login
  • Follow
  • Advertising

If you're looking for information on advertising and sponsorships, head on over to our sponsorships page. You can purchase site sponsorships in a few easy clicks. 

Toolbox Tuesday
Open Housing
  • We're Featured!

Old Town Home has been featured in the following places and publications:

The Washington Post
 
Washingtonian Magazine
 
Domino
 
Old House Journal
 
 
Apartment Therapy House Tour
 
Washington Post Express Feature
 
Home & Garden Blogs
 
© 2024 OldTownHome.com. - Privacy Policy

Unexpected Error

Your submission caused an unexpected error. You can try your request again, but if you continue to experience problems, please contact the administrator.

Working...

Working...