We took a hiatus from Toolbox Tuesdy last week for our cherry blossom photos and tour, but we're back at it this week. Over the weekend I finally started to knock out a good bit of our storm window project. Yes, I know we're near the end of cold weather, but this is also important for the heat of summer and the late night noise reduction. A significant aspect of our storm window construction has relied on our bench top mortiser, a tool I initially viewed as a luxury reserved for larger and more organized/professional wood shops. However, after trying to make do without it on several projects, a few years ago I decided I would have extensive use for it as I began a more traditional approach to building items like doors and window sash (or storm windows at this point).
If you're not familiar with a mortiser's role in a woodshop, essentially it's used to make slots in any of your material that will ultimately accept tenons (square pegs cut on the end of wood) from adjoining material for a secure joint.
At its core, the mortiser is little more than a drill press with some specialized setup. However, don't make the mistake I initially made in my expectation that any old drill press with a mortising jig attachment would do the same job.
Initially I tried to use my small Delta drill press as a mortiser. I purchased a mortising jig, which consisted of a few bolt, clamp, and screw on attachments for the drill press to turn it into a mortiser. While this was good in theory, and a great way to have more space by needing to buy fewer things, in implementation it left something to be desired.
The main problem was with the drill press's support. The plate was not sturdy or secure enough to achieve a consistent pattern of holes. Beyond this, the drill press I have is a small and entry level press (it's in the background of the photo above), the whole thing just doesn't lend itself to being a mortiser because of its construction. I kept getting holes off center, different sizes, and tear out on the back of the material. The final problem was that the jig just kept slipping and was simply not working well.
After some frustration on the first project I used the mortising jig, I decided I would invest in a tool built specifically for mortising, so I purchased a Jet bench top mortiser.
I already owned the Jet brand table saw and really liked it, and I read several reviews about how sturdy, reliable, and accurate the mortiser was, so I opted to go this route. I ordered from Amazon and it arrived well packaged and oiled (as it seems most Jet tools do) just a few days later.
Setup was simple as the whole thing came almost completely assembled. I just had to bolt on the arm, setup the fence, apply the bit collar, and install my first bit to make an initial cut.
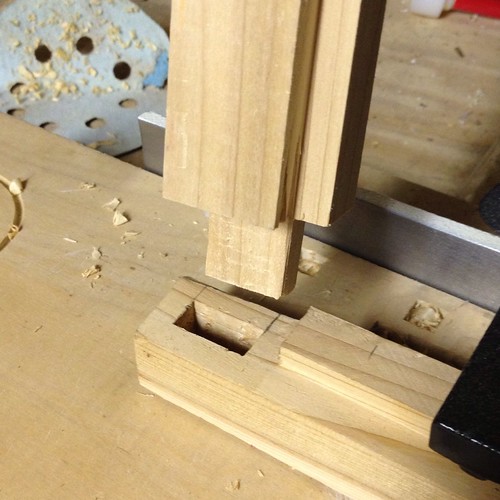
The unit came with three sizes of mortise bits with cutting sleeves, 1/8", 1/4", and 1/2". Each is essentially a long drill bit that is turned by the drill press part of the assembly, with an outer square sleeve that is like a hollow square chisel. As the arm of the mortiser is pulle towards your body, the chisel and bit contact the material. The bit clears the middle of the cut while the chisel portion cuts away the edges making a nice slot for your project.
One key I learned to making a good cut is to clearly mark your slot location, and begin your cuts with holes at either side of the slot. Then, once the sides are cut, clear the material from the middle. This ensures that you slot is only as wide as it needs to be and reduces any issues of the bit pulls to the one side or another. The bit often trys to follow a path with less cutting, so if your cutting right next to another cut, it may pull to the side just a little bit.
I used the mortiser over the weekend to make the mortises in the side rails of the storm window. Using our 1/2" bit, each rail has three slots cut for the cross pieces of the storms.
Though I'm using glue to join the mortise and tenons, the joint on its own is actually rather strong. If I wanted to I could have easily drilled holes in the finished joint and secured them with simple wood pegs. I would have probably even used square pegs, which I could have drilled holes for using the mortiser.
I realize that a bench top mortiser is a bit of a luxury, and many won't have a particular need for this tool, but if you're doing any woodworking even the slightest bit often that requires mortise and tenon joinery, it may be worth your while to pick one up.
Do you have any experience with this tool or a similar one? How about any good stories regarding the use of the drill press turned mortise machine kit. I'd especially love to hear if you had any successes with one.
Did you enjoy reading this post? Want to learn more about our first-hand experiences with other tools, devices or items used throughout our renovation? If so, check out our complete list of product reviews in our Toolbox Tuesday section.
Note: We weren't compensated for this review. We simply want to share good products when we see them, and hope that learning from our mistakes can help save you time, money and frustration.