Termites, water damage, and structural damage, oh my! If you've been following along the last couple days, you know about the roller coaster of emotions we experienced at each critical moment of our kitchen disaster and rebuild. From feeling completely defeated, to feeling as if we could conquer the world, and right back to confused and bewildered, it seemed difficult to predict how we'd feel by the end of the day each morning we woke up. How would you feel if the main corner posts of your house had been so damaged by water and eaten away by termites that it looked like this?
It looks like a crumpled paper bag, not a solid 100 year old piece of 4x4 lumber.
We were able to stick with the project and as we ticked each major element off of our lengthy to do list, our confidence as DIYers grew. We had toiled away for a while on the demolition, electrical, and plumbing, and finally had the kitchen and sun porch in good enough shape that we could begin to enclose all of our work. We were finally moving into the phase where are kitchen would begin to transform from hellhole back to a usable part of our home. However, before we could even begin to think about our finished drywall, we needed to insulate.
In previous posts we mentioned how cold air seemed to blow through the walls with little difficulty, and we were not exaggerating. If you stood within about four feet of the wall you could physically feel the temperature drop. Beyond the cold, the room was loud, any and all noise easily transferred into the room as if there were no walls at all. We were interested in both the thermal insulating factors of an insulation material as well as the possibility for sound attenuation. But back in those days, before the prevalence of itch free and eco friendly insulation solutions, we feared we were stuck with fiberglass.
Through some extensive research I was able to locate an online store that I could order packages of UltraTouch recycled denim insulation.
The name is just as it sounds. This particular insulation is made from recycled denim, and touts it's safety for the environment and no itch characteristics. Beyond the itch, this insulation is a no VOC, no warning label, and completely safe product. Their marketing materials even go as far as having babies crawl around on the exposed product.
We bought R-19 suited for 16" stud cavities, but we rarely had an easy fit. The studs in the old walls were anywhere from 6" wide to 19" in some places. This just meant lots of insulation cutting with a large cutting blade. Every time I had to cut or tear the insulation to get it into an opening, we were quite happy not to be working with fiberglass, that's for sure.
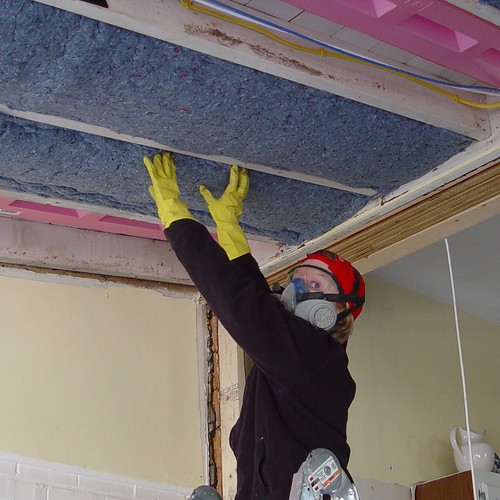
We used the same insulation in the ceiling of the sun porch. Luckily, the roof rafters were all 16" on center in this part of our house (we believe it was added in the 1950s), so it was fairly easy to fit it all in those joist cavities.
Let's just say that Wendy, though assured of the product's safety, wasn't taking any chances. She had been scarred by the past experience and warnings of working with fiberglass and didn't want anything negative to come from this experience. You can't blame the girl for being safe. I do have to say, I didn't wear a respirator and my snot turned blue by the end of the day. Sort of like Smurf snot I guess.
One other thing to note in the photo above is the use of the pink foam channels in each ceiling joist cavity and the little holes in the eave at the end of the channel. Since there is a bare roof immediately above the insulation, the foam allows air to circulate in the area right beneath the sheathing. This is important in allowing the house to breathe a bit and will help prevent ice melt situations due to a roof that's just a bit too warm that can cause ice damming.
Once the insulation was all in place we applied a vapor barrier of 3 mil plastic sheeting over all of the insulated surfaces. We chose this as our vapor barrier because of the fact that our insulation was un-faced. And if you're wondering, yes, I'm precariously standing with one foot on the ladder, and one on stacks of drywall...don't tell OSHA and don't try this at home.
Since we live in an area that typically is a cooler climate, we put the vapor battier to the inside of the wall and insulation. If we were further south (like in South Caroline or Florida), the vapor barrier would have gone in before the insulation, or better yet, on the exterior of the house before the sheathing. If you're doing insulation
Using our staple gun and a whole ton of staples, the vapor barrier went into place in almost no time at all. We were in business and moving full steam ahead. And the best thing about our insulation additions, the whole room went from cold, breezy, and loud, to warm(ish), still, and quiet. The insulation we used was absolutely doing its job.
Next we started installing the sheets of drywall. To help keep as much stiffness as possible and keep the noise down a little more, we went with 5/8" thick drywall. This seemed like a great idea and worked well while we were working on the wall. And we oriented the sheets and installed them horizontally. This detail does matter a bit as drywall actually has better rigidity when installed in this manner.
But this thickness left quite a bit to be desired with installing it on the sun porch ceiling without a deadman (a 2x4 or similar T shaped item) to assist with support. Holding 4'x8' sheets of 5/8" drywall on your head is NO fun. We have no photos of this part of the process. Why? Because our time was apparently better spent swearing at each other and the ceiling than it was taking pictures.
After skimming the whole wall and ceiling with several coats of joint compound to give it that old fashioned look of plaster, the whole room was really starting to look good...and like a room, not a bomb testing station.
We still had one major item left on the punch list before the interior project was complete, and that involved patching, repairing, and refinishing the 100 year old heart pine flooring, but the most important thing is that the room had insulated walls that were no longer full of termites. On the exterior we needed to address the issue that was ultimately causing the ice damming, but we can talk about that long and drawn out saga that nearly caused legal action at a later date. Let's just say, that story is a doozie.
Have you done any insulating in your house to improve energy efficiency? I know it's all the rage now, but remember, this project was back in 2004/2005. Using some eco friendly recycled and non-hazardous materials back then was practically cutting edge. These days you can find similar materials at your average building store, no need to special order.