In my post about our quick and easy kitchen shelf build, I outlined the relatively straight forward methods we employed to build the top two shelves for the space above the wine bar. The added shelving in the kitchen will add some much needed additional storage, but it will also serve as a means for filling an otherwise odd space in the kitchen.
Though our previous post outlined the upper two shelves and their relative simplicity, the third and lowest shelf in the set was a little bit different and more involved. We wanted it to look pretty much the same as the other two shelves, but we needed to add two functional elements to the design that complicated the build.
The first, and most important element is lighting. The lighting in our kitchen has always been seriously lacking. Beyond the center chandelier that puts off very little light, the only other lights in the room are the under cabinet puck lighting. This puck lighting does a great job of lighting the counter tops, but it does little for the right side of the room that we're now referring to as our "wine bar." (How pretentious is that?)
The third shelf is a unique opportunity to add some integrated lighting to make up for the fact we omitted any recessed lighting while we were taking care of our disastrous termite wall issue in 2004. (I honestly almost can't believe this is a photo of the same space.)
I do wish we had thought of adding recessed lights back then. Therefore, we working to add two very low profile built in recessed lights into the lower shelf, which would light the wine bar work space. Simple enough plan, right?
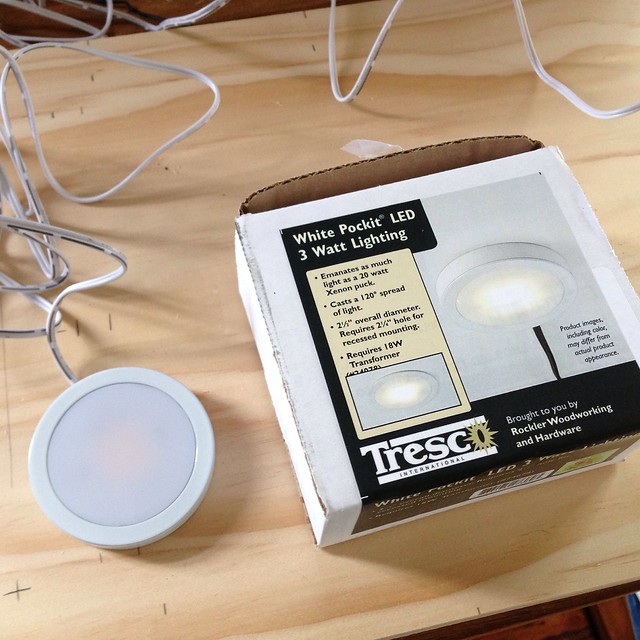
I got to work researching the various puck lights that might be a good option. Though I liked our other halogen under cabinet lights, their height and the amount of heat they put off made them less than ideal for our application. Instead, I put my focus on LED recessed lights. The other consideration was that I wanted them fully recessed, not surface mount. After hours of searching for a bright LED recessed user cabinet light that had a wide angle of dispersion and a warm color (3000K as the color temperature), I finally found one with great reviews that fit the bill.
The price was a little steep, but all of the other LEDs that I've looked at just don't throw enough light and seem to give off a much cooler light, which would have looked very strange against our other kitchen lights. We needed something that was a close match to the halogen lights on the other side of the kitchen. After we get everything all set up, I'll update you all on the final results.
Once we received the lights they seemed perfect. 2-1/2" diameter, requiring only 1/4" recessed depth, and a 3W LED chip -- just what the shelf doctor ordered. Just look at how thin they are.
In order to accommodate the recessed lights, I made a slight alteration to my shelf design. Rather than use a single piece of 1" x 12" with the 1/2" x 2" banding, I opted to double up the pieces of pine on the shelf to make it a true 1-1/2" thick. This would give me an upper portion of the shelf to place items, and a lower portion to drill holes for the lighting and cut dados for the wires. Given the lights are only 1/4" thick, the 3/4" wood was way more than enough.
If we had wanted to surface mount them, we could have, but I always like to hide wires. These lights protrude only 1/4" from the surface mount location in their supplied housing.
To provide maximum lighting below the shelf, and to ensure the brackets did not block any of the light, we placed the two lights very near the front edge of the shelf, placing the lights closer to the center of the counter top.
Using my 2-1/4" hole cutter, I drilled the two holes I had marked on the lower shelf.
I did a quick test fit of the light and it really looked great.
Next, I flipped the shelf over and marked the locations where I wanted to run the wires for the lights. This would allow me to cut several dado slots and completely conceal the wires for the lights within the construction of the shelf.
A final hole on the top side of the upper board would allow the wires to exit and plug into their power transformer, where it would the plug into the wall outlet that seems otherwise randomly placed. Perfect. Here's the small transformer that we'll have to disguise in some way on the shelf.
The lighting was only the first different element of these shelves, but someone in our previous post's comments guessed the second different element -- wine glass storage. We wanted to use the area immediately below the lower shelf to hang several of our wine (and also martini) glasses, rather than have them take up valuable space on the shelf of our white hutch.
While we were at IKEA picking up our butcher block counters, we also picked up a set of wire glass holders that mount inside of the IKEA bars and wine cabinets. Initially we thought these would work well, but the more we looked at them we realized we needed specific dimensions, and there's no way we knew what it was going to look like at the time, so we put the items back. Instead, we opted to build our own storage solution.
In short, we used some stock oak flooring threshold that you can pick up at almost any home improvement store. I won't bore you today with the in-depth details on how to do this yourself, as I'm going to bore you in the next few days with a long and drawn out tutorial post about it. But at any rate, here's a basic rundown today.
The whole process involves a lot of planning, staging, and measuring to get the glasses in the position exactly where you want them when you hang the shelf, so it was very important to spend a fair amount of time on placement.
Once you're happy with placement and position, you simply cut the necessary lengths of threshold, mount them to the underside of the shelf (I used a few screws on each), and BAM...easy and custom wine storage.
Like I said, I'll go into way more detail on another post, otherwise today's post would basically be a book.
I did a quick test fit to be sure the lighting was in good shape and that our glasses would fit. The lighting looked good...
...but the larger glasses we had didn't fit quite right. Apparently I didn't use the right ones when testing for fit. So I went back downstairs and did a bit of work on the router to trim the glass storage pieces a bit. It wasn't hard, but it was frustrating I hadn't thought of this earlier.
To finish off this shelf, I attached the brackets to the underside of the lower shelf piece, as I had done on the upper two shelves, nailed the upper wood for the shelf directly to the lower piece, making sure the edges lined up perfectly, and applied the same 1" x 2" band around the border of the shelf. While I didn't mount it in place, I was at least able to admire it while it sat on the ground.
At this point, we're getting close to the finish line on these shelves. We still need to sand and paint them, as well as mount them up on the wall, but I'm getting excited and I think it's really looking good.
What do you think? Are we headed in the right direction? Do you like our decision to include lighting and wine glass storage under the lower shelf? Have you built any custom storage solutions in your home? If so, I'd love hear all about it.