Ah, we're basking in the sweet glow of freshly painted and completely custom shelves (with integrated lighting and built in wine glass storage). Painting seems like such a simple task, but it is so gratifying when it marks one of the final steps of a project. With this step, our attempt to bring a multi-purpose wine bar and extra storage area to our kitchen is nearly complete!
Over the weekend we finished the overall sanding of the shelves and a applied a full coat of primer and paint. I know this sounds like it was probably a quick and easy completion to the project, but in reality, it was far from it.
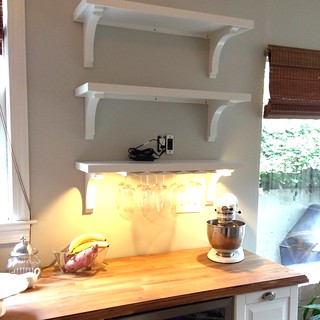
Before we could move step further to officially marking this project off of our quick kitchen renovation list, we needed to hang them in their final locations.
The first step of hanging was actually not hard at all, as I decided to use a cleat mounted to the wall that the shelves would rest on and be screwed to. This allowed me to ensure a perfectly level and evenly spaced installation without having to wrestle with the shelves at the same time.
I could have mounted the back of the brackets to the wall using their built in supports, but these were nowhere near any studs, and I just didn't trust wall anchors with these shelves. I wanted at least one screw in a stud, and preferably more.
Using the cleats I was able to place three screws in each, two of which were placed into studs, and the final with an anchor. You can see how the cleat fit nicely within the lower shelf, sliding right into its opening. The upper shelves rest more on the cleat than anything else, but everything was cut perfectly to size.
To secure the shelves, I slid them over their cleat then screwed down from the top of each shelf into the cleat using pilot holes I had drilled beforehand. The whole approach worked really well.
It also allowed us to fully test hang the shelves prior to painting.
Boy, do we need a better camera flash or what? With the days getting shorter and more of our work happening at night, it might be good to invest in one.
Painting went quickly, smoothly, and without significant hardship. We followed our normal routine, first applying a good coat of Benjamin Moore primer.
Followed by a nice hand sanding with a 220 grit paper, and two top coats of our custom Benjamin Moore trim color that we've used throughout the house (a custom shade of off white).
Installing the lights were really easy. I just slid the wires through the openings I had cut, and worked them along the back of the shelf in the recessed opening. I love it when a plan comes together.
I worked from the lower shelf to the upper to ensure I didn't have any clearance issues with the drill.
After about 15 minutes of working on shelf hanging, we were looking at a "finished" product.
I say "finished" because we still need to cover the dark screw heads in the cleats, replace the outlet/junction box to make the lights turn on and off with a switch, and let Wendy work her magic on styling the shelves with all of her very attractive accoutrements. But that will come, all in due time.
What do you think of our shelves? Pretty decent? Wendy is loving them so I've scored some major husband points there. Have any guesses on how I'll make the lights operate on a switch when this isn't a switched outlet?