As you may recall, we had a bit of an ugly leak from our master bedroom ceiling a couple weeks back that damaged our newly repaired, replastered, and repainted bedroom ceiling. It turned out that this leak was caused by a clogged trap in our attic air handler's condensate line. It was an extremely frustrating situation because it never should have happened in the first place. Had the air handler been installed correctly, the water would have gone into the overflow pan and drained away until I corrected the issue. But alas, it wasn't installed properly, and we were left with a wet ceiling and heated emotions.
It made no sense to me that:
- The trap was positioned in a way that I couldn't effectively clean it out if it was clogged.
- There was no way to tell if the trap was clogged until it began overflowing.
- There was no shutoff mechanism that would turn the AC off in the event of a clog.
- The entire unit was out of level and pitched in a way that meant the overflow pan wasn't catching all of the overflowing water.
It just seemed to me that there had to be a better way, so I hit up my good buddy, the Internet, looking for an "air conditioner condensate overflow traps with shutoff sensor." As it turns out, our situation, no matter how frustrating, was quite a common one. So common that, in addition to Internet message board posts all over the place with the exact same gripes, I found options all over the place for auto shutoff switches that sense a backup or clog in your condensate drain.
If you have an air handler in your attic or near a finished section of your house, and your condensate drain trap looks similar to the one we used to have in the following photo, you may want to pay attention to this little tutorial on replacing it before you have a problem similar to what we experienced.
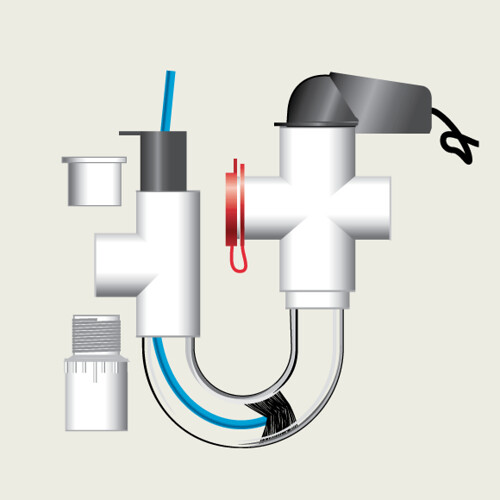
Of all of the options that I came across, for just over $30 we ended up purchasing the mechanism that seemed to most simple in its function, most ingenious, and most understandable in its operation. This unit is the SmartTrap EZT210 (The EZT211 is the same thing, it just doesn't come with the snake). This particular device has a clear trap so you can see if a clog is occurring, multiple cleanout points so you don't have to drill holes in the PVC like I did, an overflow float with kill switch that shuts down your AC if a clog is encountered, and a small cleanout brush to take care of any buildup before there is an issue.
Follow along as I walk you through the install of a SmartTrap in your HVAC system. If you are doing this yourself, make sure you get a properly sized SmartTrap based on the size of your condensate drain.
1. Gather Supplies
The first thing you will need to do is gather all of the necessary supplies for the install. Nobody likes running all over the house or to the store during the middle of a project (note to self: must remember this in the future... *must* remember this in the future). I gathered up all of my stuff I thought I would need and arranged it in the work area.
My supplies included:
- SmartTrap EZT211 device and instructions
- Necessary PVC fittings and pipe for connection (3/4" PVC, elbow, 3/4" to 1" adapter, female to threaded male fitting for connection to coil pan).
- PVC cutter (a small handsaw will do)
- Shop-Vac (for any extra water cleanup)
- Sharpie for marking PVC cuts
- Pipe dope
- PVC primer
- PVC cement
- Carpenters square
- Tape measure
- Wire strippers
- Wire nuts
- Level
- Small bucket
- Paper towels
2. Turn Off Power To Air Handler
Since I will be working with the side panels of the air handler removed, I turned off the handler at the thermostat, and I also turned off the power to the hander at the circuit breaker. This just keeps me from making a mistake along the way,
3. Remove Air Handler Panels and Excess Water
I took the air handler's panels off so I could get access to the coil's drain pan and condensate hookup. Since there was water still in the pan, and I didn't want water running anywhere while I was doing work, I used the Shop-Vac to suck up as much water as possible before disconnecting the drain.
You can see just how nasty and gnarly that AC coil is. Covered in rust and other crap, it has seen better days. That crud buildup going into the trap is what ultimately caused the clog. I can't wait to replace this whole thing at some point in the hopefully near future.
4. Remove the Existing Trap
Using your PVC cutter or handsaw, cut away the PVC beyond the low point in the trap. This will let you rotate the fitting free from the coil pan and disconnect it from the assembly.
Once you cut the trap and rotate it slightly, be sure to have the Shop-Vac at the ready to get the water out of the trap. Otherwise it will end up all over your work space when you unscrew the fitting.
Once all of the water is out, unscrew the fitting from the coil and use the Shop-Vac to get any residual water out of the pan or trap.
5. Make the New Connection to the Pan
Using the female to threaded male adapter, apply a nice coat of pipe dope to ensure a good and water tight connection.
Thread the adapter into the coil's drain pan hand tighten the fitting. Be sure not to over tighten. The drain pan is often made of somewhat soft plastic, and either crossing the threads or over tightening the fitting can leave you in bad shape. So be careful on this step.
Note: Apparently if you hand tighten with your pinkie out it helps you ensure you don't over tighten...that must be why I was doing it that way.
6. Make Up Your Connection to the SmartTrap
We wanted the SmartTrap set off of the unit a bit, so I cut a stub of PVC to the length I needed.
Next I did the typical PVC to PVC connection using my three step process (that some consider overkill).
First, clean the connection points with a glass or surface cleaner.
Second, apply the purple PVC primer. (Use the primer, not just the PVC cleaner.)
Third, apply PVC cement to the connections, push them together, then rotate them a quarter turn and hold until the two pieces are solvent welded together.
Optional Step for the Daring
There is a purely an optional step for the daringly foolish that I don't recommended, but often end up completing. It's the "let's start the project less than an hour before all home improvement stores close, so in the event I need a part, I"m screwed."
My experience of this step for this particular project went a littel something like this. Get to the point you need to apply the PVC cement, struggle to get the lid off of the container, then open it only to learn that somehow the whole thing has completely dried out and you have about 15 minutes to get to the hardware store before they close. Make sure you add the wrinkle that if you don't make it, or they don't have what you need, you will be without air conditioning when it is 95+ degrees outside and your spouse will hate you. Though not essential, it completes the Alex & Wendy DIY experience quite nicely. So it is best to start a project like this on a Sunday evening when the stores close early, just to add that little boost of a challenge. #FunFunFunFun
Repeat the above steps for each piece until you are able to connect the SmartTrap using the included step by step instructions.
Put the panel back on the air handler over the coil. You should be done working inside on the pan at this point.
7. Test the Trap
Once all of the PVC connections have been made, you can test the new SmartTrap by pouring water into the top of the T above the trap. Be careful not to get water on the outside of the PVC or you won't be able to tell if you have any leaks. If you need to, use a funnel to get the water in without spillage.
If all of your connections were good, the water should fill the trap and exit without any leakage. At which point, you should superstitiously repeat the plumbers mantra that I learned in college..."No drips, no runs, no errors." Trust me, if you don't say it, your connections will end up leaking. I have no scientific proof, I just know it will happen.
8. Install and Hook Up the Cutoff Float
The float is a simple slip in item. You just push it into the top of the T above the trap and ensure there are no obstructions.
With the panel of the electrical compartment of the air handler off, run the wire to the point where the thermostat wire enters the body of the air handler and feed it into the unit. Strip the two black wires from the SmartTrap and make the appropriate connections to the thermostat wires.
The main purpose of these connections are to shut down power to the AC when the float is in the up position (meaning there is a clog). So you are basically wiring your thermostat's power feed to also go through the float. If you've replaced your thermostat in your house, this step is really no more difficult.
I know I'm really glossing over this step. I'm not being lazy, it is just that each air handler is probably setup slightly differently. There is a wiring guide on the instructions that will show you how to make your connections. This is all low voltage, and you've already cut the power in an earlier step, so there isn't much risk here. But, if you aren't comfortable with this, just make a call to your friendly neighborhood HVAC contractor.
Once these connections are made, place the side panel back on the air handler and replace all of the fasteners.
9. Power Up the Unit and Test the Float
When you've got everything put back together, turn the power back on to the air handler, then turn on the air conditioning. Your air handler should turn on and your AC should be back on.
Test out the float by opening the red cap on the side of the T and manually activate the float by pushing up. If you've made the correct connections to the thermostat wire, this action should shut down your air conditioner and air handler. If not, you will need to make corrections to the wiring.
After the air conditioner has been running for a while, the coil pan should fill with water again and begin flowing into the trap. Keep an eye on it to make sure the water is going where you want it to.
As this point, sit back and enjoy a job well done, some money saved, and the knowledge that you don't need to worry about water going all over the place if and when you get a condensate line clog.
Conclusions
As I learned, when dealing with an air conditioner condensate drain, it isn't a question of "if" it will clog, but simply a question of "when." My hope is that our experience can save you a future headache. You would typically pay a plumber or HVAC guy upwards of $500 (according to a friend who recently received a quote) to install something like this, but it is easy enough that you should be able to tackle it yourself.
Let us know how it goes if you install this. Also, let us know if you've been the victim of a condensate overflow or surprise leak in your home. Good luck!