You may have been wondering why we've been focusing so many posts on our home's entryway over the last several weeks. We've covered our previous efforts on the hallway renovation, staircase restoration, harlequin paint treatment, cast iron entry stairs, and the front street light. There is a method to our madness -- we've been working up to our vestibule project.
Although we began renovating our entryway the first day we took ownership of the house back in 2003, and we've renovated or significantly altered everything just outside of the front door or within the entry hall, the entry vestibule has remained largely untouched. A small 3' x 3' hiccup of a room between the front door and the entry hallway, it's been in shambles from other projects for almost the entire eight years we've lived in the house.
Our various projects have impacted this small room through alterations and paint stripping, leaving a small, cramped and dirty room with partially stripped moldings that we ignored for years. When walking into the house, you pass through this little area so quickly that we were able to turn a blind eye to the cracked walls, partially stripped wood, and cracked and uneven green marble floor. While we may have been able to ignore it, I know many of our guests noticed it on the way into the house when they would say "Whad'ya got goin on up there?" while pointing to the remnants of a drip of partially stripped paint, long since dried in place and waiting for some attention.
This situation all changed last October. Our crew member Oliver was in the midst of his battle with cancer. Because of his stumpy legs and inability to easily scale our stairs, he was relegated to being a "first floor dog." Wendy and I decided to stop work on any upstairs projects and began focusing on the entry vestibule as a way to keep moving forward on projects, while giving us a greater opportunity to spend as much time as possible with our snaggle-toothed foreman. Besides, he always loved watching us work on projects, often grunting at us when we looked at him. I interpreted those grunts as a "Hey, stop slacking and get back to work" encouragement. He was a dog after Wendy's heart.
This is easily going to be another multi-part post. For such a small part of our house, there sure was a lot involved in its renovation, so sit back and enjoy our recap as we bring you up to speed on this still-in-process project. Luckily, you get to enjoy this with a little joy of blog post instant gratification, where months of work seem to quickly float by in a single post. After all, who knew that the renovation of a 3' x 3' space could take over eight months? Well, except for Wendy...she knows me too well.
This whole project started one evening when something inside of Wendy spoke to her. It said "You need to start working on the vestibule." With that little birdie's fateful words, she decided she was going to start removing molding around the existing vestibule wainscoting to get the project started. This quickly turned from Wendy removing molding to my helping Wendy to remove molding...to full speed ahead working on the whole thing.
Kids, do as I say, not as I do. It is stupid to wear soccer sandals while working on home renovation projects. I've not learned this in spite of many nails to the toes.
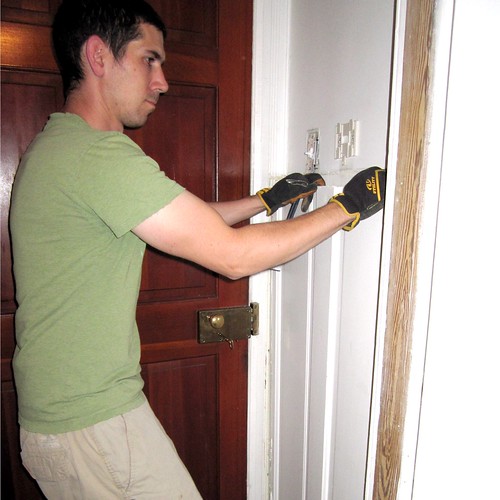
We wanted to strip all of the paint off of the paneled wainscoting and molding in place. The current paint throughout the vestibule was ridiculously thick, slopped on, and cracked. However, once we got into the meat of the project's demo, we realized that both the molding and the wainscoting would be easier to strip if we completely removed it from the wall and performed the stripping in the basement. You can see from the photo just how thick, bumpy, and in bad shape the paint was. This is just after we started to carefully remove the various pieces of molding. I was able to remove everything without breaking a single piece...for the first time ever.
When I started to remove the wainscoting, I could tell the whole thing was going to come off in one big piece, so I was glad we had decided to not strip in place. Interestingly enough, once we removed the molding around the wainscotting, and we were able to free the wainscoting from the wall, it turned out that the wainscoting was nothing more than a very large (but very old) four panel door that had been cut in half and used as wainscoting on either wall. We were quite surprised by this revelation, happy that it is yet another place in the house where something with an alternate original life has been re-purposed.
With the doors wainscoting removed from the walls, we started on their paint stripping. For this project, we decided to use our old friend, Peel Away 1, due to the number of layers of paint that coated the surfaces. By the time Halloween had rolled around, we had the door casings removed for stripping, the wainscoting panels stripped and leaned in place, and Ollie still checking on our progress through the doors. The old green marble floor was still lurking around, but it's days were also numbered.
You can see from the photo that the plaster was still in place, but crumbling in some areas. I vowed to save it knowing that plaster offers far better sound attenuation and insulation than drywall does. I'm happy to report that our efforts were a success and we saved all of the original plaster in the vestibule.
Also, from the photo above, you can get a sense for the fact that the front door, which is currently on the very exterior of our house, was reconfigured in this manner at some point in the last 30 years. The original setup would have had double doors (or no doors) on the very exterior of the house, with a solid front door on the interior of the vestibule. This would allow the vestibule to serve its purpose and allow you to get in out of the elements when entering the home. We'll cover this a bit more in future posts, but we're planning to bring it back to its intended configuration.
With the wainscoting stripping complete, we continued in our effort to strip the paint from the door jambs and molding. During all of our renovations, we've rarely found anything in the walls or ceilings. We're still hoping that we find bags of antique cash, but we're losing hope. However, occasionally when we strip paint from woodwork throughout the house, we come across pencil calculations that were scribbled by the home's builders 125 years ago. The right side of the main door jamb had one of these scribbles.
I'm sad we've not found more interesting things in the walls, but I love seeing this sort of thing. It also makes me feel good that little has changed in 125 years. I'm still writing random calculations on various pieces of installed molding throughout the house.
The final item of demolition involved pulling up the green tile floor. It was set over the original concrete in the vestibule and put down with some weak mastic. I was quite glad the installer cut serious corners here, it made our job much easier. We just had to barely tap the tiles free then scrape the floor free of the bits of cement/thinset. With that step, demolition was complete and reassembly could begin, which meant periodically removing the front door from time to time.
With all of the paint stripping complete, including all of the stripping on the extremely intricate door moldings that match the rest of the moldings throughout the house, we turned our attention to re-installing the molding and wainscoting. Each 8' length of molding each piece usually takes four to six hours of work with Peel Away, the heat gun, dentals tools, and scraping. It is a royal pain, but oh so worth the effort when you see the crisp and detailed lines once complete.
Since we were re-installing all of the same wainscoting and molding in the same places, they all went back into place relatively easily. We only ran into one major item that we had to repair. There appeared to be an area of the exterior door jamb that had been poorly patched many years ago. It could have been due to rot, perhaps having hinges screwed into them one too many time, we're not really sure. At any rate, the jamb needed some help. To ensure a solid patch this time around, I cut a portion of wood from a scrap of vintage 2"x4" rough sawn lumber.
It was a great way to use some old wood to ensure a patch that would last as long as the door jamb. The patch was then glued and screwed into the lower portion of the door jamb.
Once the patch was installed, we were able to reinstall all of the molding and wainscoting and turn our attention to saving the plaster.
As I mentioned, the plaster throughout the vestibule was in really bad shape. The walls were cracked and several of the places where I removed molding had crumbled behind it. After reinstalling the molding and wainscoting, we could see the areas we needed to focus on patching.
I used my tried and true methods for plaster repair/skim coat. This includes a thin coat of setting type joint compound, followed by a layer of fiberglass screen, followed by a thick coat of setting joint compound, sand, compound, sand, compound, sand...lather, rinse, repeat. The photo below is looking up at the ceiling and shows the progress after the first thick coat of compound was applied.
It was really tough to get a good photo of this area because it is so tight. We really need a new camera with a wide angle lense. Also, I'd like to note that carpenters from 125 years ago did a really bad job at mitering corners. Every single mitered corner I've come across in the house has been off by a couple of degrees. They seemed to rely on wood filler and paint a lot back then. It makes me feel better about any mistakes I end up making along the way.
Here's another shot of the ceiling, as well as the energy efficient LED accent light we installed. We know we want to leave the light on all the time, so LED was the way to go. It is a bit more expensive out of the box, but the lower power usage and never needing to replace the bulb means that it will pay for itself after a few years.
A couple more coats of compound followed by sandings, a generous amount of Big-Stretch caulk, and copious amounts of wood filler for nail holes, and we were the proud owners of a blank canvas vestibule, just waiting for a coat of paint. You can see just how nice and smooth the walls end up with enough patience. For all of the plaster purists out there, I know you probably take issue with my use of joint compound, but I was given this method by a restoration specialist, so please don't shoot me. I now know the error of my ways (but might still use this method).
For the paint color we chose a warm Benjamin Moore beige for the walls (we need to find the color name), and our soothing Benjamin Moore Silver Crest (faint blue) for the ceiling. Given the size of the space, painting the walls and ceiling took us about 45 minutes to an hour, but the molding took me something like four hours to cut in and ensure adequate coverage.
The end result of our painting efforts was simply stunning for a small 3' x 3' space. The room had been transformed from a filthy and dingy area into a relaxing and welcoming entry into our home.
What we used to ignore while we passed, we were now pausing to take in. Though quite gratifying, the work was only beginning. The walls, ceiling, and moldings were all in great shape, but our checklist had several items remaining:
- Renovate the space, walls, ceiling, molding, strip, patch, paint
- Install new tile floor
- Purchase antique mail slot
- Replace interior doors with stripped and fitted salvaged door
- Replace exterior door with salvaged door after stripping and replacing glass panes
- Make interior transom window operational
- Replace exterior transom window with either leaded glass or painted house numbers (we're not sure on this step yet)
Stay tuned this week and next as we bring you up to speed on the rest of this project.
Do you have a tiny room in your house that you renovated that took far longer than expected? Perhaps a vestibule or a closet? We're having fun with our tiny room, and we hope you are too.