In previous posts we've covered the renovation effort we embarked on to drastically overhaul our entryway. Given our home's modest facade and shotgun layout, the entry to our home is the first opportunity we have to make an impression on our guests. And when we purchased our home back in 2003, our home was sending a message of "I'm tired, boring, and have seen better days."
Our entryway presents some unique decorating challenges, given that it's only 37" wide from shoe molding to shoe molding. And as much as I love the look of a credenza to throw your keys on when you arrive home, a warm bench to sit on while you take off your shoes, or an umbrella stand tucked neatly in a corner, unfortunately this wasn't an option for us.
The previous owner, a veritable bachelor, who could have benefitted from a designer's loving hand, attempted to furnish the space himself. As you can see from this photo taken during our home inspection, you could hardly walk through the hallway without knocking your knees on the awkwardly placed chairs.
Given our significant restrictions on furniture and accessories, I knew that the walls themselves were going to be the star in this room. In our minds, we quickly ruled out wallpaper for two reasons: 1) we couldn't afford it, and 2) at the time, it seemed like something only people our parents' age were doing. (Boy how decorating has changed in eight years.) That left us with one clear option -- an interesting paint treatment.
My inspiration came to me when reading a decorating magazine. I spotted a picture of a kitchen's dining nook with an interesting harlequin pattern on the walls. This paint treatment (below) immediately clicked as the answer to my design dilemma for many reasons. In addition to adding bold visual interest without impeding into the space, the paint colors themselves, taken from our living room, dining room, and stairwell, offered a way to tie the downstairs together. This approach meant we already had enough paint for this small space, so the only expense was for a few rolls of painters tape.
At first, Alex wasn't quite sure of the idea. I think he said something along the lines of "You want to paint what, where?" We needed an artists rendering to help him to understand my vision.
I have an artist's sketch book that has served us for years. Both Alex and I have used this book to jot down ideas, paste inspirational clippings, sketch out plans, and even to calculate room budgets. This helps me to not only think the idea through, but in many cases, it also helps me to get my sometimes skeptical dear husband on board with my crazy ideas. Below is my original concept rendering of the space that I made to help Alex "see" what I saw.
Once all parties were on board (the second participant was just a little late to the train), we were fully committed to the idea, so we laid out a game plan. The walls had already been prepped and skimmed with a fresh coat of plaster to act as ournew smooth canvas, so we were ready to roll.
We had never painted anything like this, so our approach had to be simple but methodical to eliminate room for error. Once it was time to paint, we had come up with a good plan and our steps were simple and fairly easy to execute.
- Paint the base coat color (lighter diamonds).
- Calculate height, width, and intersection point of each diamond.
- Create a template/jig and mark each intersection point.
- Tape the boundaries of every other diamond based on the small intersection points.
- Paint first set of diamonds with two coats of paint (more if required).
- Carefully remove tape and let paint fully dry.
- Using already painted diamond borders as a guide, tape the diamonds that are left to paint.
- Paint second set of diamonds with two coats of paint.
- Carefully remove tape.
- Touch-ups
- Paint dots at the intersection of each diamond to mask the pencil marks.
- Enjoy harlequin pattern and a job well done.
1. Paint the base coat color (lighter diamonds).
First, I painted the four walls in the lighter color, Glidden's Toasty Gray, in a flat finish. We paid special attention to ensure full coverage and a good and smooth finish. This base coat will eventually make up all of the lighter color diamonds, so you want to be careful not to mark this area during any of the next steps. If you are following this for your project, make sure you have full coverage. Touch-ups of the light paint once you move past this step can be very difficult.
2. Calculate height, width, and intersection point of each diamond.
This is the most important step in the process, and the one that actually took the most time for us. If you successfully measure and calculate the precise height and width of the diamonds to fit perfectly on your wall, you won't be left trying to fudge or figure out placement while in the painting phase.
Using Alex's mad math skills (while working on this task he reminded me many times that he once got an A in geometry in eighth grade), he worked to determine the exact height and width of the diamonds.
Here's a pretty big admission coming your way: I'm super type A, as anal as they come. And my directive to Alex was that all diamonds had to fit within the wall space offered. I didn't want cut off diamonds at the ceiling or floor level, nor at any of the corners. After a few choice words back and forth, Alex set off to work on calculating my masterpiece.
Alex's Technical Notes:
Wendy and I discussed the ideal height and width of diamonds for the space basing it purely on aesthetics and not actual wall measurements. We determined that a diamond's height should be roughly two times its width. At this point, we were worrying more about what size would look best in the space than the specific end result size.
Once we figured out the ideal height and width, we then determined the rough number of full diamonds we could fit in the space. We figured out the target number of diamonds across the base of the walls, and the number of diamonds tall the pattern should be. With those numbers in place, I laid out a scale drawing to begin calculations.
Given the actual width of the wall, and the number of diamonds we wanted to appear, I divided the total width of the wall by the number of diamonds to determine the actual width of each diamond. I repeated the process with the height of the wall and the number of diamonds "tall" the layout would be, this determined the height of each one. After reminding myself how to do a little fraction long division, it really wasn't too hard to determine the ideal width and height of each diamond. But then again, I did get an A in eighth grade geometry. Are you impressed?
Thanks, Alex, we're all quite proud of your geometry accomplishments...
This is one of the instances where our skill sets complement each other. I get to be the creative mind behind the project as well as the official painter, whereas Alex's analytical engineering brain can figure out the mechanics behind it all.
As Alex crunched numbers, we realized that we could pretty easily have a nice, neat sizing scheme for the diamonds on the long wall. It was the other three walls, complete with varying sized doorways, that presented a challenge. Our secret though was to slightly alter the size of the diamonds on the other three walls, so that at quick glance they appear to be the same size, but making slight adjustments allowed for the symmetry I was after. Yep, we're sneaky like that.
3. Create a template/jig and mark each intersection point.
We had established the height and width of each diamond on the wall, so we were off to the races. Alex used a 10' long piece of 1"x4" and marked the calculated widths and heights of the diamonds on either side of the wood. This 1"x4" acted as a measuring guide that would allow us to mark the precise intersection points of each diamond on the wall.
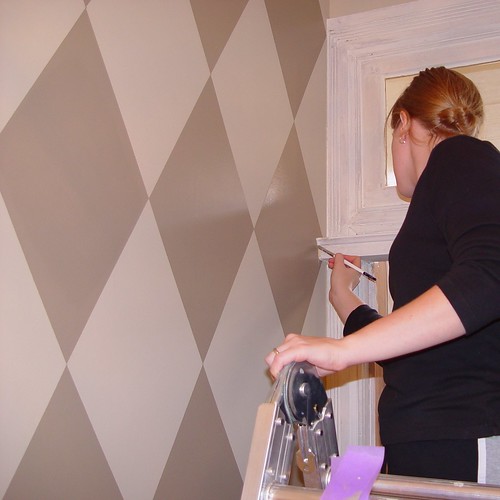
A day or so after the two coats of base paint had dried, we began marking the intersection points. We held the wood against the wall with a level to ensure a consistent and plumb measurement, and marked the calculated points. Our goal was to mark every single intersection point of the diamonds on the wall before we painted the first diamond, then we could use those pencil marks as a guide for laying out the painter's tape.
4. Tape the boundaries of every other diamond based on the small intersection points.
Using the marks from the previous steps, we began taping off the outer borders of the areas that would become the darker diamonds. And, just to be safe, I also placed a small piece of tape in the diamond areas that were supposed to be left as is. The process was tedious and time consuming, I'm not going to lie, but it was far easier since we had the small intersection pencil marks to act as our guide. We were well on our way, and I was well on my way to delirium, as seen from the Vanna White-esque photo below.
Once the taping was complete, we were careful to run our painter's rag covered fingers over the edges of all the tape to ensure the paint wouldn't bleed under the tape. It also helped that we had a very smooth wall from the recent re-plastering that Alex has completed.
5. Paint first set of diamonds with two coats of paint (more if required).
I began rolling on the darker paint, Behr's Brushwood, in a satin finish. This step was smooth sailing, and took little time at all thanks to our diligent prep work.
From the photo above, you can see what I mean by painting only every other diamond on the first go. It's important to note why we taped and painted every other diamond for the first coat. Since the diamonds each intersected with each other, it would have been nearly impossible to adhere the tape in a way that would allow for the intersection of the diamonds and painting in one fell swoop. if we had tried to tape and paint the darker color all at once, we would have had to make a lot of very detailed cuts on the painter's tape to ensure crisp intersected corners. Using this every other approach meant that the tape never ran into another diamond with wet paint.
6. Carefully remove tape and let paint fully dry.
Before the final coat has dried, remove the tape by starting at the end and pulling at a sharp angle away from the diamond. Doing this while the paint is wet will help to prevent you from pulling the paint off with the tape. Remove all of the first set of diamond's paint from the wall and then wait a day or two for the paint to fully dry. The next step will place tape directly on the new paint, and the last thing you want to do it pull the new paint off of the wall.
7. Using already painted diamond borders as a guide, tape the diamonds that are left to paint.
Once the first set of darker diamonds had set up for a day, we began taping the borders of the second set. From the photo below, you can see that Alex was able to use the lines from the first set of diamonds to simply connect one diamond to the next.
You can use the painted diamonds as a guide that ensures symmetry between all diamonds on the wall. For this step, having two people work together worked very well.
We were nervous that our tape might pull off the paint on the first set of diamonds, so Alex worked to tape off all of the diamonds, while I followed behind him painting the masked off areas. Once I was done painting a small area, Alex would circle back and carefully remove the paint.
8. Paint second set of diamonds with two coats of paint.
It was so each to use the conveniently placed tape lines to quickly and easily apply the couple coats of paint that was needed. Here I am in the midst of painting the first few second coat diamonds.
9. Carefully remove tape.
Careful removal is important here given the somewhat fragile paint from the first set of diamonds. You can see on the photo above that Alex left the tape slightly peeled up at the edges. This allowed him to easily grasp the edge of the tape for removal without scratching the new paint.
10. Touch-ups
For the harder to reach spots, I used an artist's brush to apply the paint. This let me get right into the corners that were quite hard to reach.
11. Paint dots at the intersection of each diamond to mask the pencil marks.
And this brings us to the final step of the paint treatment: the colored polka dots that overlap the intersection of the diamonds. I still chuckle when I think about the conversation Alex and I had about this, and how differently our minds work. Even though he could figure out all of the math involved in the project, he was totally stumped on how we would paint on the little dots. He was throwing out ideas of custom stencils and other complicated processes, when I looked at him with an "are you stupid glare" and said, "This is a no brainer. We're going to dip a no. 2 pencil eraser in the paint and stamp it on." I mean, duh!
Seriously though, it's just another reason why we make a great team. There are so many projects that if working alone, one of us would surely throw in the towel. It's the support from one another and different problem solving methods that help us along the way in our DIY adventures. (Though I may need someone to remind me of this when we start back up on our master bathroom reno.)
12. Enjoy harlequin pattern and a job well done.
After the paint was complete and my little red dots were dry, we put down a rug won from eBay, hung a mirror and added salvaged wooden corbels as candle holders to round out the look.
Our downstairs hallway has come a long way from the boring and dingy space that it once was. It took months of hard work to get to the point where we were ready to add a snazzy paint treatment, but the effort was well worth it.
If I had it to do over again, would I? Absolutely, but today I might try out a fun Moroccan look or a more modern, graphic pattern. But most importantly, I would never use flat paint again in such a high traffic area. It tends to scuff, and the touch ups we've made don't blend in with the original paint.
Love 'em or hate 'em, these babies make a bold statement when you enter our home. Many people actually mistake them for wallpaper because the lines are so crisp. They're a fun conversation piece and one of the lasting impressions from our home. Years after visiting our house, people often ask us "Are the diamonds still on the wall in your hallway?" They say diamonds are a girl's best friend. I couldn't agree more.
Have you tried any interesting paint treatments in your home? Or done something to make your entryway memorable? We'd love to hear about it.