We've been working on many projects over the past several weeks, but we've been rather quiet here on the blog.
Seems that we've been working on a lot but haven't been getting many of those items completed. Add a crazy work schedule, Halloween, now Thanksgiving, and an early October vacation into the mix and you've got yourself a recipe for blog slackerdom.
However, what we lack in blog posts I'm hoping we've made up for in progress that we'll be sharing over the coming weeks. Most notably we've been finally moving along the long delayed master bathroom cabinets project.
You remember those right? The two cabinets we've been building that will flank the master bathroom vanity?
We've been slowly making some really great project on these babies. This includes a good deal of working to build drawers to help close up four of the glaring holes on the front of the lower section and replacing it with functional storage.
The process is very repetitive but that makes it go more quickly. All four drawers are the same dimension so it was a matter of first cutting and sanding all of the pieces...
...and then assembling them all at once. I just used a little glue and a brad nailer to assemble the 1/2" plywood drawers.
The installation of the drawers on the slides was pretty straight forward. I installed the drawers without the drawer front using a jig clamped to the front of the cabinet. This allowed me to screw the drawers to the slides while it was all in place.
Once the drawers were all set I could then slide them back to a fully closed position, and then make sure the front of the drawer was perfectly position before screwing through from inside of the drawer into the back of the drawer front.
The end result is a pretty nice looking drawer front that will work perfectly with a polished nickel bin pull matching the vanity.
I'm more or less building each of these cabinets as two separate pieces. They both consist of an upper section and a lower section. This will make things easier when it comes to assembly, transportation, painting, and life in general. My foolish younger days would have seen me build it as one giant piece and get it stuck in the basement, but I know better than that now. As a result, I attached the bottom of the upper cabinets right to the upper structure using a bunch of countersunk wood screws.
Next up I constructed and attached the face frame of the upper section of the cabinets using copious amounts of wood glue, biscuits, and clamps.
It felt like such a minor addition to the project but went such a long way to make it feel more like a piece of furniture.
Finally, I applied the finish bead on the upper cabinets as I'd already done on the lower.
After building the cabinet shell they sat along side of our vanity looking like they might one day be decent, but there was clearly something lacking about their overall aesthetic. The most obvious thing missing (aside from things like lower doors, drawers, and paint) was a crown molding embellishment of some sort. Without the crown the two cabinets had a bit of a monolith look to them.
When planning the crown detail we wanted to do something that would fit with the room, but not something to large and top heavy. Primarily, whatever we chose had to look like it belongs in the space with everything else around it.
Due to this detail we took our inspiration from the crown moulding of the room. The crown we've used in each of the second floor rooms except for the hallway is a relatively simple large cove with a bead detail both above and below the primary cove. We both love this crown and feel it's simple enough without distracting from the room.
Based on this design we decided to make our own custom crown for the cabinets that borrowed from these elements. To test out our idea we held up a few scrap pieces of wood that is more or less the gist of what we were going for. Good news for us, we liked the look a lot.
To pull this look off we started with some 1/2" pine stock and used the router to cut an inset round over. Then I ripped these pieces to work as a backer and topper for a simple cove. To get a sense for the size of each piece and where we'd need to rip them we mocked up a small piece of the cove.
The cove I'm using is a plain 1-5/8" pine cove, and it uses the round over pieces as the back and upper boundary.
In order to install crown on a cabinet it's always easier to have a solid backer and upper section that becomes the boundary. Without the upper piece to rest the crown against, it's hard to get the miters to really line up since it's really just floating in space. To remedy this I decided to install the crown as three separate parts on the cabinets.
First I applied the backer piece along the top of the cabinet with a small reveal above the bead.
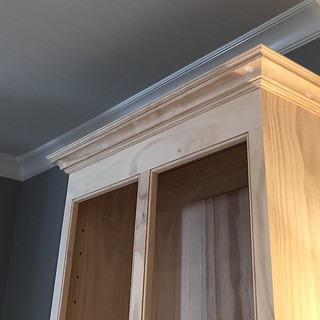
I then nailed the top piece down from the top, giving myself a good right angle like you'd have with a wall meeting a ceiling. This look alone actually looked very nice, and it seemed like it could stand on its own, but our goal of mimicking the crown was a simple cove step away.
A few quick cuts on the miter saw and a few brad nails later and we had ourselves the custom three part cabinet crown meant for these cabinets.
Looking up from the floor this looks exactly as we'd hoped. Not too top heavy, similar to the larger crown above in the room, and enough ornamentation to give the cabinets a look of furniture.
You can see just how significant this rather small detail is when comparing the complete vs. incomplete cabinets.
All told, this minor detail on the top of the cabinet is a simple embellishment that goes a long way to completing the overall look. It complements the crown moulding of the room and adds just enough decoration to truly set the cabinets apart.
We still need to build the lower door fronts, prime and paint the whole thing, and ultimately build upper glass front doors and upper shelves, but this cabinet train is really moving along now. At this rate we might even have this project done before 2020! Alas, only time will tell.
What do you think of the cabinet crown, does it complete the look of the cabinets? We ca't wait to get this moving along a little further so we can check "build cabinets" off of the master bathroom list. We may be years into it, but we still want to eventually do a grand reveal of our completed bathroom projects. Oh this is the project that will never end, it just goes on and on my friend!