We have been tiling machines of late.
Well, when I say "machines" what I'm really saying is that we're tiling machines that are old and slow, but apparently still work sometimes and eventually get the job done.
I guess if we're trying to draw a comparison, we're less like...
...and more like...
...in the whole "machine" department. I guess it fits better with the age of our house.
Fair enough? Hey, we're still machines, you can't take that away from us.
What I'm trying to say is that we've been slowly tackling the tiling of our shower walls over the last week and a half, getting about a quarter to half a wall done at a time. There are so many corners and cuts we have to make that it's just sort of a slow go of it. Nonetheless, it still feels great, and I keep going into the room to stare at the bits that are done (usually closing one eye and blocking the parts that are not done with my left hand).
For our project we're placing the tile on the wall using setting type thinset with a 1/16" grout joint. Now this is a major debate for some people, but trust me, friends don't let friends use anything other than the powder mix bags of thinset. I've said it before, and I'll say it again.
I don't care how many will swear by the use of the pre-mixed bucket types of thinset when sticking their tiles on the wall, but we're not doing that. Pre-mixed thinset never fully cures and can re-activate when it comes in contact with water. Since stone and grout are porous, you'd only use pre-mixed stuff in a shower if you really don't mind your tiles possibly falling off the wall and grout cracking. And if you don't mind that...well...wtf is your problem? Am I Right?
But I digress.
Since our tiles don't have those awesome lugs that let us butt each one against the other, we're using the hated green spacers again. You know the ones. We swore to never ever use these spacers again after our kitchen work. It seems like for every one spacer you successfully place, five fall out. It's one of those DIY challenges that tests your ability to stay sane, married, and out of jail for unspeakable acts of rage against tile spacers. Not to mention when the spacer itself is screwed up and wasn't cut right.
The issue with these little green bastards is that their leg isn't long enough and the tile can't really bite onto them, which allows them to jump from their location at will. Yes, the tile spacers hate themselves and what they stand for so much that they all try to commit suicide. These spacers have many issues, to say the least.
I actually found a much better 1/16" spacer option that's sure to work a million times better. They are large horseshoe shaped 1/16" plastic pieces that can far more easily be secured against the tile base. However, we received them after we started tiling, and we had already started with the green idiots. As it turns out, the spacing is juuuuuuust a little different with these horseshoes, so we had to stick with the one we hate. The devil you know...right?
It pained me to use the old green ones. I sort of can't wait for our next tile job so we can use these new ones and then just talk bad about the green jerks behind their backs.
Okay, back to tiling and away from ranting about spacers again. The layout we're using in our subway tile is a standard running bond pattern. Remember, we're looking for basic and classic in our bathroom.
With this pattern, as we put each tile on the wall we smoosh it into the thinset real good, then immediately support either side of the base with a spacer.
Then we place the next tile in the same manner, pop a spacer into the gap between the two tiles, then one of the spacers from the first tile to support the base of both tiles. As long as the tile size is relatively consistent, this approach gives you a consistent line and saves on the number of spacers you use.
One major benefit of tiling in our home, my butt and legs are really starting to get in great shape!
Yes, I'll save you the trip to the header to double check who is writing this post, this is Alex. Are you wondering why my butt and legs are in good shape, or why I'm even talking about it? I thought you might be. You see, as I said, we have a whole lot of cuts in this project. We're trimming the corners, trimming the base slightly in some areas, trimming at the ceiling, and making crazy cuts all over the place where necessary. Like this one around the bench.
The thing is, our tile saw is a messy water spraying proposition. It shoots water and tile dust backwards, forwards, and sideways. So its use is relegated to the basement only. That means each cut I have to make requires me to mark the tile or toe that need cuts, then walk down two flights of stairs where I can then crouch on the basement floor like a Neanderthal tile setter to cut my tile.
Then I walk back up the two flights of stairs and deliver the cut tiles to my beautiful tiling wife, who may then set them on the wall while I make my next trip down to the dungeon.
Sometimes, when I really get lucky, I don't cut the tile to the right length, and I have to go back down a second...or even a third time to cut the thing. This is what I do in the name of getting the tile as close to perfect as we can.
At the end of a weekend day of tiling, I sat in a heap on the couch and wondered why my legs were so tired. Then I realized my ridiculous setup had forced me to turn my house into a Victorian era stair master.
All the while, this is the view we have into the bedroom.
Anyhow, back to the tile.
We've opted to finish the transition areas of our tile with a vertical bullnose border of sorts. This is a pretty typical look and saves on the cost associated with standard bullnose. But the tile assumes a 1/8" spacing, rather than 1/16", so the long bullnose had to all be trimmed by 1/16" on each one. But the one inside corner of the shower will get bullnose on the short side of the tile so that the whole thing looks a little more cohesive.
The main thing about these little bullnose tiles is that we have to back butter them to ensure good coverage all of the way to the corner.
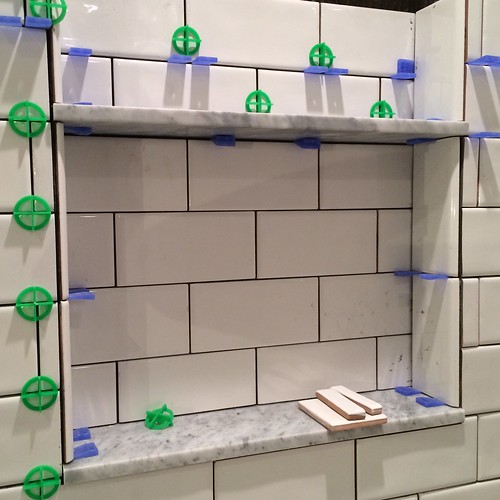
The other interesting part of the shower is the niche. Seriously, what's a modern day shower without some sort of a niche. We decided to use pieces of marble for the shelves while continuing the tile pattern through the niche's background. Also, most people put a bullnose border of sorts on the exterior of the niche, but we don't prefer this look. Instead, we've put the bullnose border on the interior of the niche, using the bullnose and a good notch on the tile to actually support the second shelf on three sides.
There are a few areas I'm not entirely happy with on the niche and I need to figure out if it will look better once grouted, or if I should take out the offending tiles and redo them. We shall see.
Let's check on the peanut gallery and see what they think of the project.
Yep, still about the same response we usually get.
I am very proud of one thing in particular. When you order tile you typically add 15% for "cuts and breakage." That calculation is based on installers who don't typically plan out how to most effectively use the tile, and are also a bit more rough and cause more breaks. However, we've only broken 1 piece, and we have been extremely conservative in our tile cuts. This means that we were able to return two full boxes of tile, a total of 22 square feet of extra. Our tile cut area looked like this the whole time.
Little slivers all over the place and no raw edge left unused. This meant that we were able to get about $160 back for the return. So our total cost for tile came in at just under $1,000. Not too shabby if you ask me.
We've got a few more pieces to put in before we can move onto grouting, but Wendy and I are both getting really excited by our progress. We'll probably have a four to six week wait for shower glass before it's a real shower, but we can feel the bathroom momentum train running at a decent speed ahead. And we think it's sure looking good.
What do you think? Does the tile look like it belongs in the shower? Are you as excited as we are about being done? Probably not, but you might be so sick of hearing us talk about it that you just want it to be all over and done with! I agree.