Over the last few months we recapped the various phases of our Master Bedroom project. From start to finish the whole project took over a year, required us to sleep in the guest bedroom, inconvenienced us tremendously, challenged us completely, and caused several nights of head scratching to figure out how to approach each aspect of the project, but it was all totally worth it given the end results. Today we'd like to provide a brief summary of the project, just in case you missed any of the nitty gritty posts, or if you'd just like to see any aspects of it again.
When we moved in we started with a blank and very rough slate of a room. White and cracked walls, white and lumpy trim, no closets, and a giant ceiling fan that haunted Alex when he slept. (He always woke up and thought it was attacking him. I'm not even joking.)
Over the first few years we bought an antique bed off of eBay, played with the various furniture arrangements, and ultimately, in an attempt to make the room feel more comfortable before we gave it a "real renovation," I painted the walls a garish yellow. Unfortunately, this only made the room less comfortable and accelerated my desire to rip things apart more than when it was just a blank canvas.
Though I wanted to make massive changes, we were still working on other projects, so we continued to make minor updates in an attempt to freshen up the stale room. We attempted to build some box valance window treatments using a yellow fabric with embroidered dragonflies. After one moderately successful but unattractive valence was installed we just weren't feeling it, so we never really finished that project. Let's just say that we used our better judgement and opted to just wait for the day we could save enough to afford the window treatments and ultimately the master bedroom we really wanted
Then the day came! The day we finally said "Let's start on the master bedroom." Our conversations for nearly three years had often revolved around what to do and how to execute our plans, and we felt like we had a good approach. We needed to add closets, paint, add pull down attic stairs where there was just a hatch in the ceiling, and change the entrance into the bathroom. No problem. Oh, and we also needed to strip every piece of molding in the room, repair replaster every wall and ceiling, restore the front windows, install recessed lighting, make necessary changes to the electrical outlets, and make our painted shut transom window operable again. No problem! Timeframe proposed by Alex, "a month or two." Yeah, right!
We got started with the "destruction" aspects of renovation. Primarily the paint stripping, molding removal, and plaster repair. During the process we uncovered the various other colors the room had seen over the years, from your basic beige and white to the more gaudy pinks, greens, and our very own yellow. There was even a layer of black on the baseboards.
Soon after completing the backbreaking efforts in paint stripping, we turned our attention to the functional aspect of the room that had long tormented us, requiring us to keep a ladder either in or nearby our bedroom. We opted to install a set of pull down attic stairs where there had previously been none. The project wasn't without it's drama, as it involved Alex falling off of the ladder while holding the 70 pound stair assembly. Luckily, he incurred no serious injuries or drain damage from the fall. Soon after, we had ourselves a functional pull down ladder.
With our stairs in place, and the deconstruction complete, we began the long process of the recessed lighting install, ceiling speaker install, plaster repair, and closet framing. Though we worked furiously on this aspect of the project, it still dragged on for many weeks. This aspect alone exceeded Alex's hopeful yet ghastly underestimation of a reasonable timeline.
As I mentioned, one of the major aspects of this project was the creation of custom closets in a space where none had previously existed. To accomplish this while keeping with the feel of our house, we wanted to use salvaged doors that matched the style of our home's own original doors. It took a good four years of planning for this aspect of the project, mostly in how long it took to find the salvaged doors. In a stroke of luck and salvaging skills, I discovered five matching doors in a DC salvage yard and snapped them up on the spot. Having done my duty in finding the doors, I let Alex take on the relatively simple task (at least by comparison) of stripping all of the doors. Boy, it sure looked like he was having fun, so I let him handle the whole thing. :-)
After much effort in stripping, squaring, fitting, measuring, adjusting, and determining proper placement of the doors, we were able to move forward on fully framing our dream closet in the previously underutilized space in the room. This small step towards improved function truly allowed us to grasp what the room was on it's way to becoming. It was a great step in the overall process, and one that I remember feeling quite a bit of relief after completing.
Rather than using a component closet organization system or company, we wanted to ensure we were maximizing our available closet space, so we decided to build ourselves a completely custom closet interior out of oak and oak plywood. This process involved a whole lot of sketching to establish the most effective use of space, and a lot of patience in dealing with an out of level floor.
After about a month of constant measuring, cutting, adjusting, and staining...
...we had ourselves a classy looking oak closet in the most unlikely of places, the master bedroom of a 15 foot wide and 125 year old house.
Though it felt great, our efforts were nowhere near complete. There were still lower doors to hang, upper doors to be built, and many finishing touches that needed to be put in the room. Oh, and also put all of our clothes in the space.
Alex began working on the restoration efforts involving the original front windows of the house. We wanted fully operational and restored original windows for some time, and his efforts on this aspect of the project made that dream a reality. It also provided a little bit of insight into the home's hardware by revealing a patent date of 1878 on the sash pulleys that were previously covered in paint.
We established a color palette for the room early on in the project, before we even began paint stripping. It was spurred by the antique rug we purchased from eBay. The muted colors lent themselves to precisely the tone and textures I most wanted to incorporate in the room. The main goal of the whole aesthetic, bring a sense of calm and peace to the bedroom, the complete opposite of what I had accomplished with the yellow that made my stomach turn.
We moved ahead in the project by hanging a simple crown molding, painting the ceiling a light pale blue (Benjamin Moore's Silver Crest), the walls a warm grey (Benjamin Moore's Balboa Mist), and the trim in our own formula of antique white.
Our many months of hard work were really paying off. We could see the room taking shape, and that was driven home more than any other time when we rolled out the antique rug and hung the curtins in a freshly painted and "complete" master bedroom. This was the first time since we moved into our home that we really felt comfortable in this bedroom, and it felt great!
As you can see from many of the photos, the bulk of the work done in this room was completed in the evenings, quite late at night. Less than ideal for photos with accurate color, but more than effective in making you exhausted. This project involved many very late nights, to say the least.
Loading the room full of our furniture and accessories didn't make the room feel cluttered, as it often can when a room has been bare for as long as this one was. Instead, each piece felt like it belonged in the room, taking up the space that was reserved for it. Our bed, dresser, and end tables all fit so nicely into their new space.
One of my favorite aspects of decorating this room involved the various accessories we were able to incorporate. I didn't force it with trinkets that had no meaning or purpose. Instead I took my time and slowly found the items I wanted in the room that would elicit good memories or warm thoughts each time I look at them.
A final finishing construction touch on our room was the addition of an in-wall and integrated jewelry cabinet/mirror combo.
This is something I asked Alex if he could build for me, and he was absolutely able to fully execute. I love that I have a great place to hang my earrings, necklaces, and bracelets, and that it's somewhere that's both out of the way and very accessible.
The end result of our extensive efforts to maximize the form and function of our bedroom, while adding as much aesthetic appeal as I could think to add in the room is a calm and serene sanctuary where we spend more time than any other room of the house.
The various accessories in the room accent our decor, rather than taking it over. This gives a sense of purpose to the room, rather than a loose collection of "things that pop," which often leads to a more distracted design.
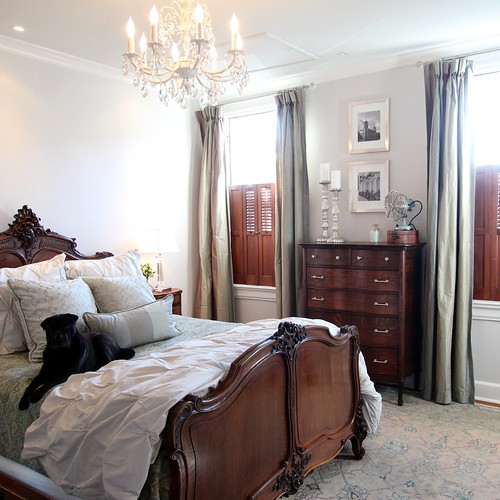
I worked to ensure the room's layout is as balanced and symmetrical as possible, since much of a small area relies on balance for consistency. Building the closets actually allowed the windows to feel much more centered in the room, since the left window is so far offset to the right window. We feel like our room was supposed to have a larger window on the right, but that was omitted when the house was first built for some reason.
Accenting the room with items that are functional but also go with the room's decor, such as this vintage inspired fan, help to add the cohesion that I was really trying to achieve.
While the closet wall, multiple windows, and multiple doors in the room had the possibility of looking rather chaotic, I feel like we did a pretty great job at making them all look very balanced, matched, intentional, and (dare I say) original. This was no small feat given the starting point, but one I'm so happy we accomplished.
The single aspect of the room that probably gives me the most joy are the few photos we've framed and hung on the wall. They are all our own photos and show a few of our favorite places...
...and favorite family members.
I know one of Alex's favorite aspects of the room is his successful effort in the restoration and return to operability of our original transom. He worked for quite a few days on stripping, reglazing, painting, and hanging the transom. The cherry on his sundae was no doubt finding, restoring, and installing the transom transom lift. Luckily, he found two matching lifts, as we will have a need for the second one in our bathroom project.
The entrance to the room is now an enjoyable and welcoming area with amble light and airflow thanks to the transom.
While we made every attempt to stay true to the home's age and character in the inclusion of salvaged materials and period appropriate application of more modern details, I also attempted to pull in a few more contemporary design aspects where appropriate. We used a few lucite/glass items in places around the room to catch your eye just a little bit. These are seen on our end table lamps (a Home Goods purchase), and on our curtain rods (from Z Gallerie).
All told, this project was a long, arduous, and sometimes tedious project that took longer than expected but ended with the ultimate payoff of a near perfect room (at least by our standards). We spend so much time in this room, either relaxing or sleeping, and we're glad we put the time and effort into its completion to make it such a great space. It also goes to show, if we had renovated this room as soon as we moved into the house, we wouldn't have known how we were going to end up using the space, and we would have undoubtedly made very different decisions. Only after going through the various minor updates, and giving ourselves time to understand how we preferred to use the room, we were finally able to formulate a plan to renovate according to what would best suit us. To me, this is the hallmark of a great project.
What do you think of our end results? Were our efforts worth the time we took to implement them? Do you get a sense of calm when you look at our finished project's after photos? And have you ever undertaken a project that simply makes you smile every time you look at the finished result (even if it took you two or three times longer than anticipated to correct it)? We'd love to hear all about it.