Last month we started to take you through our renovation of our master bedroom. Much of what we discussed involved the various elements of the work, including room demolition, discovering our closet doors at a salvage yard, and installation of our new attic stairs. But truth be told, the primary purpose behind the work we were completing in our bedroom had far more to do with the need for more clothing storage than it did with getting better attic pull down stairs (though we love the stairs since I don't have to do this anymore).
The next phase of our plan was simply to turn the largely unused "chimney wall" (and also the exterior wall of the room that doesn't touch the house next door) into a wall of closets. We had already searched tirelessly for -- and found -- a set of five matching antique doors and were ready to get rolling.
The first step in this lofty endeavor was to establish our closet wall. This would set the tone for the entire project. Too shallow and we wouldn't be able to hang clothes. Too deep and we'd lose too much space in the room. This had to be the Goldilocks of closet builds, determining a depth that was just right.
After much research we agreed on a good depth and began looking at the specs on the closet interior. We figured our ideal setup would be a mixture of his & hers & hers (Okay, Wendy came up with this "ideal" set up). I'd get one of the large closets, and Wendy would get the other large closet and the middle closet as well. Fair enough? Debatable, but I know husbands who've fared worse in the deal.
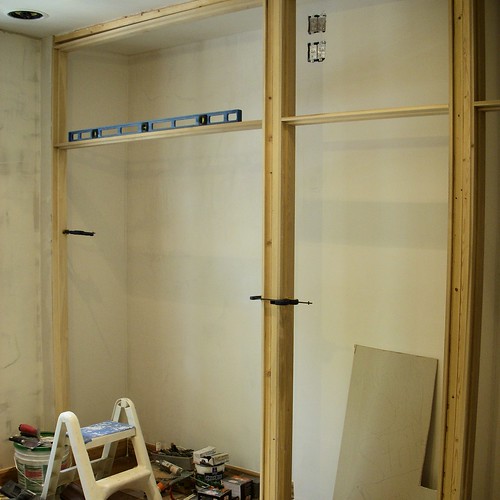
We established the front line of the closets using a few 2x4s along the two walls and the ceiling, all screwed to studs. As you can see from the photo, I also made sure to include a few holes for in-ceiling speakers in the room. Whole house audio rules, after all.
Once we had the rough divisions of the closet doors placed, I moved onto skim coating the whole room. I figured it would be far easier to work inside and around the closet before it was really, well, a closet.
I went through my typical process, mud, followed by fiberglass screen, followed by mud, mud, and more mud.
Throw in a generous helping of torturous and sweat inducing sanding, and you've got yourself a recipe for a damn nice looking set of walls and ceilings.
This whole skim coat process leaves a nearly perfectly smooth surface for painting, but maintains the irregularies you'd expect in a plaster wall of an old home. It feels warm and inviting when done nicely.
The actual closet openings were rather easy to determine since we already had the salvaged doors going into the openings. However, the widths of the interior closet areas were more difficult. The chimney column with AC duct work running down the middle of the wall meant we needed to shift everything a bit to the right on the interior, but we needed to keep the closet doors perfectly symmetrical with the room for aesthetic purposes. With a rough plan in my mind I moved forward on the front frame of the closet to establish the boundaries of the doors. Here's a quick sketch with all of our various measurements that helped guide me through the process.
The overall fit of the five doors would prove to be somewhat tight. On the wall of roughly 14 feet, we had only about 18 inches to spare. These 18 inches had to be divided by the two side studs and the two middle studs. I went ahead and placed the studs in place and move forward with the project. The though in the back of my mind was simply, "If the doors don't fit, I'll just have to make them smaller."
One thing I wanted to make sure of was the accuracy in the sizing of the door jambs. I don't know if you've paid much attention, but modern door jambs aren't like the old ones. Here's a photo of the door jamb in our vestibule. You can see just how large it is, and this is true of the original jambs throughout the house.
Our home's original jambs are big and thick. They are wider to accommodate the true 2x4 walls, and thicker to accommodate less than exacting mill standards of 100 years ago. In our closet I wanted to replicate this feeling without losing any space. The biggest issue being I couldn't just run our to the home improvement store and buy these jambs.
Instead, I went to the lumber yard and picked up some 1"x6" poplar in 4/4 thickness (that's 1" thick, in case you're wondering). I didn't know this was a measurement until I started to work with wood on a frequent basis, but it makes sense.
Wood that you buy at the store is usually some sort of "one by." The implied size is maybe 1"x4", which is actually 3/4" x 3 1/2". Make sense? Nope. There's a whole reasoning behind it that has to do with the lumber industry, evolution of cutting and finishing, rough sawn cut vs. finished, etc, but all I know is I'm always feeling ripped off.
In order to cut my own custom jambs, I needed full 1" thick poplar, so I purchased the much more expensive lumber and grumbled about it to myself in the car.
Once home, I set the dado blade on the table saw to cut the jamb relief that would match our houses original jambs. After about an hour of effort (and weeks and brainstorming and downright obsessing about this detail), I had myself enough jamb stock for the closet (and eventual bathroom) doors.
I measured everything out and cut the pieces to length. Then, using the sliding compound miter saw, I cut the reliefs in the side jamb pieces that would allow the transom cross pieces to rest in the opening, supported by the side material. I laid it all in place to dry fit in the opening, and it looked great!
After establishing all of the various sizes, I assembled the whole thing on the floor and set them each in place, using shims where necessary to ensure plumb and level.
Our closets were well on their way to becoming actual closets. At this point we started to worry we were taking away too much of the room, but this was just because we were feeling the space we were used to beginning to change.
The finished product was beginning to materialize, and our dreams of ample clothes storage were slowly becoming a reality. Based on the height of our ceiling, we had enough room for both lower his & her & hers, but also had the space for upper "off season" storage, as well as room for a television. (I know there's great debate over whether or not to house a TV in the bedroom, but we decided to go for it. More on that decision later.)
What do you think of the project to this point? Would you have spent as much time as I did making custom sized jambs, or would you have just gone with stock jamb and called it "done"? What about the skim coating? Am I a glutton for punishment or what? We'll fill you in on the actual closet interiors next time. But would it surprise you if I said "we went a little overboard"? I doubt it.