We have big news today, and much happier news than that of yesterday's gutter downspout theft! After roughly two months since we began our little kitchen upgrade with a fresh coat of paint, and after our kitchen upgrades seemingly spiraled out of control and turned into a major overhaul, we've finally checked the final items off of the list (for now).

Without any further delay, here's our grand "wine bar" reveal!!!

And our more or less the final view of the main kitchen area.

From the warm butcher block counters to the sparkling subway tile back splash, all we can say is that we are beyond pleased with how this whole thing has turned out. Just look at how far we've come in such a short period of time.

But to get a real feel for where we've been, you need to look back much further to what our kitchen looked like just before we moved in.

Before we could officially check "temporary kitchen reno part two" off of our lengthy master to do list, we had to put a few finishing touches on the cabinets and counters. I'm a firm believer in the saying "the devil's in the details," and these detail items were glaringly undone.

The first item we had to deal with was the base below the wine fridge. If you'll recall, I had to build a small platform for the fridge to sit on to bring it up to the proper level under the counter. This platform, though effective, was far from the most attractive solution. With the front visible beneath the fridge, it was obviously sitting on a piece of plywood.

To combat this look I used a spare piece of 2" by 1/2" pine and created a small kick plate cover.

By mitering the corners and measuring the proper depth of the small return pieces necessary on each side, I was able to create a small surround that would fit over the front of the plywood and around the sides, disguising the area on which the fridge was sitting.

A few brad nails, a little glue, and a quick coat of paint finished off this piece of the project with ease.

The next detail item was just a little more difficult. The task of leveling the tops of the cabinets before installing the butcher block counters was absolutely necessary, but extremely time consuming. After a solid day working to get everything lined up and fully supported, we installed the counters but were left with these unsightly gaps...

...and visible shims I put in place to ensure the proper height of the right cabinet area.

Even though these two rather small items were only really visible when you were looking for them, Wendy and I saw them both on a daily basis. Whether we were walking in the back door or getting something out of the cabinet below the sink, we were consistently bothered by the ugly look.

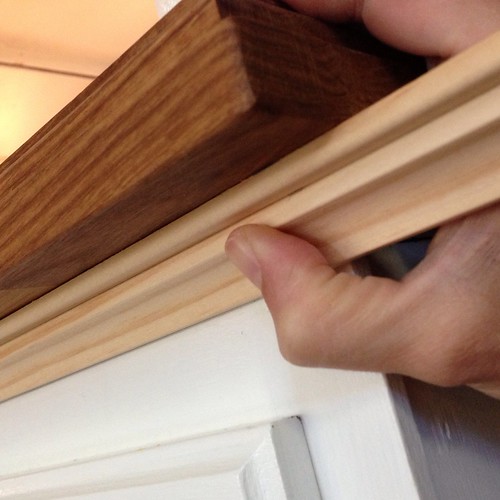
To resolve this I opted to build a little bit of custom molding. The gap was a little too large to use a single piece of cove, so I used a combination of a small trim piece combined with the cove molding.

I glued and brad nailed two 8' lengths of the molding so that I'd be able to cut the individual pieces necessary from two pieces of molding that were essentially identical. This would allow me to ensure the various cuts would line up properly without the need to carefully assemble each piece as an individual item, which took a lot of guesswork out of the entire process.

I cut all of the necessary pieces and dry fit them under the counter top to ensure a good fit.

Since I wasn't interested in getting paint on the underside of the counters, we went ahead and pre-painted the pieces of molding before installing them. Once fully painted it was just a matter of nailing them in place (using 1" brad nails), wood filling the nail holes, sanding, then giving those spots a once over with a final coat of paint.

Now our previously grotesque counter leveling (yes, it was that bad to us) now look like they've had a bit of custom molding applied in an intentional manner.

Not too shabby, eh? Though the left most cabinet didn't really need it, we added a piece of cove to the small cabinet next to the stove for good measure. We didn't want it to feel left out of the decorating party.

Once all of the molding was applied, we completed a few paint touch ups, and the little kick plate cover was in place on the wine fridge, we felt good enough to call our "quick and temporary kitchen upgrade" (yes, the one that has taken a full two months), done!

Though initially I resisted dropping everything and starting a new project, especially one that is essentially "temporary" (but who knows how long that actually is), I'm sold on the end results.

Now don't let me fool you, this doesn't mean we're totally done. I already see at least two things I still want to do and/or fix in the kitchen, such as the ugly baseboard under the dishwasher, but these are things we can do when we have a few extra minutes in the future.

What do you think of our end results? Well worth the two months of effort? Do you have a favorite improvement in this room? I think Wendy's vote is for the wine bar, and I have to say I'm particularly fond of the butcher block counters. I can't wait to move onto the sun porch so we can finally feel totally comfortable in the back of the house. Sun porch, here we come!

Home Stories A2Z TDC Before and After
Comments 37

Comments

10/18/2012 at 12:36 PM
It looks awesome. I love the idea of the molding under the counters.
Wendy
10/18/2012
Thanks, Michael. We only really thought of it because of the unsightly gaps, but are so happy with the decorative addition now that it's installed.
Katyavp
10/18/2012 at 12:37 PM
What a huge difference! Congrats on a job well done. And as a fellow OCD sufferer, I appreciate all of those extra steps you took to make it right. I only wish my husband and I were half as handy as you guys!!! Great job!
Wendy
10/18/2012
LOL - I'm glad we're not the only OCD DIYers around! Thanks!
10/18/2012 at 12:41 PM
It really looks fantastic you guys!
Wendy
10/18/2012
Thanks, Ashley! I think our back splash might be the same tile as your new shower. :-)
Karin K
10/18/2012 at 12:42 PM
It looks fantastic! Now I feel like I need to come over for some wine and cheese! Or, I could go home and have wine while I contemplate everything MY kitchen needs. It would save me gas money.
Wendy
10/18/2012
Mmm. Wine and cheese. Sounds like a party!
10/18/2012 at 12:59 PM
I love the butcher block counters. If we were staying in this house, that'd be on our list of things to do next year.
Wendy
10/18/2012
Thanks, Becky. Installing the counters was a pretty painful process, but we're thrilled with the results. Maybe in your new house?
Karen Perun Harris
10/18/2012 at 1:15 PM
Beautiful!
Carrie Cole Jolly
10/18/2012 at 1:25 PM
Lovely! What a transformation. Great work as always.
bu2fulday
10/18/2012 at 1:32 PM
What a fabulous job you guys did. I can't believe it!!! :)
10/18/2012 at 2:06 PM
Hooray for a great before and after!! Those little things, while they may not be visible or obvious to blog readers, are definitely awesome to have done so they don't nag at the back of your mind constantly :)

Sidenote: who ever thought that green laminate counters would be a good design decision? Clearly many people were tricked by them, based on the sheer number I see popping up in bloggers' "before" shots.
Wendy
10/18/2012
I ask myself that all the time, whether it's green laminate counters or gold swirly door knobs. I wonder if in 30 years, will everyone be saying "why did they install that hideous granite and vessel sink?" ;-)
10/18/2012 at 3:41 PM
I actually fear that, 5 years from now, thrift stores and homes will be overrun with white, poorly spray-painted items and eventually people will be asking "what the heck was UP with bloggers and spray paint?!" :)
10/18/2012 at 2:15 PM
Lovely, really nice... reminds me that I wanted to put my kitchen pictures on my blog too.. like half a year ago or so ;)
Wendy
10/18/2012
Thank you!

"Wait, did we ever talk about ___ project?" :-) I know that feeling!
10/18/2012 at 5:00 PM
but you're obviously doing better.. my last post was in spring :D
Kate
10/18/2012 at 3:04 PM
Gorgeous!
I love the white cabinets and shelves and the calm grey walls and the warm wood floors and counter. You guys did a wonderful job and it's so beautiful!
Wendy
10/18/2012
Thanks so much, Kate! The room has a really calm effect in person too. It's made cooking and entertaining so much more fun!
maggie
10/18/2012 at 7:14 PM
Amazing work! It's gorgeous!
Tiffany Washington
10/18/2012 at 9:25 PM
it looks great.
Kristin
10/19/2012 at 10:08 AM
Looks fabulous!!
Nikki
10/22/2012 at 1:45 PM
This turned out to look gorgeous! Have you ever considered a crown detail on the top of your upper cabinets? That might be an additional element that could look really nice - and it seems like Alex already has the skills and tools for the job! Great work both of you - I love it!
Wendy
10/22/2012
Thanks, Nikki! Alex has been wanting to put a crown on the cabinets for years. I've been hesitant because I didn't want to invest more money in a temporary solution. Now that we've done all this new work, I think it's definitely something to revisit! Thanks for the suggestion -- it might be the nudge we need. :-)
Threadbndr (Karla)
10/23/2012 at 1:48 PM
I love the finished kitchen - your 'temporary kitchen' looks better than my 'real' kitchen LOL. Someday.

I think my favorite part is the backsplash, with the shelving coming in a close second.
Alex
10/29/2012
Thank you very much. I think the backsplash is easily our favorite as well. I'm not sure why, but it just classes up the joint so much.
bb
10/24/2012 at 5:47 AM
gorgeous work, y'all.. this is a 'temporary' i could see falling in love with permanently! oh yes, the devil IS in the details! but he heard about you though, said sthg about heading down to georgia.
Wendy
11/6/2012
Thank you! I am completely in love with the new kitchen. It's definitely bought us more time before I feel like we "need" to do our real kitchen. :-)
11/6/2012 at 11:11 AM
looks fabulous! love the cabinets-so much lighter and brighter!
Wendy
11/6/2012
Thank you! I love the look of lighter cabinets. The room feels so much brighter and happier. :-)
Mo
4/22/2013 at 5:53 PM
Looks awesome! We are going to start on a kitchen remodel in the fall and I will be taking pointers from you.
Wendy
4/23/2013
Thanks so much, Mo. Good luck with your kitchen remodel!
Crystal Shields
12/8/2013 at 4:15 PM

Which butcher block countertop is this from IKEA? Is it the Akerby or the Numerar? I love the warmness!

Crystal Shields
12/8/2013 at 4:43 PM

Nevermind.Alt smile I went back and re-read and saw that you chose the oak, thus answering my own question.

10/12/2016 at 6:38 AM

Wow, what an incredible makeover, I just love the lighting and the way it lights up those glasses and reflects off those fab white tiles.

Since you've not signed in yet, you will need to fill in your name and email below. If you have a Facebook account, save yourself a step and use Connect to login.

Denotes a required field.

Please enter full URL, including http://

You can use Markdown syntax in your comment. And you can also use lots of Emoji!
  • Search

  • Login
  • Follow
  • Advertising

If you're looking for information on advertising and sponsorships, head on over to our sponsorships page. You can purchase site sponsorships in a few easy clicks. 

Toolbox Tuesday
Open Housing
  • Popular Topics
  • Comments
  • Blog Roll
  • We're Featured!

Old Town Home has been featured in the following places and publications:

The Washington Post
 
Washingtonian Magazine
 
Domino
 
Old House Journal
 
 
Apartment Therapy House Tour
 
Washington Post Express Feature
 
Home & Garden Blogs
 
© 2024 OldTownHome.com. - Privacy Policy
Login Below
or
Sign in with Facebook
Connect

Unexpected Error

Your submission caused an unexpected error. You can try your request again, but if you continue to experience problems, please contact the administrator.

Working...

Working...