As we've been working on projects at our country house we've been trying to strike that delicate balance between major overhaul projects, minor upgrades and facelifts, general upkeep and maintenance, and just trying to have a good time with friends and family.
We've been getting up to speed on crab picking...
...enjoying 4th of July festivities on the pier...
...and have been having fun in and on the water.
Given all that's going on it hasn't been particularly easy to get a lot of tasks completely accomplished, but we sure have made some good progress overall. Over the last several months we put the finishing touches on the minor overhaul turned major project of the downstairs guest bathroom.
We checked "plaster the giant living room with historically accurate lime plaster" off of our living room todo list.
We purchased and refinished a large outdoor table made from salvaged lumber.
We started working on the under stairs bench to disguise our HVAC return ducting.
We started decorating the guest sleeping spaces (not yet renovated, but good enough as they are for now).
And we've put a fair amount of time into the putting the outdoor entertaining spaces back together.
But one of the areas of our home that has actually required what seems like the lion's share of our time has been the maintenance of our large yard. Whether we're trimming the hedge or pulling weeds, it feels like there's never a shortage of things that can take an entire afternoon to complete.
Given that the outdoor space of our row house in Old Town is a whopping 800 square feet of mostly brick patio, the idea of over an acre of yard with grass, many plantings, and so much growing space that needs to be maintained can be somewhat overwhelming. For this reason, and the fact that Wendy's parents are extremely adept at gardening, we frequently enlist their help in getting our arms around our projects when they are in town.
Earlier this year, back when we were re-laying the brick walkway, Wendy and her parents spent an entire weekend weeding, trimming, planting, mulching, and generally getting our outdoor space ready for the summer.
At the conclusion of the massive effort, things were looking great.
But the problem with outdoor spaces is that they need water and attention to keep them looking great, and ultimately we're not there enough to water the plants every day during the hot days so "looking great" can quickly turn into "looking dead."
Knowing that the cool days of late spring would soon give way to the dog days of summer, I started working on a plan to remedy our watering woes. My immediate thoughts went back to my childhood in the 80s with oscillating sprinklers creating rainbow sprays of water, kids running through them in the bathing suits. Though that image has a certain allure due to its nostalgia, I know there is a much better way to accomplish what we need.
After doing a fair amount of research on the best ways to water our plantings, the preferred solution was almost immediately clear. We needed to install a drip irrigation system!
If you're not familiar with drip irrigation, it's a pretty simple concept. You deliver only the water you need directly to the plantings that need it. It's low pressure, a concentrated area right at the base of the plant, and waters the plant slowly over the course of a few hours per day.
This is a tried and true method of keeping everything watered from small flowers to large trees, and conserves water while doing it. Imagine the oscillating sprinkler from our childhood I mentioned above and all of the wasted water that isn't actually doing any watering of the plants. Sure, the plants are getting a drink, but so is the bare ground and all of the weeds around those plants. With drip irrigation you deliver water directly to the areas that need water, and you deliver it at the right flow rate for the plant.
The first step in our project to bring water to our plants was to walk all of our plantings and figure out just what we needed to water. When installing a large sprinkler system you care only about the area of land you're watering, but when installing drip irrigation you focus more on the number of plants that need water, and the distance you need to have the water travel to reach the plants.
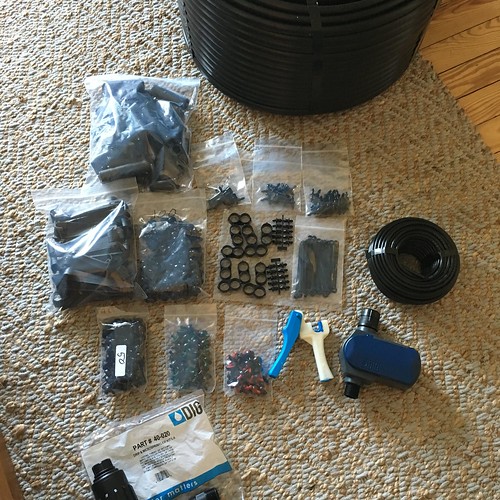
In our situation we counted up a few dozen plants that we'd need to water regularly. This included everything from sunflowers and salvia to hydrangea and roses. And these were spread over several flower beds and along the side porch of the house. Based on our calculations we orders ourselves a drip irrigation starter kit that came with a few hundred feet of large and small tubing, lots of drip attachments, tools needed to install, a pressure regulator, instructions, and a solar powered timer so the drip irrigation can run even if we're not home. Essentially, it had everything we'd need to make sure our thirsty plants could be quenched on a regular basis.
The way the drip irrigation works is pretty simple. There's larger tubing (usually about 1/2") that will take water from the house's supply and will deliver it near the plants. Then there are smaller tubes that tap off of the main 1/2" tubing that delivers the water directly to the base of the plant. And finally, there's a dripper attachment that regulates the flow of water to a certain number of gallons per hour. These drippers are variable flow rate and are color coded based on how much water they'll deliver at one, two, or four gallons per hour.
In order to get water where we'd need it to go, we needed to first install a new hose bib. While we already had one on the side of our house, it was not in a good spot for the drip kit. Also this will be a semi permanent fixture, so we didn't want to leave ourselves in a position where we couldn't hook up a hose if we needed to. So we opted to install ourselves a new hose bib more ideally suited to supply water to our whole garden. I also wanted to locate it so it would be easier to deliver water to a vegetable garden I dream of one day building in the front yard. Maybe in 2024.
The new host bib is a simple anti-freeze bib, and I was able to use the same water line run as the other hose bib to access this one, so they all use the same inside shut-off valve. This will make winter shutdown much easier.
The hose bib connects directly to the solar powered actuator valve and pressure reducer. This will let us set a daily schedule for watering without worry while we're gone, and the pressure reducer keeps the pressure in the drip irrigation system at just 25psi (to ensure we don't have a blow out).
With the hose bib installed and actuator and pressure reducer ready to go, we got to work on laying the 1/2" tubing around the yard. It's probably best if you draw your whole yard and map out exactly where you want to lay out all of the tubing. That's what the instructions on the kit say at least. But I've never been one to really follow instructions. Instead I created a mental map of the yard and figured out a rough plan of where I wanted to run everything. This worked for me, but it also drove Wendy crazy because she apparently can't read my mind even though we've been together for 21 years. Go figure.
Ideally we would have done this earlier in the year before planting and laying all of the mulch, but we often don't do things in the right order. But the advantage to this system is that the pipe doesn't need to be buried very deep, or really at all if we don't want. We can just make a little gully near the front of the border and cover it with dirt and mulch. The fittings are all the barb style press together type, so install overall is pretty quick and easy.
The one thing to note, while it's much more miserable on the installer, putting this system together on a sunny and hot day is the best way to go. I left the tubing out in the hot sun while installing, which made it far easier to work with. Installing the fittings, pressing in the drippers, everything was just a little easier with slightly softer tubing.
We did have a four sections where the main 1/2" tubing had to travel beneath the brick walkway. For these sections I just had to pull a few bricks up and dig a little trench to bury the tubing beneath the bricks. It wasn't the quickest work in the world, but it wasn't particularly difficult either.
Once the main tube was laid near all of the plants that it needed to water, we moved onto layout out the smaller watering tubes. Installing these tubes is simple. The kit came with a hole punch tool that places a small hole in the 1/2" tube.
In some cases, such as with most of the hydrangea, we were able to run the drippers right off of the main 1/2" line. For these we could just push the dripper right into the hole that was punched. As you can see from the photo, we're using the green color coded dripper, which is 2 gallons per hour, for the hydrangea.
For the majority of the garden we had to run lines off of the main supple to get water to the plants. The smaller 1/8" tubing then attaches to a barbed fitting that pushes right into the larger 1/2" tube. That's all there is to it. Just push the small tube and fitting into the large and you're good to go.
We slowly made our way around the entire garden, leading the water right to the base of the plants that would need it.
After a few days of effort, probably about 6-8 hours total, we had ourselves a fully installed and 100% functional drip irrigation system. We set the valve to turn on at 7:00am for a good morning drink, and then again at 8:00pm for a soaking before bed. It's our hope that with this system in place our plants will not face the same fate they experienced last summer, looking good early but withering and dying as the summer progressed. It also means we'll not have to spend time each day we're at the house making sure everything gets a good soaking, and instead can focus on more pressing issues, like watching the osprey babies grow up and leave the nest.
Drip irrigation is one of those things I've long been interested in trying, but never had a good space where we could use it. I did have some curiosity about using a rain barrel as the water source, but after doing a lot of research on it we learned we'd need to install a pump to force enough pressure...or build some sort of a water tower in the front yard. And as charming as a well placed water tower might look (I'm thinking one like the Silver Oak building in Napa Valley), I don't think I'll be able to get Wendy on board with that idea. Maybe in 2045?
I'm so happy to have this installed and can't wait to see how it works this year in our garden. If it's successful we'll certainly expand this to our future vegetable garden. We have big plans for this yard down the road, and this is just the first step to learning how to effectively expand without wasting time, money, and natural resources.
Do you have any experience with drip irrigation? If so, do you have any tips or tricks you'd like to share to help our process? If not, is it something that might help you in your garden? Would love to hear your thoughts.