There's just something I love about a white picket fence and brick garden walkway.
When we were looking at houses two summers ago, there were many things that attracted us to the home we ultimately ended up buying. The location on the water was number one for me, but we also loved the age and history of the home, the big wraparound porch, the Christmas staircase, and the charming white picket fence surrounding the garden.
But back when we installed a completely new HVAC and plumbing system, unfortunately the house took a beating as we worked to put Humpty Dumpty back together. Switching to a new geothermal HVAC system not only meant digging up the majority of the front yard...
...but it also meant it was time to abandon the old oil powered system. With the oil tank no longer in use, we wanted to have it removed so that we didn't have to worry about it down the line, possibly corroding and leaking. So we had our contractors drain it and take it away, but in order to get to it and run the geothermal pipes they had to remove a section of the picket fence, pull up roughly 20 feet of the charming brick-lined walkway, and dig a big hole.
While they filled the hole back in, over time the dirt settled and we were left with a muddy sinkhole in the yard, a barren patch of mud where the garden and walkway once stood, and a looming pile of bricks in the garden.
September of last year after I grew completely sick of coming to the house to find that our propped up picket fance had once again fallen over in a wind storm, Alex did a little work to at least put the fence back together again by digging a new posthole...
...and reattaching all of the old pickets. He worked into the night, which is where we got our inspiration for doing outdoor lighting.
But that's where the work stopped. We had our hands more than full with trying to put the inside back together, not to mention begin and finish work on some of the ongoing interior projects. So we let it sit, unattended, subjected to Mother Nature's whim. While it looked far from pretty during the winter months...
...it only grew worse with this Spring's record breaking rainfall.
As much as we've tried the "sit by the fire pit, drink lots of wine, and pretend the giant mess isn't lurking right behind you" distraction technique, it's driven me crazy that the front of the house is in such utter chaos. Finally I could stand it no longer.
My parents came to town a couple weeks ago for a visit, and they're much more talented than we are when it comes to gardening. While Alex worked mostly inside tackling the living room plaster project, my Mom, Dad, and I trimmed bushes, ripped up weeds, shoveled out the old wood chips, planted flowers, mulched beds, and most importantly, focused a big part of our attention on this destroyed section of garden. I could barely contain my excitement, despite being soaked from hours of yard work in the steady rain, knowing we were going to finally make it look better.
Alex and my Dad began work by leveling out the dirt (well, by this time it was largely mud) where we would re-lay the brick walkway, and also replace the missing garden border. We mimicked the same border we have around the rest of the garden, which isn't fancy, by using 2x6 lumber screwed together along the perimeter of the beds. While making an upgrade at some point is on the list, today wasn't the day for that. We were focused more on putting things back together so it wasn't such an eyesore.
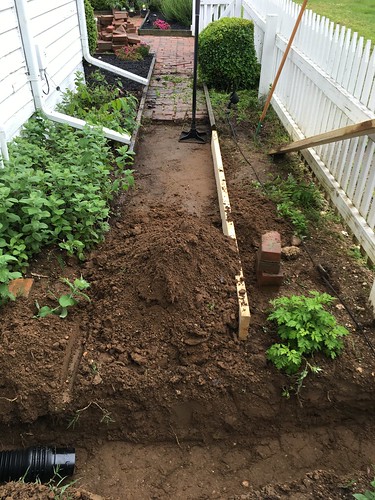
In addition to leveling the dirt, another issue we need to address is drainage. We have several downspouts that let out onto the bricks, as well as the drain from the HVAC condensate line. A considerable amount of water drains from the condensate line, which washed away a lot of dirt near to the house last year.
We're looking into a rain barrel collection/watering system for the downspouts and are leaving those as is for now, but the condensate line we wanted to tackle immediately. To resolve this we added some buried perforated drainage pipe under the walkway and out into the yard. In order to allow for the condensate to drain away from the house, we dug a trench, poured in some gravel, and placed the perforated drainage pipe in a mesh sleeve on top of the gravel bed.
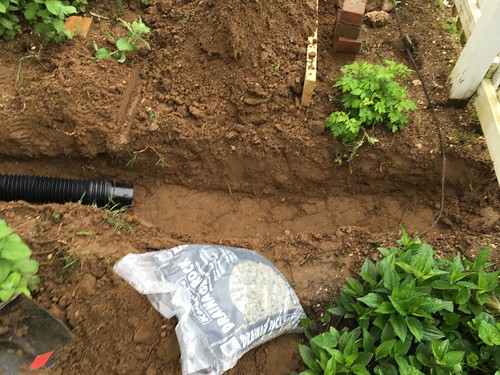
The water can then slowly seep out of this perforated section, draining the water into the gravel bed under the walkway. We then filled in around it with sand, and leveled the area with dirt.
The next step was to put a layer of paver sand down on top of the leveled dirt, and tamp it down. This is the same way the rest of the brick patio is laid, so while a layer of stone might be nice, this dirt and sand combo should do what we need.
It was a lot of prep work, but we were finally ready to begin laying bricks. I started us off on one end, and then my Dad took over for a while. We had to get a little bit creative to ensure a snug fit, but somehow we were able to make it work without having to cut a single brick. That, in and of itself, is a huge victory in my book.
The project (including all of our outdoor work) spanned three days, and on day three with all the bricks laid, we were able to begin filling in the gaps with more paver sand. Here I stand, in my purple snake repellant boots (that's what I'm telling myself, anyway), sweeping the sand back and forth to fill in the voids.
We reserved one additional bag of sand, and will repeat the spreading and sweeping process again after everything has settled a bit. After all of our hard work, we also poured in additional dirt in the beds on either side and added a little mulch to boot.
We had successfully navigated our way from a weed covered mud pit back to rustic brick walkway! We're both completely thrilled by this progress! As you can see in the photo above, we also have more mint than we'll ever know what to do with. Mojitos anyone?
We have a long way to go before our yard is where we really want it to be. I mean, a looooong way...years long even. But this is still a big step to get us to a point where I'm feeling really good about the progress, and no longer cringe when we pull in the driveway.
