<?xml version="1.0" encoding="utf-8"?>
<feed xmlns="http://www.w3.org/2005/Atom" xmlns:media="http://search.yahoo.com/mrss/">
  <title>Old Town Home Category: 'Re-purpose'</title>
  <updated>2014-04-14T15:12:39.380-04:00</updated>
  <id>http://www.oldtownhome.com/re-purpose/index.atom</id>
  <link rel="alternate" href="http://www.oldtownhome.com/re-purpose/index.atom" />
  <author>
    <name>Alex and Wendy</name>
    <uri>http://www.oldtownhome.com/</uri>
    <email>wendy@oldtownhome.com</email>
  </author>
  <entry>
    <guid>ba9aba1b-bc77-42e9-9039-c2bb7ef118fe</guid>
    <id>https://www.oldtownhome.com/2014/4/14/Building-a-Support-System-for-Our-New-Vanity/</id>
    <title>Building a Support System for Our New Vanity</title>
    <summary type="html"><![CDATA[<p>The single most important aspect (out of many very important aspects) of a marble topped vanity is the seemingly simple responsibility of the vanity to provide a rigid support structure for the marble top. Without the necessary support structure, the heavy marble top will not be adequately supported and may crack under its own weight.</p><p>In the stone and tile world the amount of give allowed under a piece of stone is called deflection. And when you're using a natural stone product, your deflection is only allowed to be L/720 (complicated calculation of dead load + live load and the amount of allowed flex), lest you risk some cracking. </p><p>This need for minimal deflection has been a major challenge in our quest to convert an antique store find into a suitable vanity for our bathroom. </p><div class="MediaContainer PhotoContainer"><a href="http://farm6.staticflickr.com/5267/5668183155_e191a5ecb8_z.jpg" rel="PhotoPopup" popupheight="478" popupwidth="640"><img alt="" src="https://farm6.staticflickr.com/5267/5668183155_e191a5ecb8.jpg" width="500" height="374" style="border-width: 0px; border-style: solid;"></a></div><p>This is the point in a project where I get into my own head. I essentially cripple myself with thoughts on how I can make this work. Rather than jumping in and trying things out, I make excuses for why I shouldn't work on the project and instead obsess about how to properly accomplish what I need to accomplish. </p><p>This is my process, no matter how infuriating and counter productive it tends to be. It insights fury and threats of "hiring someone to just get the damn thing done" from my better half, and side-eye skepticism from the pets in our home. The thing is, as inconvenient and ridiculous as it is, this is my hideous personality and it seems to work for me. Ugh. </p><p>After sufficient deliberation in the vacant corners of my brain where I often become all too distracted by the dust bunnies and tumbleweed ideas I uncover (I haven't built that automatic door opener for the bedroom yet, maybe I should do that first), I came up with an adequate solution for support that should alter the structure of the vanity to offer sufficient support for our future marble top. </p> <a href="https://www.oldtownhome.com/2014/4/14/Building-a-Support-System-for-Our-New-Vanity/">more</a>]]></summary>
    <published>2014-04-14T15:12:39.380-04:00</published>
    <updated>2014-04-14T15:12:39.380-04:00</updated>
    <link rel="alternate" href="https://www.oldtownhome.com/2014/4/14/Building-a-Support-System-for-Our-New-Vanity/" />
    <author>
      <name>Alex</name>
    </author>
    <content type="html"><![CDATA[<p>The single most important aspect (out of many very important aspects) of a marble topped vanity is the seemingly simple responsibility of the vanity to provide a rigid support structure for the marble top. Without the necessary support structure, the heavy marble top will not be adequately supported and may crack under its own weight.</p>
<p>In the stone and tile world the amount of give allowed under a piece of stone is called deflection. And when you're using a natural stone product, your deflection is only allowed to be L/720 (complicated calculation of dead load + live load and the amount of allowed flex), lest you risk some cracking. </p>
<p>This need for minimal deflection has been a major challenge in our quest to convert an antique store find into a suitable vanity for our bathroom. </p>
<div class="MediaContainer PhotoContainer"><a href="http://farm6.staticflickr.com/5267/5668183155_e191a5ecb8_z.jpg" rel="PhotoPopup" popupheight="478" popupwidth="640"><img alt="" src="https://farm6.staticflickr.com/5267/5668183155_e191a5ecb8.jpg" width="500" height="374" style="border-width: 0px; border-style: solid;"></a></div>
<p>This is the point in a project where I get into my own head. I essentially cripple myself with thoughts on how I can make this work. Rather than jumping in and trying things out, I make excuses for why I shouldn't work on the project and instead obsess about how to properly accomplish what I need to accomplish. </p>
<p>This is my process, no matter how infuriating and counter productive it tends to be. It insights fury and threats of "hiring someone to just get the damn thing done" from my better half, and side-eye skepticism from the pets in our home. The thing is, as inconvenient and ridiculous as it is, this is my hideous personality and it seems to work for me. Ugh. </p>
<p>After sufficient deliberation in the vacant corners of my brain where I often become all too distracted by the dust bunnies and tumbleweed ideas I uncover (I haven't built that automatic door opener for the bedroom yet, maybe I should do that first), I came up with an adequate solution for support that should alter the structure of the vanity to offer sufficient support for our future marble top. </p>
<p>
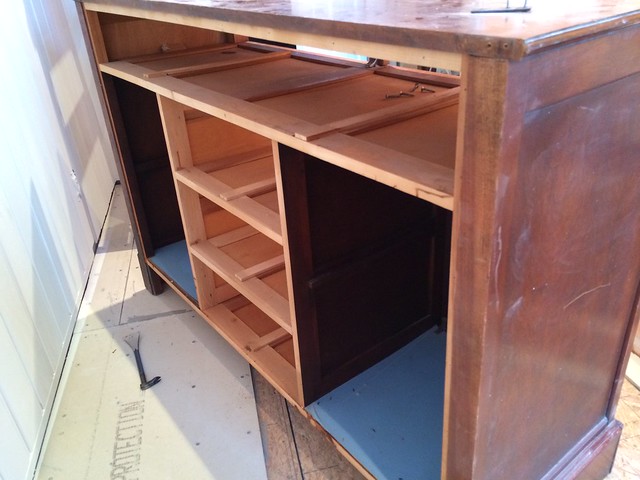
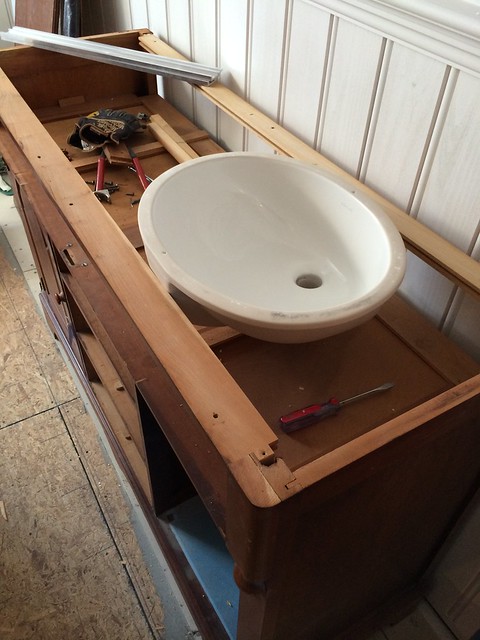
It's difficult to see the issues from the earlier photos, but there are issues with this vanity that makes this a difficult proposition right from the start. If you'll notice, the weight of the buffet top is carried across the width by that single small center support piece. Well, that support doesn't really offer any support at all. It's too small, it's actually cut too short, and the lower horizontal piece has warped down over the years. Any support it once offered is long gone. Add to it that the actual weight would be carried out to the sides of the center drawers (in the lower section of the vanity), and you've got yourself a nearly impossible engineering problem given the current set up.</p>
<p>
<div class="MediaContainer PhotoContainer"><a href="http://farm4.staticflickr.com/3718/12206521524_a80a457681_z.jpg" rel="PhotoPopup" popupheight="480" popupwidth="640"><img alt="" src="https://farm4.staticflickr.com/3718/12206521524_a80a457681.jpg" width="500" height="375" style="border-width: 0px; border-style: solid;"></a></div>
</p>
<p>
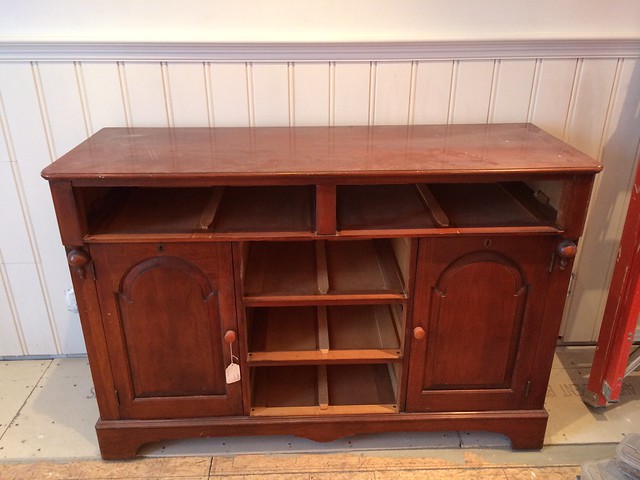
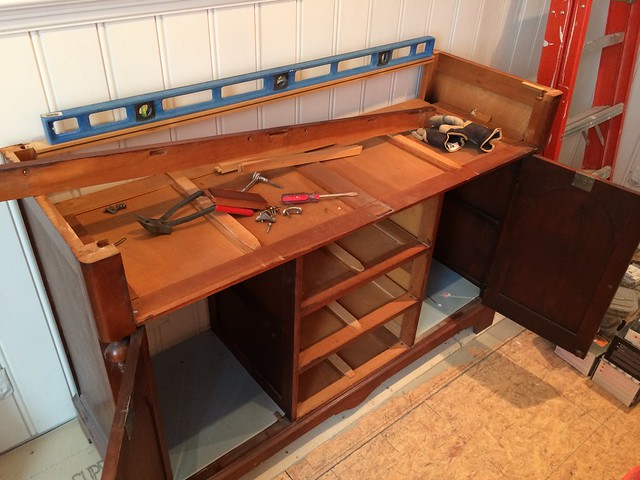
Once I started to take apart the whole thing I noticed other issues. The pieces to support the front and back are undersized and give a lot when placed under pressure. There are also essentially no center support elements. Pretty much the only thing holding any top in place are actually the four small corner posts. Given that the vanity's unsupported span is about 48", and we want to put two sinks in the marble, we'd surely be looking at cracks as soon as we set our toothbrushes down on the beautiful vanity top for the first time.</p>
<p>To resolve these issues I first had to start by taking things apart. At this point I've realized that almost every project I ever begin will typically "start by taking things apart." It's now part of my DNA, similar to the fact that I will always need to breathe air, over analyze every situation, and perpetually piss off my wife with projects that take years to complete because I always have to "start by taking things apart." Cheers.</p>
<div class="MediaContainer PhotoContainer"><a href="http://farm8.staticflickr.com/7315/12856604813_3581c39f0a_z.jpg" rel="PhotoPopup" popupheight="640" popupwidth="480"><img alt="" src="https://farm8.staticflickr.com/7315/12856604813_3581c39f0a.jpg" width="375" height="500" style="border-width: 0px; border-style: solid;"></a></div>
<p>I removed both the back and front support pieces of the cabinet so I could get better access to the interior structure. Once removed I used a tried and true trick of up-cycle renovators that has been an old standby since the earliest civilizations, I added a bunch of wood to it. </p>
<p>Don't believe me? Do poke around in the ancient pyramids of Giza. I guarantee that one of the ancient Egyptians, whose job it was to get one of those giant stones all of the way to the top of that damn pyramid, got it all of the way up there only to realize that it was just a bit too small. Do you think he took that stone all of the way back down? No, he didn't, because that's ridiculous. Instead, he probably got someone to bring a piece of pallet wood or some other scrap up there is shoved it into place, then made some snide comment like "Who cares? The Pharaoh will never know this is here. Besides, do you really think this house will be standing in 100 years? No way."</p>
<p>Sorry, I drifted there for a second. Got caught up in one of those dusty brain corners.</p>
<p>
<div class="MediaContainer PhotoContainer"><a href="http://farm6.staticflickr.com/5537/12237752583_7d52f07239_z.jpg" rel="PhotoPopup" popupheight="480" popupwidth="640"><img alt="" src="https://farm6.staticflickr.com/5537/12237752583_7d52f07239.jpg" width="500" height="375" style="border-width: 0px; border-style: solid;"></a></div>
</p>
<p>I started with a large 1x8 length of poplar that I screwed and glued to the back of the vanity, anchoring it into the legs that do much of the "heavy lift support" of the whole thing. This also allowed me to ensure the whole vanity was square. A byproduct of the fact it was all built with nails, glue, and rail and stile joinery, meant that the whole thing was a bit wobbly. This addition of structure for the upper support has also meant that we'll be fixing the wobbly.</p>
<p>Once the back piece was applied we were in much better shape already. The length and size of the piece of poplar meant that we'll have nearly sufficient support along the whole back of the piece of marble, especially in the critical weak areas in the middle of the sinks. </p>
<p>The next focus of my efforts were on the sides. The rail and stiles had already failed a bit here as the glue had aged, so there was a little bit too much give in the sides. using the same 1x8" popular I ripped it down a bit and glued &amp; screwed them to the front and back support legs, then also glued &amp; screwed them to the new back support piece. Once these two pieces were in we were looking really good!</p>
<div class="MediaContainer PhotoContainer"><a href="http://farm4.staticflickr.com/3677/13693903863_88eeba4dce_z.jpg" rel="PhotoPopup" popupheight="640" popupwidth="480"><img alt="" src="https://farm4.staticflickr.com/3677/13693903863_88eeba4dce.jpg" width="375" height="500" style="border-width: 0px; border-style: solid;"></a></div>
<p>
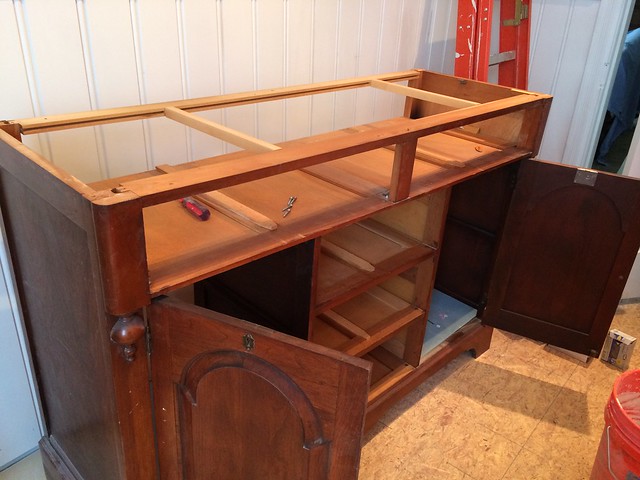
Next up, I had to focus on the front support element, which was actually one of the main reasons for my obsessive delay on this project. The buffet had two upper drawers, but we will be putting in two undermount sinks and drastically reducing the capacity of those upper drawers.</p>
<p>Having lived in our narrow and storage-light house for some 11 plus years, the thought of losing out on potential storage is one of those things that makes my spouse's eye twitch as she slowly loses control and bursts into a mixture of tears and volcanic rage. To say she appreciates storage is a bit of an understatement. And my suggestion that we'd need to get rid of those two upper drawers in exchange for the support necessary to keep our marble topped vanity from crumbling beneath the weight of her hairdryer was met with something slightly less than enthusiasm. In fact, I believe she said something like "Not an option," "Nope," or just a blank stare that began to turn me to stone. Really, we can just assume any one of those realistic responses actually happened and move on.</p>
<p>Rather than face the wrath of Mecha-Wendy, I devised a plan to sure up the front of our set up but allowing us to maintain some minor lean out type drawer assembly for things like tooth brushes and other small items.</p>
<p>Like the back, I began by screwing a piece of 1x2" poplar as a horizontal element. This is also the demarkation for the front of the sink once all will be said and done. Though in improvement, this small piece of lumber isn't nearly enough to offer sufficient support, so there was still a lot to be done.</p>
<div class="MediaContainer PhotoContainer"><a href="http://farm4.staticflickr.com/3742/13810184305_55fe1c2cc9_z.jpg" rel="PhotoPopup" popupheight="480" popupwidth="640"><img alt="" src="https://farm4.staticflickr.com/3742/13810184305_55fe1c2cc9.jpg" width="500" height="375" style="border-width: 0px; border-style: solid;"></a></div>
<p>I then ripped down the original front piece of lumber that I had removed from the front of the buffet. I made it fit in the gap between the front and the new piece of wood, glued, and then screwed through from the back of the new piece. This did quite a bit to stiffen up the wood.</p>
<p>
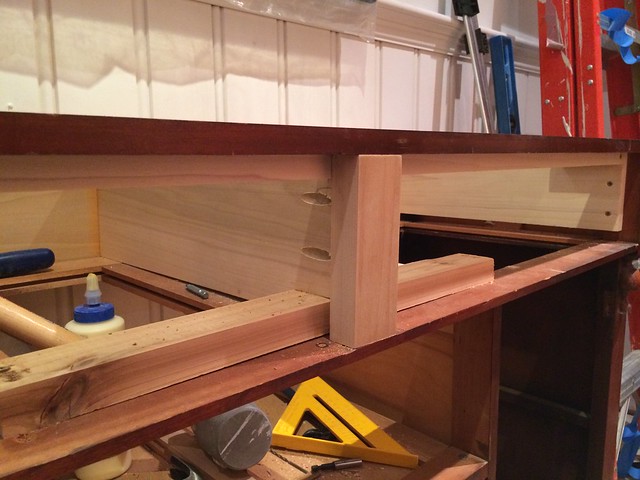
We were getting closer, but the main thing I noticed was the lack of any center support. If I could add some center support items it would likely be enough to solidly support the marble by both supporting the center of the stone and making the front piece of wood more rigid. One final thing I wanted to do was to make this center support rest not on the unsupported lower section of the upper buffet drawer, but instead distribute the weight out onto the sides of the drawer supports.</p>
<p>
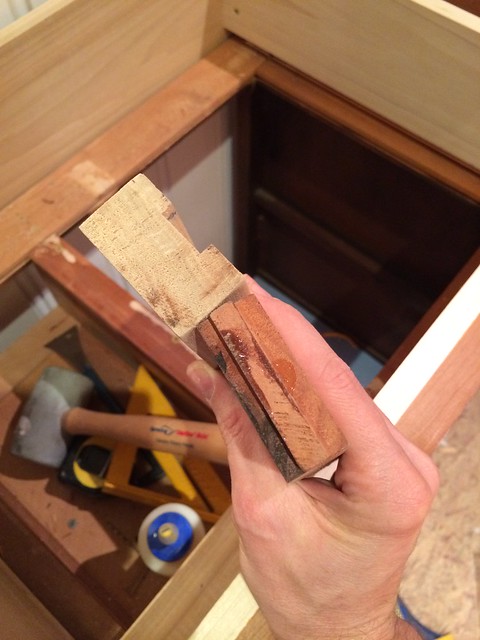
To accomplish this I ripped a center piece of wood to the height I'd need, then notched it in several places to accept the cross support pieces.</p>
<div class="MediaContainer PhotoContainer"><a href="http://farm8.staticflickr.com/7108/13838709794_fbcee4cc79_z.jpg" rel="PhotoPopup" popupheight="480" popupwidth="640"><img alt="" src="https://farm8.staticflickr.com/7108/13838709794_fbcee4cc79.jpg" width="500" height="375" style="border-width: 0px; border-style: solid;"></a></div>
<p>
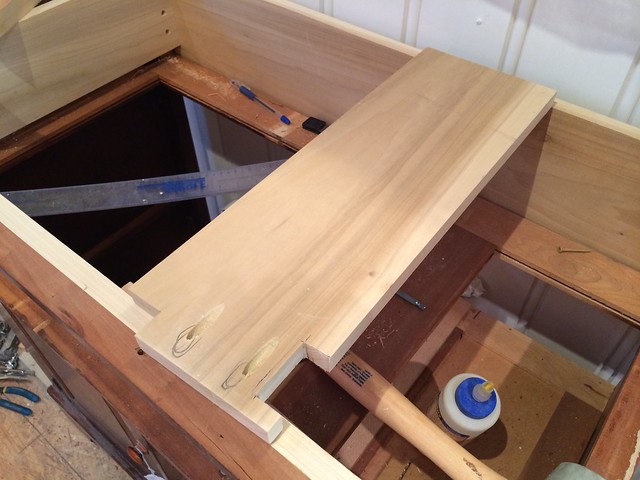
I also grabbed a piece of 4/4 material (actual 1" thickness) and cut it just long enough to span the two lower support areas. This piece of wood will act as the bridge piece that will distribute any weight brought down through the center piece out to the supporting pieces. Those supporting pieces then transfer weight down to the base of the cabinet and into the ground. Essentially, I created a carry beam where any weight of the stone will ultimately travel.</p>
<div class="MediaContainer PhotoContainer"><a href="http://farm4.staticflickr.com/3828/13844930843_bcdc6c2155_z.jpg" rel="PhotoPopup" popupheight="640" popupwidth="480"><img alt="" src="https://farm4.staticflickr.com/3828/13844930843_bcdc6c2155.jpg" width="375" height="500" style="border-width: 0px; border-style: solid;"></a></div>
<p>
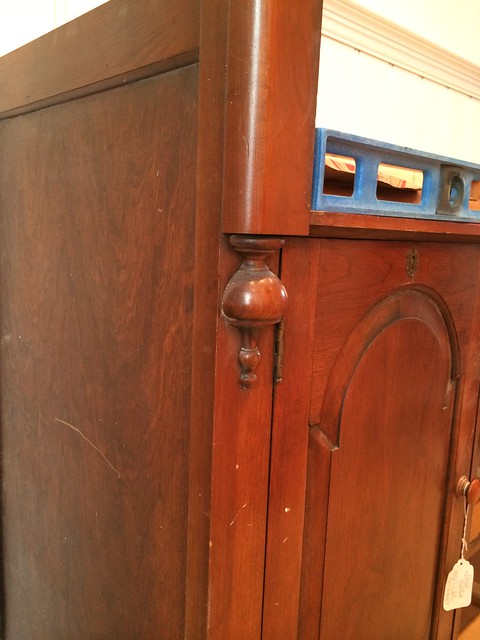
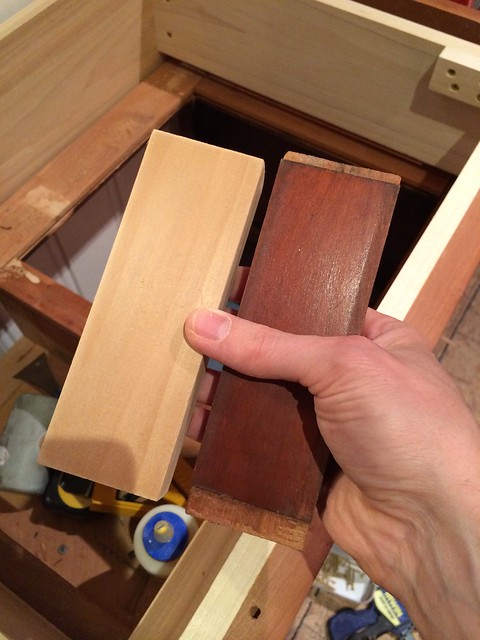
The final piece I had to apply was the center facia component. The original piece was never the right size, as I believe it was actually cut short, and didn't quite fit right. This didn't look terrible when it was stained, but once the piece is painted, the gaps and change in size would have stood out. I took a new piece of wood and cut it to the same width as the old.&nbsp;</p>
<div class="MediaContainer PhotoContainer"><a href="http://farm4.staticflickr.com/3782/13843414525_6283d32cec_z.jpg" rel="PhotoPopup" popupheight="640" popupwidth="480"><img alt="" src="https://farm4.staticflickr.com/3782/13843414525_6283d32cec.jpg" width="375" height="500" style="border-width: 0px; border-style: solid;"></a></div>
<p>Then, measuring carefully, I cut it to the correct height.</p>
<div class="MediaContainer PhotoContainer"><a href="http://farm4.staticflickr.com/3699/13837157315_601b3abf4a_z.jpg" rel="PhotoPopup" popupheight="480" popupwidth="640"><img alt="" src="https://farm4.staticflickr.com/3699/13837157315_601b3abf4a.jpg" width="500" height="375" style="border-width: 0px; border-style: solid;"></a></div>
<p>Then I cut a dado in the back of that piece so I could apply it to the center piece in a glued up and sturdy manner. I had also cut some pocket holes in the center piece so I could sink a few screws from the back and hide the fact they are there.</p>
<div class="MediaContainer PhotoContainer"><a href="http://farm8.staticflickr.com/7431/13843933683_46154be37c_z.jpg" rel="PhotoPopup" popupheight="640" popupwidth="480"><img alt="" src="https://farm8.staticflickr.com/7431/13843933683_46154be37c.jpg" width="375" height="500" style="border-width: 0px; border-style: solid;"></a></div>
<p>A few good smacks with the mallet to get the piece in place and it was looking good.</p>
<div class="MediaContainer PhotoContainer"><a href="http://farm8.staticflickr.com/7358/13846373505_1aebb8abe3_z.jpg" rel="PhotoPopup" popupheight="480" popupwidth="640"><img alt="" src="https://farm8.staticflickr.com/7358/13846373505_1aebb8abe3.jpg" width="500" height="375" style="border-width: 0px; border-style: solid;"></a></div>
<p>After it was all said and done the top portion of the vanity is about as sound as it's going to be. I think you could have a party up there and not get any significant sag. And given how long it's taken me to get to this point, I might just have to have a little party up there. I might even invite Wendy (though she'll just point out how long things are taking).</p>
<div class="MediaContainer PhotoContainer"><a href="http://farm8.staticflickr.com/7273/13847017864_3a73310a1e_z.jpg" rel="PhotoPopup" popupheight="640" popupwidth="480"><img alt="" src="https://farm8.staticflickr.com/7273/13847017864_3a73310a1e.jpg" width="375" height="500" style="border-width: 0px; border-style: solid;"></a></div>
<p>
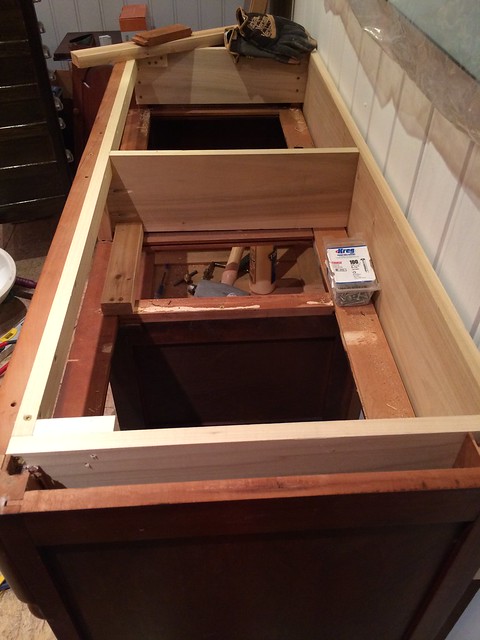
I still want to add some structure to the bottom of the vanity, cut some holes for the plumbing, and also cut an inch or two off of the bottom before we can call it ready for paint, but this level of progress is very encouraging.</p>
<p>What do you think? Is this sufficient for our vanity stone? I'm thinking maybe I need a few more corner pieces to help out, but I'm also thinking it's getting to just be pure overkill.&nbsp;</p><p><a href="https://www.oldtownhome.com/2014/4/14/Building-a-Support-System-for-Our-New-Vanity/">Read Full Post</a></p>]]></content>
    <category term="Header Image" />
    <category term="Master Bathroom" />
    <category term="Re-purpose" />
    <category term="Vanity" />
    <PostImage>https://farm8.staticflickr.com/7397/13855806634_36578f7b87.jpg</PostImage>
    <media:thumbnail url="https://farm8.staticflickr.com/7397/13855806634_36578f7b87_t.jpg" />
    <ExtensionElements>
      <Item>PostImage</Item>
      <Item>media:thumbnail</Item>
    </ExtensionElements>
  </entry>
  <entry>
    <guid>a9fda294-1c1c-4959-afe2-08866b5c0a88</guid>
    <id>https://www.oldtownhome.com/2014/2/18/How-an-Antique-Buffet-Can-Slowly-Become-a-Bathroom-Vanity/</id>
    <title>How an Antique Buffet Can (Slowly) Become a Bathroom Vanity</title>
    <summary type="html"><![CDATA[<p>We've all likely seen it in magazines, or heard of it being done from a friend or antiques dealer, or witnessed it in a friend or family members renovated bathroom, and it seems like a pretty straight forward and simple idea. The concept is one that can both save a few bucks, add a little character to a room. What am I talking about? I'm talking about taking an old low dresser, side board, or buffet and transforming it into a bathroom sink or vanity. </p><div class="MediaContainer">
<a data-pin-do="embedPin" href="http://www.pinterest.com/pin/432767845413365894/"></a>
</div><p>Really, the idea seems like it should be so easy. Just take an old vanity, cut a few holes in the top, drop a sink or two in, call it a day. Better yet, don't even bother with the old top, take it off and grab a piece of remnant marble or granite, pop in a sink, and you've got yourself a one of a kind vanity.</p><p>I have to admit, at first my mind went to the good old "Yeah, that'll be no problem." But then reality set in and I realized that pretty much anything involving retrofitting an existing piece of furniture to be something else, let alone one where you must ensure plumbing has a place to run, is an entirely new set of challenges. Sure, the Pinterest boards are alive with the look of effortless simplicity. "Here, here's a stunning before and after!" We all collectively ooh and ahh at the magnificence of the piece, like a couple of grandmas at a fireworks display. </p><div class="MediaContainer">
<a data-pin-do="embedPin" href="http://www.pinterest.com/pin/194288171397673916/"></a>
</div><p>Slap that little Pinterest price tag ribbon on the piece to add a little salt to the wound. "Wow, would you look at what someone was able to accomplish for just $150.00! Take that, $3,299 Restoration Hardware mass produced double vanity, I'm all in, and I'll raise you a bundle of character you can't possibly be dealt in your hand." Ignore the man behind the curtain and the fact the $150 tag is only talking about the faucet hardware.</p><p>Gone are the nitty gritty details, the hole necessary in the cabinet interiors that look like they were chewed by beavers, the sweat and tears no doubt shed while trying to wrestle this piece of furniture from intended purpose into the submission induced new life it's surely meant to lead.</p><div class="MediaContainer">
<a data-pin-do="embedPin" href="http://www.pinterest.com/pin/432767845413446338/"></a>
</div><p>The sad fact is that the majority of these such re-purposes, or "up cycles" as it is often called, end in wasted effort, broken dreams, or in the worst case scenarios, a pile of useless kindling created from the lethal combination if craftiness, power tools, and the haze of an Internet inspired dream. </p> <a href="https://www.oldtownhome.com/2014/2/18/How-an-Antique-Buffet-Can-Slowly-Become-a-Bathroom-Vanity/">more</a>]]></summary>
    <published>2014-02-18T10:04:00.000-05:00</published>
    <updated>2014-02-18T10:04:00.000-05:00</updated>
    <link rel="alternate" href="https://www.oldtownhome.com/2014/2/18/How-an-Antique-Buffet-Can-Slowly-Become-a-Bathroom-Vanity/" />
    <author>
      <name>Alex</name>
    </author>
    <content type="html"><![CDATA[<p>We've all likely seen it in magazines, or heard of it being done from a friend or antiques dealer, or witnessed it in a friend or family members renovated bathroom, and it seems like a pretty straight forward and simple idea. The concept is one that can both save a few bucks, add a little character to a room. What am I talking about? I'm talking about taking an old low dresser, side board, or buffet and transforming it into a bathroom sink or vanity. </p>
<div class="MediaContainer">
<a data-pin-do="embedPin" href="http://www.pinterest.com/pin/432767845413365894/"></a>
</div>
<p>Really, the idea seems like it should be so easy. Just take an old vanity, cut a few holes in the top, drop a sink or two in, call it a day. Better yet, don't even bother with the old top, take it off and grab a piece of remnant marble or granite, pop in a sink, and you've got yourself a one of a kind vanity.</p>
<p>I have to admit, at first my mind went to the good old "Yeah, that'll be no problem." But then reality set in and I realized that pretty much anything involving retrofitting an existing piece of furniture to be something else, let alone one where you must ensure plumbing has a place to run, is an entirely new set of challenges. Sure, the Pinterest boards are alive with the look of effortless simplicity. "Here, here's a stunning before and after!" We all collectively ooh and ahh at the magnificence of the piece, like a couple of grandmas at a fireworks display. </p>
<div class="MediaContainer">
<a data-pin-do="embedPin" href="http://www.pinterest.com/pin/194288171397673916/"></a>
</div>
<p>Slap that little Pinterest price tag ribbon on the piece to add a little salt to the wound. "Wow, would you look at what someone was able to accomplish for just $150.00! Take that, $3,299 Restoration Hardware mass produced double vanity, I'm all in, and I'll raise you a bundle of character you can't possibly be dealt in your hand." Ignore the man behind the curtain and the fact the $150 tag is only talking about the faucet hardware.</p>
<p>Gone are the nitty gritty details, the hole necessary in the cabinet interiors that look like they were chewed by beavers, the sweat and tears no doubt shed while trying to wrestle this piece of furniture from intended purpose into the submission induced new life it's surely meant to lead.</p>
<div class="MediaContainer">
<a data-pin-do="embedPin" href="http://www.pinterest.com/pin/432767845413446338/"></a>
</div>
<p>The sad fact is that the majority of these such re-purposes, or "up cycles" as it is often called, end in wasted effort, broken dreams, or in the worst case scenarios, a pile of useless kindling created from the lethal combination if craftiness, power tools, and the haze of an Internet inspired dream. </p>
<p>Don't worry, we've all been there, we've all done that, we should all attend support group meetings, and we should all sing songs of unrealized DIY dreams around amateur fire pits (also from "Pinsperstions") fueled by failed project scrap and poorly conceptualized glitter use. </p>
<p>Well, we want to change the score. Like a couple of scrawny kids on the playground who haven't learned their lesson from the school yard bullies, we refuse to hand over our hard earned lunch money to the likes of mass production pieces and instead and bought ourselves a "vintage" solid wood buffet that will (hopefully) one day become our bathroom vanity. </p>
<p>Rather than just present you with the ugly before and the (hopefully) beautiful after, we're going to show you the step by step journey we're taking to (hopefully) transform our purchase from a mid-century walnut buffet into a double sink marble top vanity with realistic costs for doing such a project in our area. </p>
<p>Jeesh, there sure are a lot of (hopefully)s in those last few paragraphs. But those are there because we don't know how it will actually turn our yet. We only just started the project, and we don't have all the answers. We're going to try our best, absolutely, but a little voice in my head keeps saying "I wouldn't be surprised if we're fire pitting this bad boy by spring." (Not really, but you get the idea.)</p>
<p>
</p>
<div class="MediaContainer PhotoContainer"><a href="http://farm6.staticflickr.com/5267/5668183155_e191a5ecb8_z.jpg" rel="PhotoPopup" popupheight="478" popupwidth="640" class="cboxElement"><img alt="" src="https://farm6.staticflickr.com/5267/5668183155_e191a5ecb8.jpg" width="500" height="374" style="border-width: 0px; border-style: solid;"></a></div>
<p>After purchasing the buffet, we shared its general look and our plan with you several months ago. Now that we've allowed the buffet to acclimate to our home (and a bunch of other bullcrap excuses for why a project took far too long to begin), we're tackling the first major aspects of this effort, disassembly. </p>
<p>Unlike the joys of renovation demolition, where you have no real care for the damage you do on the items you're throwing out, initial disassembly of a re-purposed piece must be done with purpose and care. In our case, our first goal of removing the top of the buffet so it could ultimately be replaced with a new piece of Carrera marble was not a simple case of a pry bar and elbow grease. </p>
<p>
</p>
<div class="MediaContainer PhotoContainer"><a href="http://farm4.staticflickr.com/3718/12206521524_a80a457681_z.jpg" rel="PhotoPopup" popupheight="480" popupwidth="640" class="cboxElement"><img alt="" src="https://farm4.staticflickr.com/3718/12206521524_a80a457681.jpg" width="500" height="375" style="border-width: 0px; border-style: solid;"></a></div>
<p>Instead, we had to remove the drawers, shelves, and reinforcing backing piece (you know, the thing that comes with all the Ikea stuff that you're supposed to hammer on with the included nails but never actually do because you're too lazy, always bend the nails, and don't want to make so much noise). After carefully removing all of the nails and setting then aside, the backer piece of compressed board came right off. </p>
<p>
</p>
<div class="MediaContainer PhotoContainer"><a href="http://farm6.staticflickr.com/5528/12235136946_6f3cbc59bd_z.jpg" rel="PhotoPopup" popupheight="480" popupwidth="640" class="cboxElement"><img alt="" src="https://farm6.staticflickr.com/5528/12235136946_6f3cbc59bd.jpg" width="500" height="375" style="border-width: 0px; border-style: solid;"></a></div>
<p>With the backing removed, we finally had access to all of the screws used to secure the buffet top to the base. After removing the screws, we received our first major stroke of luck, the top hadn't been glued to the base, so it removed very easily. </p>
<p>
</p>
<div class="MediaContainer PhotoContainer"><a href="http://farm3.staticflickr.com/2869/12236648076_c47732e65c_z.jpg" rel="PhotoPopup" popupheight="480" popupwidth="640" class="cboxElement"><img alt="" src="https://farm3.staticflickr.com/2869/12236648076_c47732e65c.jpg" width="500" height="375" style="border-width: 0px; border-style: solid;"></a></div>
<p>As is customary in projects like these, any bit of luck is typically followed by a torrent, or at least a trickle, of misfortune. In our case, it came in the form of structure, or more specifically, the lack of structure. </p>
<p>Any piece of furniture that hopes to one day support a piece of stone as its surface must possess a solid and sturdy base, capable of supporting the stone on all edges and through potential points of weakness. Our buffet was only ever meant to hold a wood top, so the structure needed simply wasn't included in the original construction. </p>
<p>To add insult to injury, the pieces of wood already there had began sagging over the years, almost ensuring a day one crack if we were to ever set a piece of stone in place. </p>
<p>To remedy this issue, we had to perform some additional surgery, removing various pieces of the vanity's support pieces in an effort to ultimately sure up the structure of the vanity's top to support our choice of stone. </p>
<p>
</p>
<div class="MediaContainer PhotoContainer"><a href="http://farm6.staticflickr.com/5537/12237752583_7d52f07239_z.jpg" rel="PhotoPopup" popupheight="480" popupwidth="640" class="cboxElement"><img alt="" src="https://farm6.staticflickr.com/5537/12237752583_7d52f07239.jpg" width="500" height="375" style="border-width: 0px; border-style: solid;"></a></div>
<p>At this point in the project we've paused and I've begun obsessing about how best to tackle this item. We don't have the sinks that will ultimately grace this piece of furniture, and that's throwing a wrench into my plans. Without the sinks and their actual dimensions we can't calculate exactly where we can put support elements and where we need to leave room for the bowls. Our plan is to use two undermount sinks for this project. To us, these sinks look better, but they definitely add difficulty over using vessel sinks.</p>
<p>
</p>
<div class="MediaContainer PhotoContainer"><a href="http://farm4.staticflickr.com/3830/12613721223_8c5fcef1cc.jpg" rel="PhotoPopup" popupheight="263" popupwidth="400" class="cboxElement"><img alt="" src="https://farm4.staticflickr.com/3830/12613721223_8c5fcef1cc.jpg" width="400" height="263" style="border-width: 0px; border-style: solid;"></a></div>
<p>So we're sink shopping and support structure planning, all while hoping beyond all hope that this project actually works out. But this is the Internet, and the Internet loves a good crash and burn as much as a success story, perhaps even more, so we hope you'll follow along to see how this aspect of our overall bathroom project works out. As of now, your guess is as good as ours.  </p>
<p>Oh, and let's not forget about the debate that's been ongoing for quite some time about "The Balls." More specifically, should they stay or should they go, now? If they stay there could be trouble (with Wendy). But if they go there could be double (with a torn up vanity). So the answer we need to know...should they stay or should they go?</p>
<p>
</p>
<div class="MediaContainer PhotoContainer"><a href="http://farm6.staticflickr.com/5550/12238154805_7b135e90ae_z.jpg" rel="PhotoPopup" popupheight="640" popupwidth="480" class="cboxElement"><img alt="" src="https://farm6.staticflickr.com/5550/12238154805_7b135e90ae.jpg" width="375" height="500" style="border-width: 0px; border-style: solid;"></a></div>
<p>Have you ever done one of these retrofits? Have any tips or helpful hints that might make our lives easier? I'd love to hear your re-purpose war stories. And what are your thoughts on "The Balls?"</p><p><a href="https://www.oldtownhome.com/2014/2/18/How-an-Antique-Buffet-Can-Slowly-Become-a-Bathroom-Vanity/">Read Full Post</a></p>]]></content>
    <category term="Header Image" />
    <category term="Master Bathroom" />
    <category term="Re-purpose" />
    <PostImage>http://farm8.staticflickr.com/7381/12614774314_f841b41385.jpg</PostImage>
    <media:thumbnail url="https://farm8.staticflickr.com/7381/12614774314_f841b41385_t.jpg" />
    <ExtensionElements>
      <Item>PostImage</Item>
      <Item>media:thumbnail</Item>
    </ExtensionElements>
  </entry>
  <entry>
    <guid>6f476eab-96c9-48db-8215-2f20e3c9bc38</guid>
    <id>https://www.oldtownhome.com/2012/3/12/Pinterest-Challenge-Breathing-New-Life-Into-Empty-Wine-Bottles/</id>
    <title>Pinterest Challenge: Breathing New Life Into Empty Wine Bottles</title>
    <summary type="html"><![CDATA[<p>If you're a regular around here, a friend or family member of ours, or have a vague sense of who I am, you know that I love wine. Hmm, love might not be a strong enough word. Maybe LOVE is better. We've expressed this affinity towards wine (and the Napa Valley wine country) through a series of posts.</p>
<ul>
    <li><a href="http://oldtownhome.com/2011/6/8/Let-There-Be-Light-Wine-Barrel-Turned-Candle-Holder/index.aspx">How To Make a Wine Barrel Stave Candle Holder</a>&nbsp;</li>
    <li><a href="http://oldtownhome.com/napa-valley-itinerary/index.aspx">The Perfect Napa Valley Vacation Itinerary</a></li>
    <li><a href="http://www.oldtownhome.com/2011/7/8/Old-Town-Alexandria-Wishful-Thinking-or-is-it-Beginning-to-Look-a-Lot-Like-Napa-Valley-Part-1/index.aspx">Old Town Alexandria is Starting to Look Like Napa</a>&nbsp;</li>
</ul>
<p>Well, we're back at it, but this time we're doing it in the name of the <a href="http://www.younghouselove.com/2012/03/can-you-smell-that-smell/" target="_blank">Pinterest Challenge</a>.</p>
<p>If you're not familiar, the <a href="http://www.younghouselove.com/2012/03/can-you-smell-that-smell/" target="_blank">Pinterest Challenge</a> is being hosted by Sherri &amp; John at <a href="http://www.younghouselove.com/" target="_blank">Young House Love</a>,&nbsp;Katie at <a href="http://www.bowerpowerblog.com/" target="_blank">BowerPower</a>, Erin at <a href="http://hisugarplum.blogspot.com/" target="_blank">Hi Sugarplum</a>, and Cassie at the <a href="http://tatumgreatindoors.blogspot.com/" target="_blank">Great Indoors</a>. The goal is simple -- take something you've pinned that you find inspirational, do your own version, and put your own spin on it. Easy enough, right? Well, have you see how many cool and inspirational things there are on <a href="http://www.pinterest.com" target="_blank">Pinterest</a>? Just picking one thing to make might actually be the hardest thing about the challenge.&nbsp;</p>
<p>
</p>
<div class="MediaContainer PhotoContainer"><a href="http://farm8.staticflickr.com/7209/6829921988_85fdff39fc.jpg" rel="PhotoPopup" popupheight="187" popupwidth="500"><img alt="" src="https://farm8.staticflickr.com/7209/6829921988_85fdff39fc_m.jpg" width="240" height="90" style="border-width: 0px;border-style: solid;"></a></div>
<p>Over the past few months I've been pinning things with a wine bar/wine country feel to it on a pin board called "<a href="http://pinterest.com/oldtownhome/cheers/" target="_blank">Cheers</a>". (If you're not already <a href="http://pinterest.com/oldtownhome/" target="_blank">following us on Pinterest,</a> what are you waiting for? <a href="http://pinterest.com/oldtownhome/" target="_blank">We have a ton of cool stuff we've shared.</a>) It's my dream to have a functional and cool wine bar to entertain people and share a little wine with some friends. During my Pinterest&nbsp;perusing, one of the things that repeatedly caught my eye was the creative use of empty wine bottles.</p>
<p>
</p>
<div class="MediaContainer PhotoContainer"><a href="http://farm8.staticflickr.com/7063/6830017048_183bd2069b_z.jpg" rel="PhotoPopup" popupheight="640" popupwidth="613"><img alt="" src="https://farm8.staticflickr.com/7063/6830017048_183bd2069b.jpg" width="479" height="500" style="border-width: 0px;border-style: solid;"></a><br>
<em><a href="http://pinterest.com/pin/275352964687173488/" target="_blank">Link to original Pin</a></em></div>
<p>In my opinion, wine bottles are quite elegant as far as containers go. Their shape, color, size, and look evoke memories of vacations, celebrations, fun times of the past, and good times to come. But after they're spent, I always feel a little bad throwing them in the recycling bin, especially the special bottles whose corks were popped for celebratory reasons.</p>
<p>
</p>
<div class="MediaContainer PhotoContainer"><a href="http://farm8.staticflickr.com/7066/6830017100_7a35bcf1c6_z.jpg" rel="PhotoPopup" popupheight="640" popupwidth="613"><img alt="" src="https://farm8.staticflickr.com/7066/6830017100_7a35bcf1c6.jpg" width="479" height="500" style="border-width: 0px;border-style: solid;"></a><br>
<em><a href="http://pinterest.com/pin/275352964687173484/" target="_blank">Link to original Pin</a></em></div>
<p>Though I absolutely loved the bottles I saw on Pinterest, and love love love the majority of the things in the Napa Style catalog (and I also love chef Michael Chiarello, but that's a different story), there were two major issues. The following pinned photo is originally from the <a href="http://www.napastyle.com/catalog/product.jsp?productId=4183" target="_blank">catalog pages of Napa Style</a>.</p>
<p></p></img></img></img> <a href="https://www.oldtownhome.com/2012/3/12/Pinterest-Challenge-Breathing-New-Life-Into-Empty-Wine-Bottles/">more</a>]]></summary>
    <published>2012-03-12T11:41:00.000-04:00</published>
    <updated>2012-03-12T11:41:00.000-04:00</updated>
    <link rel="alternate" href="https://www.oldtownhome.com/2012/3/12/Pinterest-Challenge-Breathing-New-Life-Into-Empty-Wine-Bottles/" />
    <author>
      <name>Wendy</name>
    </author>
    <content type="html"><![CDATA[<p>If you're a regular around here, a friend or family member of ours, or have a vague sense of who I am, you know that I love wine. Hmm, love might not be a strong enough word. Maybe LOVE is better. We've expressed this affinity towards wine (and the Napa Valley wine country) through a series of posts.</p>
<ul>
    <li><a href="http://oldtownhome.com/2011/6/8/Let-There-Be-Light-Wine-Barrel-Turned-Candle-Holder/index.aspx">How To Make a Wine Barrel Stave Candle Holder</a>&nbsp;</li>
    <li><a href="http://oldtownhome.com/napa-valley-itinerary/index.aspx">The Perfect Napa Valley Vacation Itinerary</a></li>
    <li><a href="http://www.oldtownhome.com/2011/7/8/Old-Town-Alexandria-Wishful-Thinking-or-is-it-Beginning-to-Look-a-Lot-Like-Napa-Valley-Part-1/index.aspx">Old Town Alexandria is Starting to Look Like Napa</a>&nbsp;</li>
</ul>
<p>Well, we're back at it, but this time we're doing it in the name of the <a href="http://www.younghouselove.com/2012/03/can-you-smell-that-smell/" target="_blank">Pinterest Challenge</a>.</p>
<p>If you're not familiar, the <a href="http://www.younghouselove.com/2012/03/can-you-smell-that-smell/" target="_blank">Pinterest Challenge</a> is being hosted by Sherri &amp; John at <a href="http://www.younghouselove.com/" target="_blank">Young House Love</a>,&nbsp;Katie at <a href="http://www.bowerpowerblog.com/" target="_blank">BowerPower</a>, Erin at <a href="http://hisugarplum.blogspot.com/" target="_blank">Hi Sugarplum</a>, and Cassie at the <a href="http://tatumgreatindoors.blogspot.com/" target="_blank">Great Indoors</a>. The goal is simple -- take something you've pinned that you find inspirational, do your own version, and put your own spin on it. Easy enough, right? Well, have you see how many cool and inspirational things there are on <a href="http://www.pinterest.com" target="_blank">Pinterest</a>? Just picking one thing to make might actually be the hardest thing about the challenge.&nbsp;</p>
<p>
</p>
<div class="MediaContainer PhotoContainer"><a href="http://farm8.staticflickr.com/7209/6829921988_85fdff39fc.jpg" rel="PhotoPopup" popupheight="187" popupwidth="500"><img alt="" src="https://farm8.staticflickr.com/7209/6829921988_85fdff39fc_m.jpg" width="240" height="90" style="border-width: 0px;border-style: solid;"></a></div>
<p>Over the past few months I've been pinning things with a wine bar/wine country feel to it on a pin board called "<a href="http://pinterest.com/oldtownhome/cheers/" target="_blank">Cheers</a>". (If you're not already <a href="http://pinterest.com/oldtownhome/" target="_blank">following us on Pinterest,</a> what are you waiting for? <a href="http://pinterest.com/oldtownhome/" target="_blank">We have a ton of cool stuff we've shared.</a>) It's my dream to have a functional and cool wine bar to entertain people and share a little wine with some friends. During my Pinterest&nbsp;perusing, one of the things that repeatedly caught my eye was the creative use of empty wine bottles.</p>
<p>
</p>
<div class="MediaContainer PhotoContainer"><a href="http://farm8.staticflickr.com/7063/6830017048_183bd2069b_z.jpg" rel="PhotoPopup" popupheight="640" popupwidth="613"><img alt="" src="https://farm8.staticflickr.com/7063/6830017048_183bd2069b.jpg" width="479" height="500" style="border-width: 0px;border-style: solid;"></a><br>
<em><a href="http://pinterest.com/pin/275352964687173488/" target="_blank">Link to original Pin</a></em></div>
<p>In my opinion, wine bottles are quite elegant as far as containers go. Their shape, color, size, and look evoke memories of vacations, celebrations, fun times of the past, and good times to come. But after they're spent, I always feel a little bad throwing them in the recycling bin, especially the special bottles whose corks were popped for celebratory reasons.</p>
<p>
</p>
<div class="MediaContainer PhotoContainer"><a href="http://farm8.staticflickr.com/7066/6830017100_7a35bcf1c6_z.jpg" rel="PhotoPopup" popupheight="640" popupwidth="613"><img alt="" src="https://farm8.staticflickr.com/7066/6830017100_7a35bcf1c6.jpg" width="479" height="500" style="border-width: 0px;border-style: solid;"></a><br>
<em><a href="http://pinterest.com/pin/275352964687173484/" target="_blank">Link to original Pin</a></em></div>
<p>Though I absolutely loved the bottles I saw on Pinterest, and love love love the majority of the things in the Napa Style catalog (and I also love chef Michael Chiarello, but that's a different story), there were two major issues. The following pinned photo is originally from the <a href="http://www.napastyle.com/catalog/product.jsp?productId=4183" target="_blank">catalog pages of Napa Style</a>.</p>
<p></p>
<p>
</p>
<div class="MediaContainer PhotoContainer"><a href="http://farm8.staticflickr.com/7196/6830017162_d81e5928de_z.jpg" rel="PhotoPopup" popupheight="640" popupwidth="528"><img alt="" src="https://farm8.staticflickr.com/7196/6830017162_d81e5928de.jpg" width="412" height="500" style="border-width: 0px;border-style: solid;"></a><br>
<a href="http://pinterest.com/pin/275352964687173487/" target="_blank"><em>Link to original Pin</em></a></div>
<p>The first, size. The bottles Napa Style is selling start at the three liter sizes and go all the way up to six liters. Six! Our house is tiny, I can't imagine where a giant bottle like that would even fit without looking ridiculous.</p>
<p>The second issue is price. Starting at $99 and topping out at $249, these bottles, though very pretty, are well outside of my price range for used bottles. Call me crazy, but my preference on price is "free" or perhaps $0.05 cents in Michigan.</p>
<p>Rather than order large and expensive bottles, we set out to turn a few of our own smaller wine bottles into creative candle holders that could adorn our future wine bar or our outside entertaining area.</p>
<p>We started our project with two bottles, one standard 750ml wine bottle and one 750ml sparkling wine (champagne style) bottle. The goal was simple -- cut the bottom of the bottle off without shattering it into pieces and&nbsp;maiming&nbsp;ourselves. Though the bottles were full, we took it upon ourselves to drink them...in the name and spirit of the Pinterest Challenge.&nbsp;</p>
<p>
</p>
<div class="MediaContainer PhotoContainer"><a href="http://farm8.staticflickr.com/7201/6975104737_126cec3c2f_z.jpg" rel="PhotoPopup" popupheight="640" popupwidth="480"><img alt="" src="https://farm8.staticflickr.com/7201/6975104737_126cec3c2f.jpg" width="375" height="500" style="border-width: 0px;border-style: solid;"></a></div>
<p>We had seen methods to cut bottles that included everything from scoring the bottles with a glass cutter to heating them with a blow torch and dipping them into a cold bucket of water, but all seemed less than exact and a little dangerous. For our project we decided to give the good ole wet saw a try. We did quite a bit of looking online but couldn't find&nbsp;definitive&nbsp;proof that a wet saw would do the job we wanted it to, so we figured we should figure it for ourselves.</p>
<p>The fist step was to set the fence on the wet saw to give us a good guide to rest the bottom of the bottle on. Our approach was to begin cutting the bottle and then slowly rotate it into the blade. The blade would take a little bit at a time from the bottle until it just dropped off...or at least that was the plan.&nbsp;</p>
<p>
</p>
<div class="MediaContainer PhotoContainer"><a href="http://farm8.staticflickr.com/7194/6828916438_0de720fe00_z.jpg" rel="PhotoPopup" popupheight="480" popupwidth="640"><img alt="" src="https://farm8.staticflickr.com/7194/6828916438_0de720fe00.jpg" width="500" height="375" style="border-width: 0px;border-style: solid;"></a></div>
<p>I love it when a plan comes together. It was a success, and at long last, here's the actual video evidence that it is possible to use a standard wet tile saw to cut a glass wine bottle.</p>
<p>
</p>
<div class="MediaContainer VideoEmbed"><iframe width="560" height="349" src="http://www.youtube.com/embed/AQf9cZSD5Pc?wmode=transparent&amp;hd=1" frameborder="0" allowfullscreen="true"></iframe></div>
<p>I hope it goes without saying, but be sure to wear your eye protection when working with tools like this.</p>
<p>As you can see, you just need to take it slowly, rotate the bottle as evenly as possible, and you can easily remove the bottom from a wine bottle. Once the bottom is cut free, there's going to be a good amount of glass residue still inside the bottle. Using a bucket of water, simply rinse out the inside of the bottle so you don't end up getting any glass pieces on your hands.</p>
<p>
</p>
<div class="MediaContainer PhotoContainer"><a href="http://farm8.staticflickr.com/7204/6828909606_7890864bde_z.jpg" rel="PhotoPopup" popupheight="640" popupwidth="480"><img alt="" src="https://farm8.staticflickr.com/7204/6828909606_7890864bde.jpg" width="375" height="500" style="border-width: 0px;border-style: solid;"></a></div>
<p>Because of the shape of the bottle there was a small bit of a glass bump left on the cut line. We used a tile file to shave it down a bit and were left with a nice and smooth cut line that wasn't sharp or dangerous.</p>
<p>
</p>
<div class="MediaContainer PhotoContainer"><a href="http://farm8.staticflickr.com/7183/6975027599_70afc672d0_z.jpg" rel="PhotoPopup" popupheight="640" popupwidth="480"><img alt="" src="https://farm8.staticflickr.com/7183/6975027599_70afc672d0.jpg" width="375" height="500" style="border-width: 0px;border-style: solid;"></a></div>
<p>Next we let the bottles soak in the bucket of water in order to loosen the labels.&nbsp;</p>
<p>
</p>
<div class="MediaContainer PhotoContainer"><a href="http://farm8.staticflickr.com/7046/6828900712_9085ec4dd2_z.jpg" rel="PhotoPopup" popupheight="640" popupwidth="480"><img alt="" src="https://farm8.staticflickr.com/7046/6828900712_9085ec4dd2.jpg" width="375" height="500" style="border-width: 0px;border-style: solid;"></a></div>
<p>After a quick wash and thorough dry, we were in business.&nbsp;</p>
<p>
</p>
<div class="MediaContainer PhotoContainer"><a href="http://farm8.staticflickr.com/7203/6975023477_be1b8f2102_z.jpg" rel="PhotoPopup" popupheight="640" popupwidth="480"><img alt="" src="https://farm8.staticflickr.com/7203/6975023477_be1b8f2102.jpg" width="375" height="500" style="border-width: 0px;border-style: solid;"></a></div>
<p>With our bottles ready, we set them on our dining room buffet with small candles.</p>
<p>
</p>
<div class="MediaContainer PhotoContainer"><a href="http://farm8.staticflickr.com/7210/6975298413_f7a84047d7_z.jpg" rel="PhotoPopup" popupheight="640" popupwidth="427"><img alt="" src="https://farm8.staticflickr.com/7210/6975298413_f7a84047d7.jpg" width="333" height="500" style="border-width: 0px;border-style: solid;"></a></div>
<p>We breathed a sigh of relief, figuring that the hard part was over and now all we had to do is set the bottles over the candles.</p>
<p>
</p>
<div class="MediaContainer PhotoContainer"><a href="http://farm8.staticflickr.com/7060/6829174976_bf4d6c4cc8_z.jpg" rel="PhotoPopup" popupheight="640" popupwidth="427"><img alt="" src="https://farm8.staticflickr.com/7060/6829174976_bf4d6c4cc8.jpg" width="333" height="500" style="border-width: 0px;border-style: solid;"></a></div>
<p>Wait a second, not so fast.</p>
<p>After lighting the candles and putting the bottles over them we hit our first small speed bump with the project. To this point we've only seen this type of thing with much larger format bottles, like the 3+ liter bottles. It seems the necks on the large format bottles are large enough to let the heat of the flames out while allowing fresh air in for the flame (remember, fire needs oxygen). However, these 750ml bottles have a bit more difficult time letting the candle breathe, causing the flame to go out after about 30 seconds.</p>
<p>
</p>
<div class="MediaContainer PhotoContainer"><a href="http://farm8.staticflickr.com/7203/6975301481_e0a3aac0c1_z.jpg" rel="PhotoPopup" popupheight="640" popupwidth="427"><img alt="" src="https://farm8.staticflickr.com/7203/6975301481_e0a3aac0c1.jpg" width="333" height="500" style="border-width: 0px;border-style: solid;"></a></div>
<p>We solved this by allowing the back of the bottle to sit just off of a coaster it was sitting on, allowing air to circulate. Once this was done the candles stayed lit without issue. I also think this will work well on our slatted outdoor table, or in a garden where the ground the bottle is sitting on is uneven.</p>
<p>
</p>
<div class="MediaContainer PhotoContainer"><a href="http://farm8.staticflickr.com/7200/6829177744_f974d1d061_z.jpg" rel="PhotoPopup" popupheight="640" popupwidth="427"><img alt="" src="https://farm8.staticflickr.com/7200/6829177744_f974d1d061.jpg" width="333" height="500" style="border-width: 0px;border-style: solid;"></a></div>
<p>You don't need much of an air gap at all to make it work. Making a quick and easy base with two pieces of 1/4" thick wood will also solve the problem. It would elevate the bottle enough and allow air in between the two pieces of material.</p>
<p>These bottles will also make excellent candle holders outdoors on breezy nights, the flame fully protected from the weather to ensure it won't go out.&nbsp;</p>
<p>
</p>
<div class="MediaContainer PhotoContainer"><a href="http://farm8.staticflickr.com/7197/6829180370_7a43d8ee2d_z.jpg" rel="PhotoPopup" popupheight="640" popupwidth="427"><img alt="" src="https://farm8.staticflickr.com/7197/6829180370_7a43d8ee2d.jpg" width="333" height="500" style="border-width: 0px;border-style: solid;"></a></div>
<p>One final step we took to put our little twist on the project was to personalize the bottles using a Posterpaint Sharpie. Depending on the occasion, you could write a message on the bottles.</p>
<p>
</p>
<div class="MediaContainer PhotoContainer"><a href="http://farm8.staticflickr.com/7055/6828898118_422e821cf3_z.jpg" rel="PhotoPopup" popupheight="640" popupwidth="480"><img alt="" src="https://farm8.staticflickr.com/7055/6828898118_422e821cf3.jpg" width="375" height="500" style="border-width: 0px;border-style: solid;"></a></div>
<p>These can be anything from wine inspired greetings to a note about a celebration associated with the given bottle. You can use them to denote what is being served from a table, as seating cards, or just as a way to spice up a gathering. And best of all, you can wipe the messages off and alter them to your heart's content.</p>
<p>
</p>
<div class="MediaContainer PhotoContainer"><a href="http://farm8.staticflickr.com/7180/6975306527_c0078407dd_z.jpg" rel="PhotoPopup" popupheight="640" popupwidth="427"><img alt="" src="https://farm8.staticflickr.com/7180/6975306527_c0078407dd.jpg" width="333" height="500" style="border-width: 0px;border-style: solid;"></a></div>
<p>So there you have it, our Pinterest and <a href="http://www.napastyle.com/" target="_blank">Napa Style</a> inspired "wine bottle candle holders." Overall, a project that was not too difficult, quite inexpensive (I'll actually go ahead and say "Free" since we already had all items on hand), and one that will work well for a variety of events and settings. I just can't wait until the weather starts to get nice and we can have people over for a wine evening in our garden. Maybe we'll make a large collection of these candle holders in various sizes and colors and decorate our back yard and patio with them. I'm not sure what I like better, the end result or the journey to consume the necessary amount of wine to make the project a reality. &nbsp;</p>
<p>And in case you're wondering, the wet saw does a pretty good job of cutting, but it doesn't leave a nice and finished edge (at least not with our blade). So you really couldn't use it to create wine bottle drinking glasses without a bit of grinding and polishing.</p>
<p>So what do you think of our wine bottle candle holders? Not too shabby of a little project. And best of all, we're reusing something that would otherwise be a recyclable!&nbsp;</p>
<p>Are you currently inspired by anything on Pinterest that you absolutely need to try for yourself? Maybe you're even taking part in this very same Pinterest Challenge? Share some of your ideas and likes with us, we'd love to see what you're working on.</p><p><a href="https://www.oldtownhome.com/2012/3/12/Pinterest-Challenge-Breathing-New-Life-Into-Empty-Wine-Bottles/">Read Full Post</a></p>]]></content>
    <category term="Header Image" />
    <category term="Napa Valley" />
    <category term="Pinterest Challenge" />
    <category term="Projects:Crafts" />
    <category term="Re-purpose" />
    <category term="Trash to Treasure" />
    <PostImage>http://farm8.staticflickr.com/7204/6830158246_3f8fc63d9d.jpg</PostImage>
    <media:thumbnail url="https://farm8.staticflickr.com/7204/6830158246_3f8fc63d9d_t.jpg" />
    <ExtensionElements>
      <Item>PostImage</Item>
      <Item>media:thumbnail</Item>
    </ExtensionElements>
  </entry>
  <entry>
    <guid>817d9370-e964-4ff2-8cd7-b9564976adee</guid>
    <id>https://www.oldtownhome.com/2011/6/9/Who-Says-You-Need-an-SUV-Renovating-with-an-Old-Sports-Car/</id>
    <title>Who Says You Need an SUV? Renovating with an (Old) Sports Car</title>
    <summary type="html"><![CDATA[<p>When we talk to people about our&nbsp;renovation projects, we often find that most assume Wendy and I have&nbsp;multiple&nbsp;cars and at least one SUV or pickup truck. To most, that's the only logical way we could possibly transport and haul the various construction-related items needed to complete&nbsp;our projects. But in reality, that couldn't be further from the truth.</p>
<p>In fact, we drive a 2000 Ford Mustang GT, purchased new back in May 2000.&nbsp;Our Mustang, who we lovingly refer to as "The Pone" (short for pony), has become our renovating family's hauling workhorse. Last month marked the 11th anniversary of my purchase of the car, which has just shy of 77,000 miles on it. When people learn that we have renovated our house for eight years while driving a small, eleven year old sports car, they often wonder how we do it.</p>
<div class="MediaContainer PhotoContainer"><a href="http://farm4.static.flickr.com/3555/5749525258_c196060d6f_z.jpg" rel="PhotoPopup" popupwidth="640" popupheight="478"><img alt="" width="500" height="374" style="border:0px solid;" src="https://farm4.static.flickr.com/3555/5749525258_c196060d6f.jpg"></a></div>
<p>Really, it's been far less difficult than most people realize.</p>
<p></p></img> <a href="https://www.oldtownhome.com/2011/6/9/Who-Says-You-Need-an-SUV-Renovating-with-an-Old-Sports-Car/">more</a>]]></summary>
    <published>2011-06-09T09:05:00.000-04:00</published>
    <updated>2011-06-09T09:05:00.000-04:00</updated>
    <link rel="alternate" href="https://www.oldtownhome.com/2011/6/9/Who-Says-You-Need-an-SUV-Renovating-with-an-Old-Sports-Car/" />
    <author>
      <name>Alex</name>
    </author>
    <content type="html"><![CDATA[<p>When we talk to people about our&nbsp;renovation projects, we often find that most assume Wendy and I have&nbsp;multiple&nbsp;cars and at least one SUV or pickup truck. To most, that's the only logical way we could possibly transport and haul the various construction-related items needed to complete&nbsp;our projects. But in reality, that couldn't be further from the truth.</p>
<p>In fact, we drive a 2000 Ford Mustang GT, purchased new back in May 2000.&nbsp;Our Mustang, who we lovingly refer to as "The Pone" (short for pony), has become our renovating family's hauling workhorse. Last month marked the 11th anniversary of my purchase of the car, which has just shy of 77,000 miles on it. When people learn that we have renovated our house for eight years while driving a small, eleven year old sports car, they often wonder how we do it.</p>
<div class="MediaContainer PhotoContainer"><a href="http://farm4.static.flickr.com/3555/5749525258_c196060d6f_z.jpg" rel="PhotoPopup" popupwidth="640" popupheight="478"><img alt="" width="500" height="374" style="border:0px solid;" src="https://farm4.static.flickr.com/3555/5749525258_c196060d6f.jpg"></a></div>
<p>Really, it's been far less difficult than most people realize.</p>
<p></p>
<p>Wendy and I grew up in the suburbs on the west side of Cleveland. We come from the land where a family can't exist without at least two cars. SUVs and minivans dominate the landscape, and soccer moms require the space and size that Suburbans afford to haul their various cargo. Your car is such a significant aspect of your identity that adolescent males know one another by the car that they drive. Back in the day, we had no concern over parking or gas, and everyone seemed to have a three car garage. We really only cared how cool or fast our car was.&nbsp;</p>
<p>In retrospect, my car purchase just a few weeks after college graduation seems a little odd to me. I sold my first car, my super hella awesome 1994 Probe GT that I loved, to one of my college friends and started shopping for a new car. I knew that Wendy and I were moving to an apartment in the D.C. area at the end of the summer, so I decided I could get a completely&nbsp;impractical&nbsp;car. Besides, I <em>needed</em> a muscle car, you know, for my identity. I figured that if we needed a practical car, that could be on Wendy. So I went ahead and bought the Mustang.</p>
<p>Shortly after moving into our apartment, I quickly realized I wouldn't be driving into work, but rather taking the bus and metro into the city. Given where we grew up, this was a foreign concept to me. I actually didn't drive my car into work for the first time until we had lived here for over five years. Wendy is the one that drove the most, taking the car to work every day in Alexandria, about nine miles round trip per day. Thus began our single car household life.</p>
<p>We&nbsp;purchased&nbsp;our home in January 2003 and made the last payment on our car just four months later. Our home has a single off-street parking spot assigned to it, which luckily is the perfect fit for our car. Additionally, after we bought our house money was very tight, so we decided we would need to make our car work for all of our renovations, at least for the foreseeable future. It was and still is&nbsp;nice to not have a car payment.</p>
<p>Amazingly, we learned that you can fit a tremendous amount of stuff into the backseat and trunk of a Mustang. With the seats folded down you can fit about one dozen 8' 2x4s, 8 bags of mulch or soil, several five gallon buckets or large bags of joint compound, a couple of 10' lengths of PVC or copper plumbing, two very large cast iron urn planters, or even a seven foot tall Christmas tree.</p>
<p>&nbsp;</p>
<div class="MediaContainer PhotoContainer"><a href="http://farm6.static.flickr.com/5029/5678255292_2b5d1dab73_z.jpg" rel="PhotoPopup" popupwidth="640" popupheight="478"><img alt="" width="500" height="374" style="border:0px solid;" src="https://farm6.static.flickr.com/5029/5678255292_2b5d1dab73.jpg"></a></div>
<p>Occasionally, there comes a time when we need to purchase something a bit bigger than our Mustang can handle. When this occurs, we have several viable options in the area. </p>
<p><strong>1. ZipCar</strong></p>
<p>I've been a member of <a href="http://www.zipcar.com" target="_blank">ZipCar</a> for several years now. Their tagline of "Wheels When You Need Them" is spot on. It is an affordable and convenient way to get the car you need when the car you have won't do. We used their pickup trucks to carry tempered shower glass doors, their mid sized car to pickup a television, and other cars when we know our car just can't make it in the snow.</p>
<p><strong>2. Home Depot or Lowes Truck Rentals</strong></p>
<p>Both Home Depot and Lowes offer a large truck rental program for $25 per hour. We've used them in the past for larger items, like 4x8 sheets of drywall or molding. Often when we rent from them, we'll coordinate another item that we need the truck for to kill two birds with one stone. For example, we used one of these trucks to pickup an old clawfoot bathtub, and another time to haul away about 50 bags of trash and debris to a landfill.&nbsp;</p>
<p><strong>3. Friends and Neighbors</strong></p>
<p>We have some of the best friends and neighbors anyone could ever hope for, and many of them have trucks or SUVs and are glad to help. We've borrowed their cars to pickup plywood, furniture, and other large items. We're very lucky to live in such a great neighborhood.</p>
<p><strong>4. Deliveries</strong></p>
<p>From time to time, the items we need can be ordered from the Internet or from local suppliers that offer free or low cost deliveries. We've used this for items like a large quantity siding purchase, new copper gutters&nbsp;and downspout,&nbsp;and for cherry lumber to build our office desk.</p>
<p>As you can see, there are plenty of options for us beyond our own car.</p>
<p>Now that our car is getting up there in age, we've starting to casually look for a new car. I'm trying to convince Wendy that we should get an SUV, but I really can't use the justification that we need the room for our renovation, as we've already proven that this isn't the case. This is more just a personal preference for cars than anything else. If there is one thing we are looking for, our new car should get at least a little better fuel mileage than the 17 MPG we're used to. Though, 17 MPG when you drive less than 7,000 miles per year really isn't that bad. But until we replace our car, this is how I can make trips back from the hardware store.</p>
<div class="MediaContainer VideoEmbed"><iframe width="560" height="349" src="http://www.youtube.com/embed/VT_X9PmKSis?wmode=transparent&amp;start=6" frameborder="0" allowfullscreen="true"></iframe></div>
<p>We're actually quite proud of the fact that we've made it through eight plus years of renovation using a car that is meant more for speed&nbsp;demons&nbsp;and mid life crisis mobiles than that of DIY renovators. Friends have used us as an example to the contrary when people give reasons why they absolutely need an SUV. </p>
<p>When the time comes to part ways with The Pone, it will be the end of an era for us, and something that we will surely miss. But one thing is for sure, we've embraced the single car family idea whole heartedly and have no plans to change that. We've also learned that, given the circumstances, you can make just about any car work in a renovation.</p>
<div class="MediaContainer PhotoContainer"><a href="http://farm3.static.flickr.com/2641/5749080487_82b1f7e431_z.jpg" rel="PhotoPopup" popupwidth="640" popupheight="478"><img alt="" width="500" height="374" style="border:0px solid;" src="https://farm3.static.flickr.com/2641/5749080487_82b1f7e431.jpg"></a></div>
<p>Do you have a surprising vehicle choice for your home or renovation? Perhaps a good recommendation&nbsp;for the car we should purchase next? If so, please share.</p><p><a href="https://www.oldtownhome.com/2011/6/9/Who-Says-You-Need-an-SUV-Renovating-with-an-Old-Sports-Car/">Read Full Post</a></p>]]></content>
    <category term="City Living" />
    <category term="Re-purpose" />
    <PostImage>http://farm3.static.flickr.com/2444/5814636913_a3e5b0bcf1.jpg</PostImage>
    <media:thumbnail url="https://farm3.static.flickr.com/2444/5814636913_a3e5b0bcf1_t.jpg" />
    <ExtensionElements>
      <Item>PostImage</Item>
      <Item>media:thumbnail</Item>
    </ExtensionElements>
  </entry>
  <entry>
    <guid>ec6c5533-af62-468e-adfb-2a75c562cdbc</guid>
    <id>https://www.oldtownhome.com/2011/6/8/Let-There-Be-Light-Wine-Barrel-Turned-Candle-Holder/</id>
    <title>Let There Be Light: Wine Barrel Turned Candle Holder</title>
    <summary type="html"><![CDATA[<p>Yesterday, <a href="http://www.centsationalgirl.com/2011/06/wine-barrels-in-home-decor/" target="_blank">Centsational Girl</a> (who Wendy and I are both very jealous of due to her proximity to California's wine country) wrote a post about decorating using the all too important aspect of wine production -- the wine barrel. This resonated with us because we constructed our very own wine barrel candle holders just last year, and made several more as gifts for friends and relatives. The candle holders turned out so nicely that we want to share the step-by-step instructions with you so that you can make one for yourself.</p>
<p>Wendy and I absolutely love Napa Valley, CA. We love the atmosphere, we love the wine, we love the food, we love the scenery, we love the pace of life, and more than anything, we love going there because it just puts us at ease. We've made the trip out to the Bay Area and Napa Valley every year for the last six years. Did I mention, we really love it out there? We're wine country fans.</p>
<p>Through all of our trips, we've seen tons of wine barrel decorations for sale in the various shops all around the Napa Valley and Sonoma area. People use the individual pieces of wood from wine barrels, called barrel staves, to construct everything from cheese boards to rocking chairs. It's a charming and efficient use of spent barrels that turns them into a conversation piece and reminder of wine country.</p>
<div class="MediaContainer PhotoContainer"><a href="http://farm6.static.flickr.com/5308/5657731867_18574b2d9a_z.jpg" rel="PhotoPopup" popupwidth="478" popupheight="640"><img alt="" width="374" height="500" style="border: 0px solid;" src="https://farm6.static.flickr.com/5308/5657731867_18574b2d9a.jpg"></a></div>
<p>During our 2010 trip, while strolling the main street shops in St. Helena, California, we wandered into a shop that had several very nicely prepared barrel stave candle holders. Wendy picked one up, looked at the price, and set it down&nbsp;immediately. Shocked, she turned her head, looked at me, and quietly mouthed the words "$85, can you believe that?" I responded with a somewhat unsure, "I think I can make that for you." And with those words, my personal challenge was accepted and thus began our wine barrel stave candle holder adventure.</p>
<p></p></img> <a href="https://www.oldtownhome.com/2011/6/8/Let-There-Be-Light-Wine-Barrel-Turned-Candle-Holder/">more</a>]]></summary>
    <published>2011-06-08T09:45:00.000-04:00</published>
    <updated>2011-06-08T09:45:00.000-04:00</updated>
    <link rel="alternate" href="https://www.oldtownhome.com/2011/6/8/Let-There-Be-Light-Wine-Barrel-Turned-Candle-Holder/" />
    <author>
      <name>Alex</name>
    </author>
    <content type="html"><![CDATA[<p>Yesterday, <a href="http://www.centsationalgirl.com/2011/06/wine-barrels-in-home-decor/" target="_blank">Centsational Girl</a> (who Wendy and I are both very jealous of due to her proximity to California's wine country) wrote a post about decorating using the all too important aspect of wine production -- the wine barrel. This resonated with us because we constructed our very own wine barrel candle holders just last year, and made several more as gifts for friends and relatives. The candle holders turned out so nicely that we want to share the step-by-step instructions with you so that you can make one for yourself.</p>
<p>Wendy and I absolutely love Napa Valley, CA. We love the atmosphere, we love the wine, we love the food, we love the scenery, we love the pace of life, and more than anything, we love going there because it just puts us at ease. We've made the trip out to the Bay Area and Napa Valley every year for the last six years. Did I mention, we really love it out there? We're wine country fans.</p>
<p>Through all of our trips, we've seen tons of wine barrel decorations for sale in the various shops all around the Napa Valley and Sonoma area. People use the individual pieces of wood from wine barrels, called barrel staves, to construct everything from cheese boards to rocking chairs. It's a charming and efficient use of spent barrels that turns them into a conversation piece and reminder of wine country.</p>
<div class="MediaContainer PhotoContainer"><a href="http://farm6.static.flickr.com/5308/5657731867_18574b2d9a_z.jpg" rel="PhotoPopup" popupwidth="478" popupheight="640"><img alt="" width="374" height="500" style="border: 0px solid;" src="https://farm6.static.flickr.com/5308/5657731867_18574b2d9a.jpg"></a></div>
<p>During our 2010 trip, while strolling the main street shops in St. Helena, California, we wandered into a shop that had several very nicely prepared barrel stave candle holders. Wendy picked one up, looked at the price, and set it down&nbsp;immediately. Shocked, she turned her head, looked at me, and quietly mouthed the words "$85, can you believe that?" I responded with a somewhat unsure, "I think I can make that for you." And with those words, my personal challenge was accepted and thus began our wine barrel stave candle holder adventure.</p>
<p></p>
<p>When I say my challenge was accepted, I mean it was really accepted. I started working on it while still in the store. I took out my iPhone and hit my first stop for this project, eBay. We always use eBay when we need to find an odd, random, and rare item that would be difficult to find otherwise. &nbsp;I do feel "wine barrel staves" tend to uniquely qualify in at least two of those descriptions.</p>
<p>Surprisingly, I was able to quickly find an auction item with a low "buy it now" price for six barrel staves. I believe the total cost was $24, including shipping, for the six staves. Because of the great deal we found, we decided that we would seize this opportunity to also make several gifts for friends and family, so we bought the six and made a real project out of it.</p>
<p><em>If you're interested, there are usually <a href="http://shop.ebay.com/i.html?_from=R40&amp;_trksid=p5197.m570.l1313&amp;_nkw=wine+barrel+staves&amp;_sacat=See-All-Categories" target="_blank">a couple of active auctions going at any given time</a>. You can usually get five to seven staves for about $15 + shipping.</em></p>
<p>We won the auction while still in the store in St. Helena, so the staves arrived at our house only a day or two after we returned home from the trip. When they arrived, they were quite dirty, still smelled of wine, and had a great patina on each one.&nbsp;<a href="http://www.oldtownhome.com/content/About-Us/">Oliver</a> wasn't sure about them, but they were just what we had hoped for.</p>
<p>
</p>
<div class="MediaContainer PhotoContainer"><a href="http://farm3.static.flickr.com/2079/5811436497_2fc811c7ee_z.jpg" rel="PhotoPopup" popupheight="640" popupwidth="478"><img alt="" src="https://farm3.static.flickr.com/2079/5811436497_2fc811c7ee.jpg" width="374" height="500" style="border-width: 0px; border-style: solid;"></a></div>
<p>The first thing we needed to do was to prep the staves for the work by cleaning them up a little bit. Since I wanted to keep the patina, and really only wanted to lose the splinters and dirt, I used the random orbit sander with 220 grit sand paper to just give every surface on each board a light once over. I was careful not to push too hard or linger too long on any one spot for fear of losing all of the great character on the wood. The barrel strap marks, wine seepage outlines, and rich color form the interior of the barrels was just too good to lose.</p>
<p>Once the staves were cleaned up, we were able to measure the width and determine the number and location of glass&nbsp;candle holders that would be placed on each stave. We decided on five candles per stave, and found a place to order the 25 glass votive holders that we would need. We only needed enough for five boards because one of the boards was too thin to make a good candle holder. We decided upon votives from <a href="http://kitkraft.biz/product.php?productid=4888" target="_blank"><span style="color: #61838a;">KitKraft</span></a> that would work well and look good, but there are obviously many different styles that you could choose for your project.</p>
<div class="MediaContainer PhotoContainer"><a href="http://farm4.static.flickr.com/3624/5810894116_1fb1d75338.jpg" rel="PhotoPopup" popupwidth="400" popupheight="400"><img alt="" width="400" height="400" style="border: 0px solid;" src="https://farm4.static.flickr.com/3624/5810894116_1fb1d75338.jpg"></a></div>
<p>One of the staves of the bunch was apparently from a white wine barrel, and didn't have much of that patina. It was just clean and crisp looking. So I started working on that one just in case I made a mistake. I carefully measured to find the center point of the stave, both length and width, and&nbsp;pencil&nbsp;marked the center with an X. That determined the location for the center candle holder. I then measured out of the center and divided the length into 1/3rds. I then made similar pencil marks at each 1/3 point away from the center. This gave a balanced and level location to each votive holder. I then repeated this process on each stave.</p>
<div class="MediaContainer PhotoContainer"><a href="http://farm6.static.flickr.com/5204/5365141945_fb7bcbece5_z.jpg" rel="PhotoPopup" popupwidth="478" popupheight="640"><img alt="" width="374" height="500" style="border: 0px solid;" src="https://farm6.static.flickr.com/5204/5365141945_fb7bcbece5.jpg"></a></div>
<p>Once the center points of each candle were marked on the staves, I took the staves to the basement for an appointment with my drill press. I wanted to drill shallow pilot holes at each pencil mark, but because the barrel staves are curved, and I wanted the candle to sit perpendicular to the surface the stave would sit on, I had to make a small platform jig to make sure the stave sat in the correct position. I did this by attaching a board to the drill press platform that was long enough to support the entire width of the barrel stave while I was drilling it. I sunk each pilot hole only about 1/4 of the way into the stave. I just wanted the holes as a simple guide,&nbsp;and I didn't want to go all of the way through.</p>
<div class="MediaContainer PhotoContainer"><a href="http://farm6.static.flickr.com/5250/5365141485_501443d9da_z.jpg" rel="PhotoPopup" popupwidth="478" popupheight="640"><img alt="" width="374" height="500" style="border: 0px solid;" src="https://farm6.static.flickr.com/5250/5365141485_501443d9da.jpg"></a></div>
<p>With the pilot holes drilled, I had a good point of reference to begin making the larger holes for the candle holders. I chose a <a href="http://www.amazon.com/gp/product/B0000DD0RA/ref=as_li_tf_tl?ie=UTF8&amp;tag=oltoho-20&amp;linkCode=as2&amp;camp=217153&amp;creative=399349&amp;creativeASIN=B0000DD0RA">2 1/2" forstner hole bit</a><img alt="" width="1" height="1" style="margin: 0px; border-style: none !important;" src="http://www.assoc-amazon.com/e/ir?t=oltoho-20&amp;l=as2&amp;o=1&amp;a=B0000DD0RA&amp;camp=217153&amp;creative=399349"> to roughly match the base of the candle holders. Using the same jig, plus a little bit of support under the stave to account for the flex in the stave each time I lowered the bit into the wood. I kept cutting away little bits of wood until I was about 1/4"-1/2" deep for each hole, then moved to the next spot. </p>
<div class="MediaContainer PhotoContainer"><a href="http://farm6.static.flickr.com/5244/5365754392_5ae166117a_z.jpg" rel="PhotoPopup" popupwidth="478" popupheight="640"><img alt="" width="374" height="500" style="border: 0px solid;" src="https://farm6.static.flickr.com/5244/5365754392_5ae166117a.jpg"></a></div>
<p>Remember, wine barrels are typically made of oak, and oak is a very hard wood. I had to really get into repeatedly lowering the bit with a fair amount of pressure just to make a little bit of progress with each one. Oak chips were flying everywhere, saw dust was in the air, and the friction of the bit on oak soaked with wine made the whole basement smell like a camp fire and vineyard all rolled into one. It was actually quite a nice smell, and a good change of pace from my normal stinky projects.</p>
<p>Once the holes were drilled, I knocked down the sharp edges with some 120 grit sandpaper, then gave the top of each stave one more light hand sanding with 220 grit paper.</p>
<p>To finish them, since they had the great patina I mentioned, having all been cut from deep and rich oak trees, I decided to just use some low luster shellac rather than adding any stain. To keep the sheen down, we used one coat of shellac. (We tried one with&nbsp;two coats and it looked a little too shiny.) You can see how the color really came out once we put the finish on, and the difference in the clean white wine barrel versus the patina'd red wine staves.</p>
<div class="MediaContainer PhotoContainer"><a href="http://farm6.static.flickr.com/5249/5365140459_30c9c38194_z.jpg" rel="PhotoPopup" popupwidth="478" popupheight="640"><img alt="" width="374" height="500" style="border: 0px solid;" src="https://farm6.static.flickr.com/5249/5365140459_30c9c38194.jpg"></a></div>
<p>We allowed them to try for a couple of days, then placed our candle holders and tea lights for a rather stunning and unique end result.</p>
<div class="MediaContainer PhotoContainer"><a href="http://farm6.static.flickr.com/5141/5658056121_3ddd64b070_z.jpg" rel="PhotoPopup" popupwidth="640" popupheight="478"><img alt="" width="500" height="374" style="border: 0px solid;" src="https://farm6.static.flickr.com/5141/5658056121_3ddd64b070.jpg"></a></div>
<p>After all was said and done, including purchasing and shipping of the staves and candle holders, the project ended up costing about $25 per stave. Not too bad, and all of the friends and family who we gave these to as gifts seemed to really enjoy them. Nothing says you care like a hand made, original gift.</p>
<p>
</p>
<div class="MediaContainer PhotoContainer"><a href="http://farm4.static.flickr.com/3053/5811471583_0f415edeb9_z.jpg" rel="PhotoPopup" popupheight="640" popupwidth="640"><img alt="" src="https://farm4.static.flickr.com/3053/5811471583_0f415edeb9.jpg" width="500" height="500" style="border-width: 0px; border-style: solid;"></a></div>
<p>Have you made anything cool from a wine barrel or barrel stave? Perhaps you, like me, are still finding wood chips all over the place several months after the project is finished? If so, let us know, we'd love to see how you used them.</p>
<script type="text/javascript" src="http://www.assoc-amazon.com/s/link-enhancer?tag=oltoho-20&o=1" originalattribute="src" originalpath="http://www.assoc-amazon.com/s/link-enhancer?tag=oltoho-20&o=1">
</script>
<noscript>
<img src="http://www.assoc-amazon.com/s/noscript?tag=oltoho-20" originalattribute="src" originalpath="http://www.assoc-amazon.com/s/noscript?tag=oltoho-20" alt="">
</noscript><p><a href="https://www.oldtownhome.com/2011/6/8/Let-There-Be-Light-Wine-Barrel-Turned-Candle-Holder/">Read Full Post</a></p>]]></content>
    <category term="eBay" />
    <category term="Header Image" />
    <category term="How To" />
    <category term="Projects:Crafts" />
    <category term="Re-purpose" />
    <PostImage>http://farm4.static.flickr.com/3053/5811471583_0f415edeb9.jpg</PostImage>
    <media:thumbnail url="https://farm4.static.flickr.com/3053/5811471583_0f415edeb9_t.jpg" />
    <ExtensionElements>
      <Item>PostImage</Item>
      <Item>media:thumbnail</Item>
    </ExtensionElements>
  </entry>
</feed>