<?xml version="1.0" encoding="utf-8"?>
<feed xmlns="http://www.w3.org/2005/Atom" xmlns:media="http://search.yahoo.com/mrss/">
  <title>Old Town Home Category: 'Family Heirlooms'</title>
  <updated>2019-04-22T14:17:00.000-04:00</updated>
  <id>http://www.oldtownhome.com/family-heirlooms/index.atom</id>
  <link rel="alternate" href="http://www.oldtownhome.com/family-heirlooms/index.atom" />
  <author>
    <name>Alex and Wendy</name>
    <uri>http://www.oldtownhome.com/</uri>
    <email>wendy@oldtownhome.com</email>
  </author>
  <entry>
    <guid>6b916167-d6fb-4906-9bd7-5d0e3b380d1c</guid>
    <id>https://www.oldtownhome.com/2019/4/22/The-Ellusive-Search-for-the-Perfect-Dining-Room-Sideboard/</id>
    <title>The Ellusive Search for the Perfect Dining Room Sideboard</title>
    <summary type="html"><![CDATA[<p>Have you ever searched for years for just the right piece of furniture, only to find it in an unlikely place?</p><p>Well, we have. We spent the last five years or so looking for the perfect sideboard for our dining room, but we had a case of sentimentality combined with utility that kept getting in our way. As a result, the hulking buffet/sideboard from the photo below remained in our dining room, in spite of its scale.</p><p>
</p><div class="MediaContainer PhotoContainer"><a href="https://live.staticflickr.com/65535/47593548502_a8eba6b7b9_z.jpg" rel="PhotoPopup" popupheight="424" popupwidth="640"><img alt="" src="https://live.staticflickr.com/65535/47593548502_a8eba6b7b9.jpg" width="500" height="331" style="border-width: 0px; border-style: solid;"></a></div><p>Shortly after we bought our row house in 2003, we discovered the amazing antique and salvage row of Cleveland's Lorain Ave. Nestled just a stone's throw from downtown Cleveland you could find yourself smack in the middle of shop after shop of affordable vintage finds. Whether you were looking for a little architectural salvage or a full room of vintage furniture, you were bound to find something your heart desired.</p><p>
</p><div class="MediaContainer PhotoContainer"><a href="https://live.staticflickr.com/65535/47565707722_acd4592771_z.jpg" rel="PhotoPopup" popupheight="480" popupwidth="640"><img alt="" src="https://live.staticflickr.com/65535/47565707722_acd4592771.jpg" width="500" height="375" style="border-width: 0px; border-style: solid;"></a></div><p>Today, as Cleveland has undergone an urban revival, many of these shops have shuttered. Victims of the rejuvenation of the trendy Ohio City area and the rising rents, their closure ultimately means progress for a city that had fallen on hard times in the late 1990s and early 2000s. But at the same time, the amazing antique resource that was Lorain Avenue, is a dwindling memory from our newlywed and first home honeymoon days.&nbsp;</p> <a href="https://www.oldtownhome.com/2019/4/22/The-Ellusive-Search-for-the-Perfect-Dining-Room-Sideboard/">more</a>]]></summary>
    <published>2019-04-22T14:17:00.000-04:00</published>
    <updated>2019-04-22T14:17:00.000-04:00</updated>
    <link rel="alternate" href="https://www.oldtownhome.com/2019/4/22/The-Ellusive-Search-for-the-Perfect-Dining-Room-Sideboard/" />
    <author>
      <name>Alex</name>
    </author>
    <content type="html"><![CDATA[<p>Have you ever searched for years for just the right piece of furniture, only to find it in an unlikely place?</p>
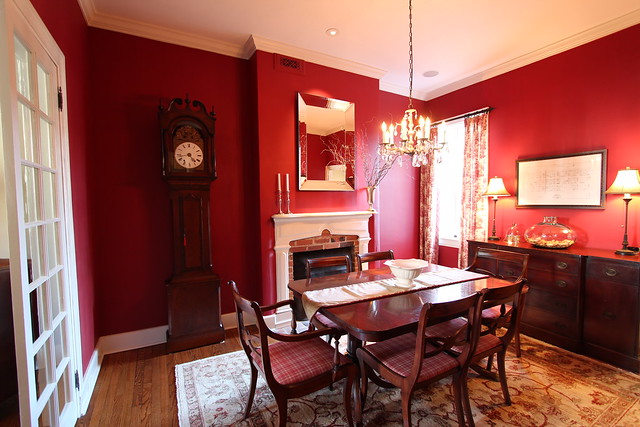
<p>Well, we have. We spent the last five years or so looking for the perfect sideboard for our dining room, but we had a case of sentimentality combined with utility that kept getting in our way. As a result, the hulking buffet/sideboard from the photo below remained in our dining room, in spite of its scale.</p>
<p>
</p>
<div class="MediaContainer PhotoContainer"><a href="https://live.staticflickr.com/65535/47593548502_a8eba6b7b9_z.jpg" rel="PhotoPopup" popupheight="424" popupwidth="640"><img alt="" src="https://live.staticflickr.com/65535/47593548502_a8eba6b7b9.jpg" width="500" height="331" style="border-width: 0px; border-style: solid;" /></a></div>
<p>Shortly after we bought our row house in 2003, we discovered the amazing antique and salvage row of Cleveland's Lorain Ave. Nestled just a stone's throw from downtown Cleveland you could find yourself smack in the middle of shop after shop of affordable vintage finds. Whether you were looking for a little architectural salvage or a full room of vintage furniture, you were bound to find something your heart desired.</p>
<p>
</p>
<div class="MediaContainer PhotoContainer"><a href="https://live.staticflickr.com/65535/47565707722_acd4592771_z.jpg" rel="PhotoPopup" popupheight="480" popupwidth="640"><img alt="" src="https://live.staticflickr.com/65535/47565707722_acd4592771.jpg" width="500" height="375" style="border-width: 0px; border-style: solid;" /></a></div>
<p>Today, as Cleveland has undergone an urban revival, many of these shops have shuttered. Victims of the rejuvenation of the trendy Ohio City area and the rising rents, their closure ultimately means progress for a city that had fallen on hard times in the late 1990s and early 2000s. But at the same time, the amazing antique resource that was Lorain Avenue, is a dwindling memory from our newlywed and first home honeymoon days.&nbsp;</p>
<p>
</p>
<div class="MediaContainer PhotoContainer"><a href="https://live.staticflickr.com/5479/14246432860_210b8906b0_z.jpg" rel="PhotoPopup" popupheight="640" popupwidth="480"><img alt="" src="https://live.staticflickr.com/5479/14246432860_210b8906b0.jpg" width="375" height="500" style="border-width: 0px; border-style: solid;" /></a></div>
<p>During one of our visits to Cleveland in the early 2000s, after we'd owned our home for just a short time, we found ourselves a vintage dining room set for only about $1,100. A beautiful table, six chairs, china cabinet, and a large buffet. A matching set, they were all from the 1940s, built by a furniture maker in Youngstown, Ohio, and in pretty decent shape overall! The whole set's scale was large for our 15' wide row house, but it was a great price and has moved from room to room as we set up our dining room in a few different areas of the house.</p>
<p>
</p>
<div class="MediaContainer PhotoContainer"><a href="https://live.staticflickr.com/5187/5645760441_a11b24b2e3_z.jpg" rel="PhotoPopup" popupheight="480" popupwidth="640"><img alt="" src="https://live.staticflickr.com/5187/5645760441_a11b24b2e3.jpg" width="500" height="375" style="border-width: 0px; border-style: solid;" /></a></div>
<p>In addition to antique shopping during those early days of old home ownership, we were also welcomed into our neighborhood by many of the wonderful neighbors we'd get to know. Whether attending gatherings in neighbor's homes, or enjoying their company around our Cleveland dining room table, getting to know our neighbors, many of whom have become lifelong friends, was the unexpected element of homeownership that we were fortunate enough to find ourselves amidst.&nbsp;</p>
<p>Sometime during the last six or so years, we looked at our vintage dining room set and said, "You know what, as great as this set has been, it's not quite right for our house. I think we need to make a change. And that change needs to start with the buffet...It's always been way too big for our house, so what about getting something new?"</p>
<p>
</p>
<div class="MediaContainer PhotoContainer"><a href="https://live.staticflickr.com/7002/6656007081_7de2620ca9_z.jpg" rel="PhotoPopup" popupheight="427" popupwidth="640"><img alt="" src="https://live.staticflickr.com/7002/6656007081_7de2620ca9.jpg" width="500" height="333" style="border-width: 0px; border-style: solid;" /></a></div>
<p>Yes, the large buffet has been the workhorse of our dining room for years. The amount of storage it offered allowed us to look beyond its clear and ever present flaws. Its gargantuan width somehow fit between the window and door casings with only millimeters to spare, as if it were divined to live in our dining room. It even doubled as a storage area during our dining room renovation.</p>
<p>
</p>
<div class="MediaContainer PhotoContainer"><a href="https://live.staticflickr.com/5065/5646383000_61f39df68d_z.jpg" rel="PhotoPopup" popupheight="480" popupwidth="640"><img alt="" src="https://live.staticflickr.com/5065/5646383000_61f39df68d.jpg" width="500" height="375" style="border-width: 0px; border-style: solid;" /></a></div>
<p>Much like a beloved car with 200k miles, that smells a little off and is always a quart low on oil, but has always successfully shuttled you from point A to B with little fanfare, our buffet could only be replaced with a piece of furniture that's juuuuuuust right! It's not that there aren't better buffets, it's just that this buffet was "good enough" and we had developed a bond.</p>
<p>
</p>
<div class="MediaContainer PhotoContainer"><a href="https://live.staticflickr.com/6239/6228290411_94e95c6b3d_z.jpg" rel="PhotoPopup" popupheight="478" popupwidth="640"><img alt="" src="https://live.staticflickr.com/6239/6228290411_94e95c6b3d.jpg" width="500" height="374" style="border-width: 0px; border-style: solid;" /></a></div>
<p>From antique store to auction house, every piece we'd ever found had some inherent flaw. Too fancy. Too big. Too delicate. Too small. Too modern. Too rustic. We knew we wanted something smaller that would fit well in the space, but we still needed storage. Beyond all of that, Wendy had it in her head that whatever we chose needed to have a white and gray marble top.</p>
<p>We'd literally searched for years, and were starting to give up hopes of finding the right piece. Our sentimental attachment to the oversized buffet, not to mention the plethora of utilitarian storage it offered, seemed to be&nbsp; thwarting our efforts as much as our exacting desire to find that perfect piece. This may sound corny, but we had what seemed an unrealistic need for our eventual find to fill the storage and sentimentality void giving up our buffet would mean. A pretty impossible task when the search is more or less scrolling eBay, FirstDibs, or auction websites.</p>
<p>
</p>
<div class="MediaContainer PhotoContainer"><a href="https://live.staticflickr.com/7515/15293741893_0db709912d_z.jpg" rel="PhotoPopup" popupheight="640" popupwidth="480"><img alt="" src="https://live.staticflickr.com/7515/15293741893_0db709912d.jpg" width="375" height="500" style="border-width: 0px; border-style: solid;" /></a></div>
<p>About a year and a half ago, one of those neighbors that we'd mentioned, whom made us feel so welcomed in our new home, and that we'd become lifelong friends with, passed away. He was elderly and in failing health, but it still felt sudden and unexpected. He was one of the first people who'd invited us to a party at his home after we'd moved into the neighborhood, and we'd always enjoyed chatting with him and catching up.&nbsp;</p>
<p>After our friend's passing, we had the opportunity to get to know some of his wonderful family, including his nephew who was handling the estate. During this time, and after his family had selected the items they wanted to keep as mementos, our friend's nephew asked if there was anything from the estate that we'd like to purchase before it went to auction.&nbsp;</p>
<p>Hoping to find something that would be meaningful and would remind us of our friend and neighbor, we looked over his remaining belongings, hoping to find something to remember him by. To our surprise, we found several wonderful items. He had owned a mid-sized antique marble topped cabinet that he kept in his dining room. It was really lovely, and we were very surprised nobody in his family had wanted it. After speaking with his family, measuring the piece, and deciding it seemed about right right, we realized we'd maybe found our unicorn. Wendy snapped this photo and we decided it might be perfect, but even if it wasn't, it would be perfect for us.</p>
<p>
</p>
<div class="MediaContainer PhotoContainer"><a href="https://live.staticflickr.com/784/39548046470_65f5d7205d_z.jpg" rel="PhotoPopup" popupheight="480" popupwidth="640"><img alt="" src="https://live.staticflickr.com/784/39548046470_65f5d7205d.jpg" width="500" height="375" style="border-width: 0px; border-style: solid;" /></a></div>
<p>The piece not only looked great, had a marble top, and offered some needed open storage, but it also had the sentimental connection we'd hoped for. We'd always be able to think about our departed friend and neighbor when we looked at it nestled in our dining room.</p>
<p>In anticipation of the new piece we had to clean out the old buffet. With four large drawers, two cabinets, and two smaller drawers, all completely full, to say we were shocked at the amount it held is an understatement.</p>
<p>
</p>
<div class="MediaContainer PhotoContainer"><a href="https://live.staticflickr.com/4849/45986410911_ba7697779a_z.jpg" rel="PhotoPopup" popupheight="640" popupwidth="480"><img alt="" src="https://live.staticflickr.com/4849/45986410911_ba7697779a.jpg" width="375" height="500" style="border-width: 0px; border-style: solid;" /></a></div>
<p>We had napkins, candles, tea lights, and placemats galore...</p>
<p>
</p>
<div class="MediaContainer PhotoContainer"><a href="https://live.staticflickr.com/4904/32114957808_3c41284042_z.jpg" rel="PhotoPopup" popupheight="640" popupwidth="480"><img alt="" src="https://live.staticflickr.com/4904/32114957808_3c41284042.jpg" width="375" height="500" style="border-width: 0px; border-style: solid;" /></a></div>
<p>...Bags of table linens, runners, and pillow cases...</p>
<p>
</p>
<div class="MediaContainer PhotoContainer"><a href="https://live.staticflickr.com/4855/32114958518_f545a212ca_z.jpg" rel="PhotoPopup" popupheight="480" popupwidth="640"><img alt="" src="https://live.staticflickr.com/4855/32114958518_f545a212ca.jpg" width="500" height="375" style="border-width: 0px; border-style: solid;" /></a></div>
<p>...And More liquor than we can ever reasonably drink. After removing and re-homing a majority of those items, and reserving the new cabinet as more of a napkin and liquor home, we moved the old buffet from its longstanding location and wished it well. The location for our new sideboard was ready, and looking quite empty.</p>
<p>
</p>
<div class="MediaContainer PhotoContainer"><a href="https://live.staticflickr.com/4890/32108379258_ac07e77bd6_z.jpg" rel="PhotoPopup" popupheight="640" popupwidth="480"><img alt="" src="https://live.staticflickr.com/4890/32108379258_ac07e77bd6.jpg" width="375" height="500" style="border-width: 0px; border-style: solid;" /></a></div>
<p>After gingerly carrying it from its prior home into our home, we placed it to get a sense of scale. It was a shock, as we'd grown used to the monolithic monster completely covering the wall between the window and door, but this was a breath of fresh air. The size seemed to be ideal for the room.</p>
<p>
</p>
<div class="MediaContainer PhotoContainer"><a href="https://live.staticflickr.com/908/41121072274_93540fd64a_z.jpg" rel="PhotoPopup" popupheight="640" popupwidth="480"><img alt="" src="https://live.staticflickr.com/908/41121072274_93540fd64a.jpg" width="375" height="500" style="border-width: 0px; border-style: solid;" /></a></div>
<p>We rejuvenated the dried and cracked finish a bit by using a little Howard's Feed-n-Wax, an placed the marble top. It really was perfect!</p>
<p>
</p>
<div class="MediaContainer PhotoContainer"><a href="https://live.staticflickr.com/957/28112862178_efe3eb8317_z.jpg" rel="PhotoPopup" popupheight="640" popupwidth="480"><img alt="" src="https://live.staticflickr.com/957/28112862178_efe3eb8317.jpg" width="375" height="500" style="border-width: 0px; border-style: solid;" /></a></div>
<p>The cabinet is a solid antique with dovetail joinery, and what I believe is a mahogany or walnut veneer.</p>
<p>
</p>
<div class="MediaContainer PhotoContainer"><a href="https://live.staticflickr.com/65535/46944601254_391fff0414_z.jpg" rel="PhotoPopup" popupheight="360" popupwidth="640"><img alt="" src="https://live.staticflickr.com/65535/46944601254_391fff0414.jpg" width="500" height="281" style="border-width: 0px; border-style: solid;" /></a></div>
<p>The finish isn't perfect, but the small chips and dings do nothing to detract from the piece.</p>
<p>
</p>
<div class="MediaContainer PhotoContainer"><a href="https://live.staticflickr.com/65535/32725876197_a8cf8f7c70_z.jpg" rel="PhotoPopup" popupheight="360" popupwidth="640"><img alt="" src="https://live.staticflickr.com/65535/32725876197_a8cf8f7c70.jpg" width="500" height="281" style="border-width: 0px; border-style: solid;" /></a></div>
<p>At first it felt small, especially while we got used to the scale in comparison with the old piece. But before we knew it, it felt just right, ideal for the room.</p>
<p>
</p>
<div class="MediaContainer PhotoContainer"><a href="https://live.staticflickr.com/65535/47668742581_55fc8eac63_z.jpg" rel="PhotoPopup" popupheight="360" popupwidth="640"><img alt="" src="https://live.staticflickr.com/65535/47668742581_55fc8eac63.jpg" width="500" height="281" style="border-width: 0px; border-style: solid;" /></a></div>
<p>If you're wondering what happened to the old buffet, don't worry, it's not gone and separated from its set for good. Wendy's parents needed a larger piece for their dining room, so they took it off of our hands. It's now right at home in their dining room. Like our Mustang that they bought off of us back in 2012, we get to visit it every time we're back visiting Cleveland.</p>
<p>
</p>
<div class="MediaContainer PhotoContainer"><a href="https://live.staticflickr.com/65535/47668743141_c876e63967_z.jpg" rel="PhotoPopup" popupheight="360" popupwidth="640"><img alt="" src="https://live.staticflickr.com/65535/47668743141_c876e63967.jpg" width="500" height="281" style="border-width: 0px; border-style: solid;" /></a></div>
<p>We'd nearly given up, but stumbled into the right piece that not only met our needs in what we'd hoped to find, but also provided us with a tangible connection to a dear friend.&nbsp;</p>
<p>
</p>
<div class="MediaContainer PhotoContainer"><a href="https://live.staticflickr.com/65535/47615929382_355dae5c2a_z.jpg" rel="PhotoPopup" popupheight="360" popupwidth="640"><img alt="" src="https://live.staticflickr.com/65535/47615929382_355dae5c2a.jpg" width="500" height="281" style="border-width: 0px; border-style: solid;" /></a></div>
<p>We like to think that our friend, in lieu of his family taking the cabinet, would be happy to know that it's sitting in our home just a few yards from the home he lived in and loved for so many years. At the very least, we like knowing that we'll always have something in our home to remember him by.</p><p><a href="https://www.oldtownhome.com/2019/4/22/The-Ellusive-Search-for-the-Perfect-Dining-Room-Sideboard/">Read Full Post</a></p>]]></content>
    <category term="Antique" />
    <category term="Dining Room" />
    <category term="Family Heirlooms" />
    <category term="Header Image" />
    <PostImage>https://live.staticflickr.com/65535/48673543577_794c101e87_c.jpg</PostImage>
    <media:thumbnail url="https://live.staticflickr.com/65535/48673543577_794c101e87_t.jpg" />
    <ExtensionElements>
      <Item>PostImage</Item>
      <Item>media:thumbnail</Item>
    </ExtensionElements>
  </entry>
  <entry>
    <guid>7209d31d-7960-4431-857d-1ee119c7558e</guid>
    <id>https://www.oldtownhome.com/2013/2/22/Getting-Sit-uated-Upholstering-a-Family-Heirloom/</id>
    <title>Getting Sit-uated: Upholstering a Family Heirloom</title>
    <summary type="html"><![CDATA[<p>Do you remember last week when I said I was <a href="http://www.oldtownhome.com/2013/2/15/I-Cannot-Tell-a-Lie---Im-Excited-For-This-Weekend/index.aspx">excited for the potential of the upcoming weekend</a>? Well, I went and jinxed myself with that one. The weekend was good for the most part, but I came down with some sort of a super bug sinus cold at some point on Saturday and I've been as sick as a dog all week. While I had planned to add Tuesday and Friday to my Monday off, enabling me to knock out a whole bunch of chores around the house so we could go marching into spring with the&nbsp;lengthy&nbsp;backlog of our DIY tasks knocked off of our list, that's not how this weekend really ended up going. You know what they say,<em> "The best laid plans of mice and men oft go astray."&nbsp;</em></p><p>So I've been hobbling around our house in a zip up fleece while toting a consistently depleted box of tissues or half used roll of TP. I'll walk from one room to another, notice a little project that needs to be done, glare at it longingly trying to muster the energy to put together a plan of execution, only to find myself on the couch watching TV or in bed taking a nap, in a fog of congestion.&nbsp;</p><p>Rather than fill your reading with unpleasantries of how my snoring is&nbsp;undoubtedly torturing Wendy and Lulu all night, I'll shift gears a little and show you something that we can officially check off of our list as "complete and finished!"&nbsp;</p><p>Do you recall Wendy's Great-Great-Grandmother's (that we originally thought was Wendy's Great-Grandfather's) <a href="http://www.oldtownhome.com/2012/11/27/Breathing-Life-into-a-Forgotten-Family-Heirloom/index.aspx">chair that we refinished last year</a>? After allowing this poor chair to sit in basement after basement for 40 or more years, eight of them in our basement, we finally got a move on and did something about it. For those who were not following along before, here's a quick recap starting with a decidedly "before" photo.</p><p>
</p><div class="MediaContainer PhotoContainer"><a href="http://farm6.staticflickr.com/5144/5663901313_ef7739aba8_z.jpg" rel="PhotoPopup" popupheight="640" popupwidth="480"><img alt="" src="https://farm6.staticflickr.com/5144/5663901313_ef7739aba8.jpg" width="375" height="500" style="border-width: 0px; border-style: solid;"></a></div><p>We took the sad chair completely apart and <a href="http://www.oldtownhome.com/2012/11/27/Breathing-Life-into-a-Forgotten-Family-Heirloom/index.aspx">sanded it back down to its bare wood</a>.</p> <a href="https://www.oldtownhome.com/2013/2/22/Getting-Sit-uated-Upholstering-a-Family-Heirloom/">more</a>]]></summary>
    <published>2013-02-22T15:20:00.000-05:00</published>
    <updated>2013-02-22T15:20:00.000-05:00</updated>
    <link rel="alternate" href="https://www.oldtownhome.com/2013/2/22/Getting-Sit-uated-Upholstering-a-Family-Heirloom/" />
    <author>
      <name>Alex</name>
    </author>
    <content type="html"><![CDATA[<p>Do you remember last week when I said I was <a href="http://www.oldtownhome.com/2013/2/15/I-Cannot-Tell-a-Lie---Im-Excited-For-This-Weekend/index.aspx">excited for the potential of the upcoming weekend</a>? Well, I went and jinxed myself with that one. The weekend was good for the most part, but I came down with some sort of a super bug sinus cold at some point on Saturday and I've been as sick as a dog all week. While I had planned to add Tuesday and Friday to my Monday off, enabling me to knock out a whole bunch of chores around the house so we could go marching into spring with the&nbsp;lengthy&nbsp;backlog of our DIY tasks knocked off of our list, that's not how this weekend really ended up going. You know what they say,<em> "The best laid plans of mice and men oft go astray."&nbsp;</em></p>
<p>So I've been hobbling around our house in a zip up fleece while toting a consistently depleted box of tissues or half used roll of TP. I'll walk from one room to another, notice a little project that needs to be done, glare at it longingly trying to muster the energy to put together a plan of execution, only to find myself on the couch watching TV or in bed taking a nap, in a fog of congestion.&nbsp;</p>
<p>Rather than fill your reading with unpleasantries of how my snoring is&nbsp;undoubtedly torturing Wendy and Lulu all night, I'll shift gears a little and show you something that we can officially check off of our list as "complete and finished!"&nbsp;</p>
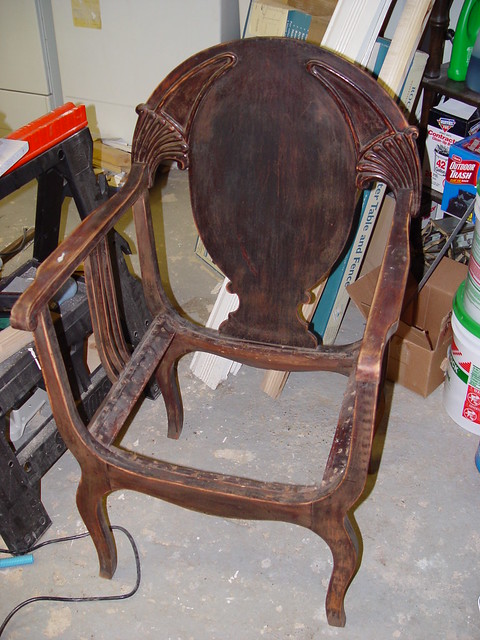
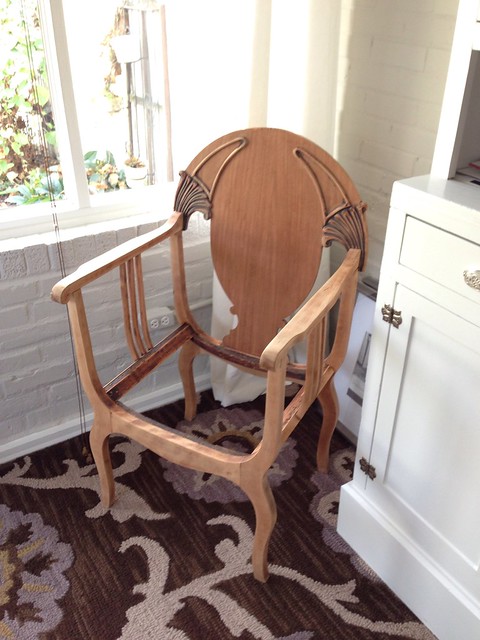
<p>Do you recall Wendy's Great-Great-Grandmother's (that we originally thought was Wendy's Great-Grandfather's) <a href="http://www.oldtownhome.com/2012/11/27/Breathing-Life-into-a-Forgotten-Family-Heirloom/index.aspx">chair that we refinished last year</a>? After allowing this poor chair to sit in basement after basement for 40 or more years, eight of them in our basement, we finally got a move on and did something about it. For those who were not following along before, here's a quick recap starting with a decidedly "before" photo.</p>
<p>
</p>
<div class="MediaContainer PhotoContainer"><a href="http://farm6.staticflickr.com/5144/5663901313_ef7739aba8_z.jpg" rel="PhotoPopup" popupheight="640" popupwidth="480"><img alt="" src="https://farm6.staticflickr.com/5144/5663901313_ef7739aba8.jpg" width="375" height="500" style="border-width: 0px; border-style: solid;"></a></div>
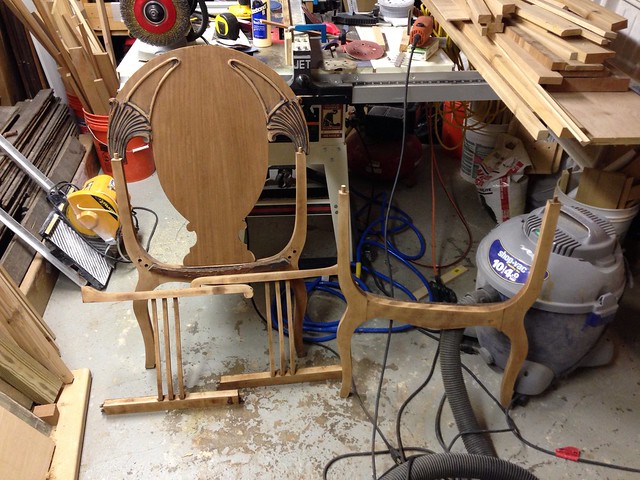
<p>We took the sad chair completely apart and <a href="http://www.oldtownhome.com/2012/11/27/Breathing-Life-into-a-Forgotten-Family-Heirloom/index.aspx">sanded it back down to its bare wood</a>.</p>
<p>
</p>
<div class="MediaContainer PhotoContainer"><a href="http://farm9.staticflickr.com/8209/8222152693_869828cdde_z.jpg" rel="PhotoPopup" popupheight="480" popupwidth="640"><img alt="" src="https://farm9.staticflickr.com/8209/8222152693_869828cdde.jpg" width="500" height="375" style="border-width: 0px; border-style: solid;"></a></div>
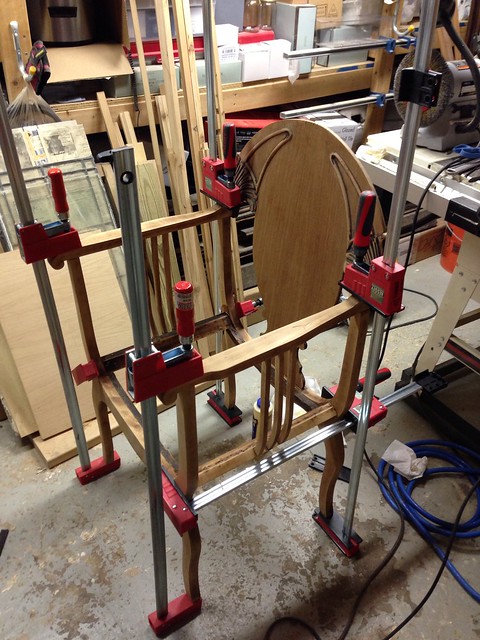
<p>After sanding, we carefully reassembled its various pieces, adding much needed structure and stability in the way of glue.</p>
<p>
</p>
<div class="MediaContainer PhotoContainer"><a href="http://farm9.staticflickr.com/8070/8222155107_2bffea8636_z.jpg" rel="PhotoPopup" popupheight="640" popupwidth="480"><img alt="" src="https://farm9.staticflickr.com/8070/8222155107_2bffea8636.jpg" width="375" height="500" style="border-width: 0px; border-style: solid;"></a></div>
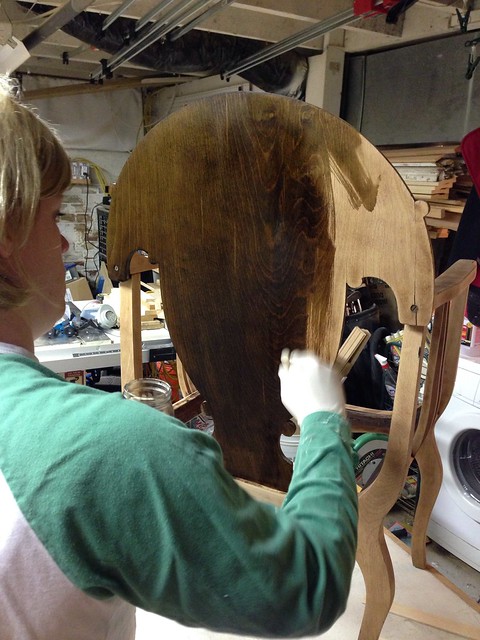
<p>Once assembled, we tried our hand at staining the chair, <a href="http://www.oldtownhome.com/2012/12/5/Using-Aniline-Dye-to-Breathe-Life-Into-a-Forgotten-Family-Heirloom/index.aspx">or rather dyeing it using aniline dye</a>.&nbsp;</p>
<p>
</p>
<div class="MediaContainer PhotoContainer"><a href="http://farm9.staticflickr.com/8483/8239162025_f183c8467d_z.jpg" rel="PhotoPopup" popupheight="640" popupwidth="480"><img alt="" src="https://farm9.staticflickr.com/8483/8239162025_f183c8467d.jpg" width="375" height="500" style="border-width: 0px; border-style: solid;"></a></div>
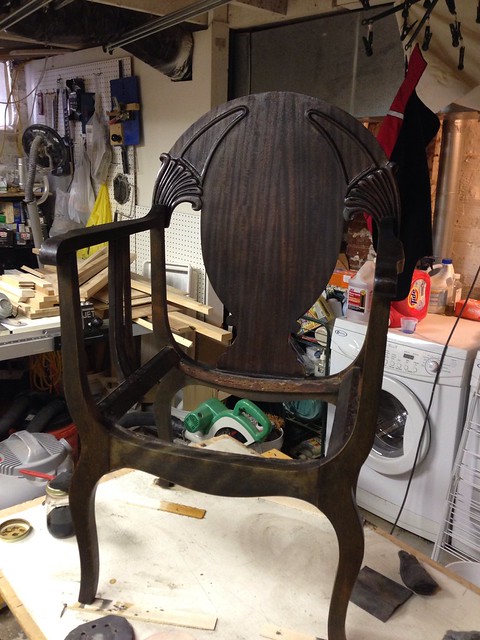
<p>We followed that up with several coats of shellac. We were quite thrilled with the results, especially given the shape the chair was in when we took ownership.</p>
<p>
</p>
<div class="MediaContainer PhotoContainer"><a href="http://farm9.staticflickr.com/8200/8239188407_7b0b659078_z.jpg" rel="PhotoPopup" popupheight="640" popupwidth="480"><img alt="" src="https://farm9.staticflickr.com/8200/8239188407_7b0b659078.jpg" width="375" height="500" style="border-width: 0px; border-style: solid;"></a></div>
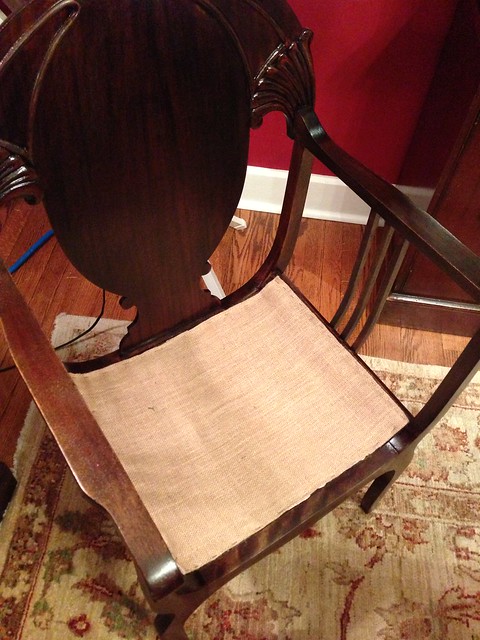
<p>Finally, I used our <a href="http://www.oldtownhome.com/2013/1/8/Toolbox-Tuesday-Where-Has-This-Pneumatic-Stapler-Been-all-my-Life/index.aspx">new pneumatic staple gun</a> to <a href="http://www.oldtownhome.com/2012/12/17/Webbing-and-Burlap-Restoring-the-Seat-of-Wendys-Great-Grandfathers-Chair/index.aspx">add a jute-like webbing for the seat</a>...</p>
<p>
</p>
<div class="MediaContainer PhotoContainer"><a href="http://farm9.staticflickr.com/8487/8239221669_5bdd0c4b5a_z.jpg" rel="PhotoPopup" popupheight="640" popupwidth="480"><img alt="" src="https://farm9.staticflickr.com/8487/8239221669_5bdd0c4b5a.jpg" width="375" height="500" style="border-width: 0px; border-style: solid;"></a></div>
<p>...followed by a burlap covering, hopefully giving this great chair another lease on life that can be appreciated for many generations to come.&nbsp;</p>
<p>
</p>
<div class="MediaContainer PhotoContainer"><a href="http://farm9.staticflickr.com/8492/8268009271_aa906033d5_z.jpg" rel="PhotoPopup" popupheight="640" popupwidth="480"><img alt="" src="https://farm9.staticflickr.com/8492/8268009271_aa906033d5.jpg" width="375" height="500" style="border-width: 0px; border-style: solid;"></a></div>
<p>But that's not where this story ends. Though we had taken the chair as far as our skills were able to go, we still had the issue of final upholstery of the piece. Wendy had selected a wonderful gray fabric from West Elm and ordered a couple yards just for this project.</p>
<p>
</p>
<div class="MediaContainer PhotoContainer"><a href="http://farm9.staticflickr.com/8360/8268024341_dbcca36102_z.jpg" rel="PhotoPopup" popupheight="640" popupwidth="480"><img alt="" src="https://farm9.staticflickr.com/8360/8268024341_dbcca36102.jpg" width="375" height="500" style="border-width: 0px; border-style: solid;"></a></div>
<p>As much as we would both love to be amazing upholsterers and&nbsp;seamstresses&nbsp;(yes, this is a dream of mine yet to be fulfilled, honestly), we don't own a sewing machine, were horrible at it when we had one, and I don't even think we were able to sew a single thing properly. We're deficient in the area of sewing, it's a sad truth, but becoming adequate is on my list of life goals.</p>
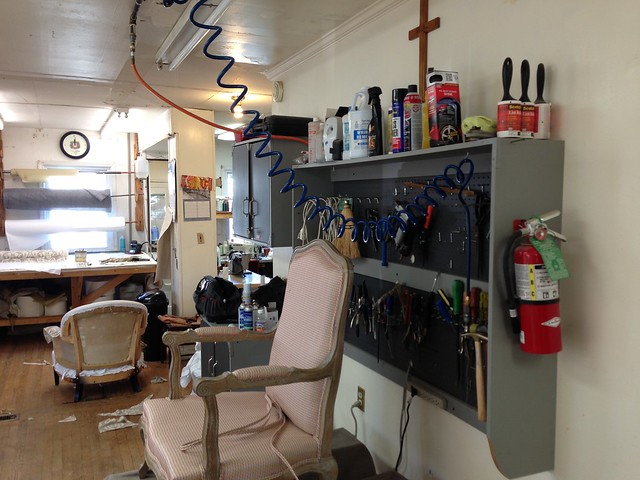
<p>Until that day comes we have a list of other seamstresses and upholsters that we've used in the past. In the case of our chair we opted to enlist the help of a local company, <a href="http://www.yelp.com/biz/mt-vernon-upholstery-alexandria" target="_blank">Mt. Vernon Upholstery</a>. They actually upholstered our mid century couch in our living room. They did a wonderful job and we were so happy with the outcome that we entrusted Wendy's heirloom chair to them for the final touches. I dropped the chair off at the shop several weeks ago and hoped for the best. We weren't sure of exactly what we wanted so we left it in their capable hands.&nbsp;</p>
<p>Here's a photo of their shop. In my opinion this is the type of look you typically want to see in an upholsterer. Reminds me of the window shop I worked in when I was younger. Utilitarian, not fussy, they're there to do a job and do it well.</p>
<p>
</p>
<div class="MediaContainer PhotoContainer"><a href="http://farm9.staticflickr.com/8228/8495951722_8ea019492f_z.jpg" rel="PhotoPopup" popupheight="480" popupwidth="640"><img alt="" src="https://farm9.staticflickr.com/8228/8495951722_8ea019492f.jpg" width="500" height="375" style="border-width: 0px; border-style: solid;"></a></div>
<p>Last week we received word that he had completed the work on the chair and I headed out to pick it up. What I arrived home with was a complete and finished piece that we often thought we might never actually see.</p>
<p>
</p>
<div class="MediaContainer PhotoContainer"><a href="http://farm9.staticflickr.com/8229/8494844269_d5b1a38b55_z.jpg" rel="PhotoPopup" popupheight="640" popupwidth="427"><img alt="" src="https://farm9.staticflickr.com/8229/8494844269_d5b1a38b55.jpg" width="333" height="500" style="border-width: 0px; border-style: solid;"></a></div>
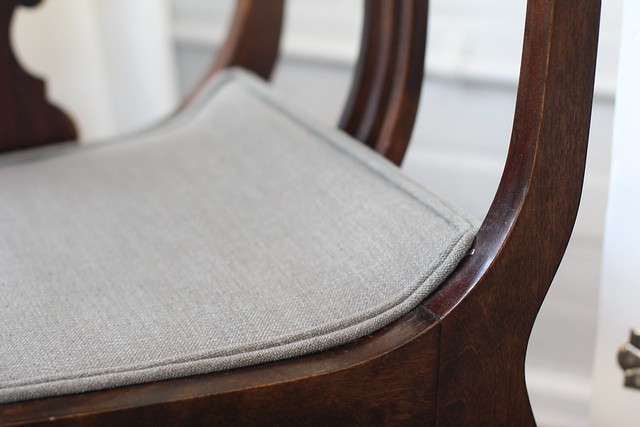
<p>I was a bit disappointed to see the upholsterer covered the burlap I had spent so long on with the fabric we had provided (sigh). He also added a double piping around the&nbsp;perimeter&nbsp;of the area below the cushion to ensure a clean and finished edge since you'll be able to see it below the pillow. Though my wonderful burlap had been covered, I understand why, because it looks so much better this way.</p>
<p>
</p>
<div class="MediaContainer PhotoContainer"><a href="http://farm9.staticflickr.com/8387/8494858393_95f5ac19be_z.jpg" rel="PhotoPopup" popupheight="427" popupwidth="640"><img alt="" src="https://farm9.staticflickr.com/8387/8494858393_95f5ac19be.jpg" width="500" height="333" style="border-width: 0px; border-style: solid;"></a></div>
<p>In addition, they used standard furniture fabric (not sure what the&nbsp;technical&nbsp;name is) for the underside of the chair, covering the bottom of the webbing I had labored over for hours. Again, I understand why this is in place, but now I just have to imagine the work I put into the seat now that I can no longer see it with my own eyes.</p>
<p>
</p>
<div class="MediaContainer PhotoContainer"><a href="http://farm9.staticflickr.com/8228/8494862973_cfef9b9b8c_z.jpg" rel="PhotoPopup" popupheight="427" popupwidth="640"><img alt="" src="https://farm9.staticflickr.com/8228/8494862973_cfef9b9b8c.jpg" width="500" height="333" style="border-width: 0px; border-style: solid;"></a></div>
<p>I actually talked to the owner for a few minutes when I picked up the chair and asked him about the job I had done on the webbing and burlap. I was wondering if I had done it correctly, but he was surprised that I had done it myself and said that it seemed very secure and like it will last for a while. He said the best thing I had done was properly weave the webbing and also that I had used staples that were evenly placed and sturdy enough to hold. I asked him about stretching or fraying of the ends of the straps over time and if we had to worry. His opinion was the webbing I had used won't come apart like jute would have, since it's covered in a sort of rubber. I felt quite good about my decisions after speaking with him.</p>
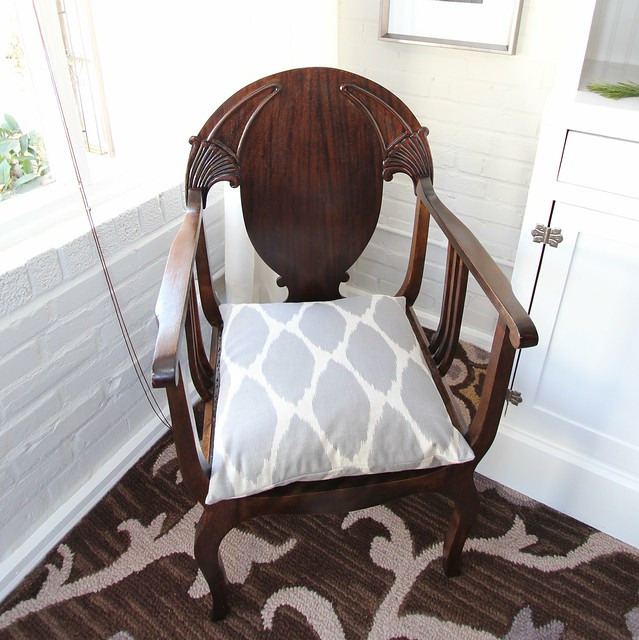
<p>The final touch, the cushion for the seat, isn't entirely what we were expecting, but we're happy with it nonetheless.&nbsp;</p>
<p>
</p>
<div class="MediaContainer PhotoContainer"><a href="http://farm9.staticflickr.com/8234/8494847741_89da30d7bb_z.jpg" rel="PhotoPopup" popupheight="640" popupwidth="427"><img alt="" src="https://farm9.staticflickr.com/8234/8494847741_89da30d7bb.jpg" width="333" height="500" style="border-width: 0px; border-style: solid;"></a></div>
<p>I think we had expected the cushion to have more structure than it does. This cushion is more of a simple pillow than a seat cushion. We were thinking it would be more like a chair seat with a true top, bottom, and sides. When we first placed it in its spot, I think we were somewhat thrown by the fluffed up height of the pillow.&nbsp;</p>
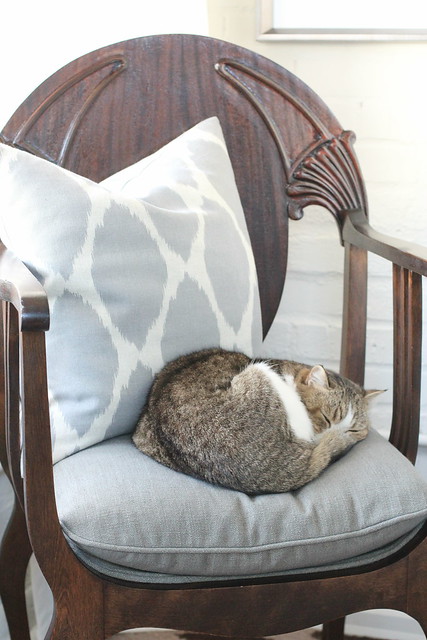
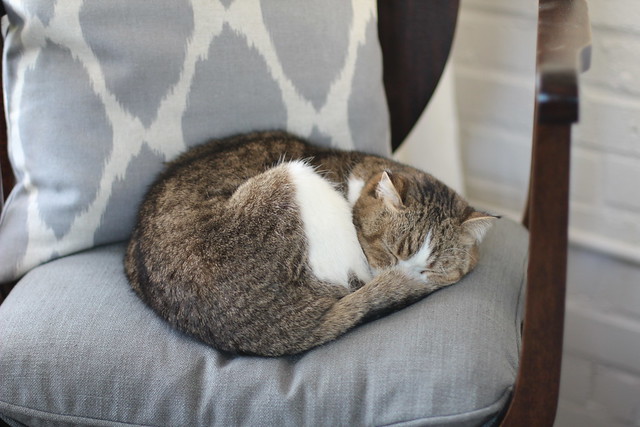
<p>But now that Mel has made it his new favorite napping spot, and several humans have done their job weighing it down, we really like the way it's looking.&nbsp;</p>
<p>
</p>
<div class="MediaContainer PhotoContainer"><a href="http://farm9.staticflickr.com/8373/8494836191_b1f15e6b9f_z.jpg" rel="PhotoPopup" popupheight="640" popupwidth="427"><img alt="" src="https://farm9.staticflickr.com/8373/8494836191_b1f15e6b9f.jpg" width="333" height="500" style="border-width: 0px; border-style: solid;"></a></div>
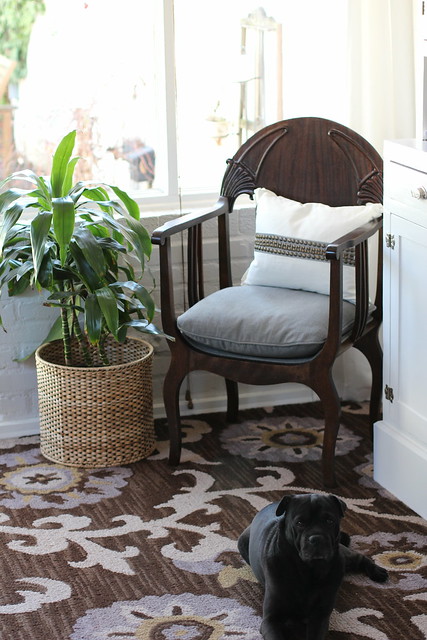
<p>We're very happy to have our chair back in its rightful home in the corner of our newly finished sun porch. We think it really fits in wonderfully with the room and gives Mel yet another spot where he can relax and enjoy the day.&nbsp;</p>
<p>Oh, I guess it also gives some extra seating for our guests, but that's surely secondary to its primary function as "cat throne."</p>
<p>
</p>
<div class="MediaContainer PhotoContainer"><a href="http://farm9.staticflickr.com/8090/8495926444_fa1d7a663f_z.jpg" rel="PhotoPopup" popupheight="427" popupwidth="640"><img alt="" src="https://farm9.staticflickr.com/8090/8495926444_fa1d7a663f.jpg" width="500" height="333" style="border-width: 0px; border-style: solid;"></a></div>
<p>Sure, we love projects that are finished in a blink of an eye as much as the next person, but sometimes you need to slow down to do things the right way. In this case, I feel like we've ended up with a pretty great finished product. What do you think of our end result?&nbsp;</p>
<p>Have you ever tackled a furniture restoration or upholstery job of your own? Would you do it again? We'd love to hear about your experiences.</p><p><a href="https://www.oldtownhome.com/2013/2/22/Getting-Sit-uated-Upholstering-a-Family-Heirloom/">Read Full Post</a></p>]]></content>
    <category term="Family Heirlooms" />
    <category term="Header Image" />
    <category term="Upholstery" />
    <PostImage>http://farm9.staticflickr.com/8226/8496104974_44b562822f.jpg</PostImage>
    <media:thumbnail url="https://farm9.staticflickr.com/8226/8496104974_44b562822f_t.jpg" />
    <ExtensionElements>
      <Item>PostImage</Item>
      <Item>media:thumbnail</Item>
    </ExtensionElements>
  </entry>
  <entry>
    <guid>2a40c43f-872d-4269-b8c2-b072bd0e7f92</guid>
    <id>https://www.oldtownhome.com/2012/12/17/Webbing-and-Burlap-Restoring-the-Seat-of-Wendys-Great-Grandfathers-Chair/</id>
    <title>Webbing and Burlap: Restoring the Seat of Wendy's Great-Grandfather's Chair</title>
    <summary type="html"><![CDATA[<p>After we completed the <a href="http://www.oldtownhome.com/2012/11/27/Breathing-Life-into-a-Forgotten-Family-Heirloom/index.aspx">lengthy preparations to get Wendy's great-grandfather's chair to the point of finishing</a>, then completed the <a href="http://www.oldtownhome.com/2012/12/5/Using-Aniline-Dye-to-Breathe-Life-Into-a-Forgotten-Family-Heirloom/index.aspx">tenuous finishing process using aniline dyes</a>, we figured the hard part was fully behind us. All that was left was to affix the support webbing for the seat as well as the burlap covering. Easy enough, right?</p><p>
</p><div class="MediaContainer PhotoContainer"><a href="http://farm9.staticflickr.com/8200/8239188407_7b0b659078_z.jpg" rel="PhotoPopup" popupheight="640" popupwidth="480"><img alt="" src="https://farm9.staticflickr.com/8200/8239188407_7b0b659078.jpg" width="375" height="500" style="border-width: 0px; border-style: solid;"></a></div><p>Before we got to this final step, Wendy and I had quite a bit of disagreement. We've actually been going back and forth on this issue for years. And I mean, quite literally, years. When we first received the chair, we had no idea what sort of seat had adorned the piece of furniture. Wendy's initial thought was to finish it with a piece of flat plywood covered in a bit of cushion and fabric, much like a typical dining room chair. Though this approach was an early possibility, when I began working on the chair I realized that it both wouldn't work and wasn't right for the shape and construction of the seat. </p><p>It wasn't until I actually paid attention to the curved front and back of the chair that I started to realize a more appropriate option. The seat was meant to be more of a U shape than a flat bottom seat. The side support rails of the seat area lent themselves to this shape as well. Any wood bottom would need to be shaped to fit in this opening, which would have been difficult at the very least. You can see the curve in the bottom when the chair was completely disassembled.</p><p>
</p><div class="MediaContainer PhotoContainer"><a href="http://farm9.staticflickr.com/8482/8222154247_27365cb9e3_z.jpg" rel="PhotoPopup" popupheight="640" popupwidth="480"><img alt="" src="https://farm9.staticflickr.com/8482/8222154247_27365cb9e3.jpg" width="375" height="500" style="border-width: 0px; border-style: solid;"></a></div><p>Secondly, as I removed nail after nail from the seat frame area, I also saw remnants of fabric that appeared to be burlap. After further inspection, I came to the conclusion that &nbsp;the chair 's original seat might have been woven fabric, covered in a padded cushion. Growing up, Wendy remembers the original seat of the chair was covered in a striped satin or silk, but the supports had long since deteriorated leaving the chair unusable.</p> <a href="https://www.oldtownhome.com/2012/12/17/Webbing-and-Burlap-Restoring-the-Seat-of-Wendys-Great-Grandfathers-Chair/">more</a>]]></summary>
    <published>2012-12-17T09:51:00.000-05:00</published>
    <updated>2012-12-17T09:51:00.000-05:00</updated>
    <link rel="alternate" href="https://www.oldtownhome.com/2012/12/17/Webbing-and-Burlap-Restoring-the-Seat-of-Wendys-Great-Grandfathers-Chair/" />
    <author>
      <name>Alex</name>
    </author>
    <content type="html"><![CDATA[<p>After we completed the <a href="http://www.oldtownhome.com/2012/11/27/Breathing-Life-into-a-Forgotten-Family-Heirloom/index.aspx">lengthy preparations to get Wendy's great-grandfather's chair to the point of finishing</a>, then completed the <a href="http://www.oldtownhome.com/2012/12/5/Using-Aniline-Dye-to-Breathe-Life-Into-a-Forgotten-Family-Heirloom/index.aspx">tenuous finishing process using aniline dyes</a>, we figured the hard part was fully behind us. All that was left was to affix the support webbing for the seat as well as the burlap covering. Easy enough, right?</p>
<p>
</p>
<div class="MediaContainer PhotoContainer"><a href="http://farm9.staticflickr.com/8200/8239188407_7b0b659078_z.jpg" rel="PhotoPopup" popupheight="640" popupwidth="480"><img alt="" src="https://farm9.staticflickr.com/8200/8239188407_7b0b659078.jpg" width="375" height="500" style="border-width: 0px; border-style: solid;"></a></div>
<p>Before we got to this final step, Wendy and I had quite a bit of disagreement. We've actually been going back and forth on this issue for years. And I mean, quite literally, years. When we first received the chair, we had no idea what sort of seat had adorned the piece of furniture. Wendy's initial thought was to finish it with a piece of flat plywood covered in a bit of cushion and fabric, much like a typical dining room chair. Though this approach was an early possibility, when I began working on the chair I realized that it both wouldn't work and wasn't right for the shape and construction of the seat. </p>
<p>It wasn't until I actually paid attention to the curved front and back of the chair that I started to realize a more appropriate option. The seat was meant to be more of a U shape than a flat bottom seat. The side support rails of the seat area lent themselves to this shape as well. Any wood bottom would need to be shaped to fit in this opening, which would have been difficult at the very least. You can see the curve in the bottom when the chair was completely disassembled.</p>
<p>
</p>
<div class="MediaContainer PhotoContainer"><a href="http://farm9.staticflickr.com/8482/8222154247_27365cb9e3_z.jpg" rel="PhotoPopup" popupheight="640" popupwidth="480"><img alt="" src="https://farm9.staticflickr.com/8482/8222154247_27365cb9e3.jpg" width="375" height="500" style="border-width: 0px; border-style: solid;"></a></div>
<p>Secondly, as I removed nail after nail from the seat frame area, I also saw remnants of fabric that appeared to be burlap. After further inspection, I came to the conclusion that &nbsp;the chair 's original seat might have been woven fabric, covered in a padded cushion. Growing up, Wendy remembers the original seat of the chair was covered in a striped satin or silk, but the supports had long since deteriorated leaving the chair unusable.</p>
<p>After coming to this realization, I told Wendy that I thought we should "upholster" the chair ourselves and take care of the seat and support on our own. She was not in agreement. </p>
<p>We went back and forth on this issue over the last several years. Wendy felt we were ill prepared to handle this on our own, and that we should let a professional furniture restorer handle the whole thing. I felt quite the opposite, more specifically that we had the knowhow and ability to figure our a viable solution to the problem and would be able to complete the project in an equally satisfactory manner as the pros. </p>
<p>As this debate went on, unchanged, for years, I had time to plan. I did a fair amount of research and found chairs all over eBay and antique websites that showed a similar webbing pattern as what I believe our chair was originally built with. </p>
<p class="MediaContainer PhotoContainer"><a href="http://farm9.staticflickr.com/8214/8280389220_17e48d22fa_z.jpg" rel="PhotoPopup" popupheight="470" popupwidth="640"><img alt="" src="https://farm9.staticflickr.com/8214/8280389220_17e48d22fa.jpg" width="500" height="368" style="border-width: 0px; border-style: solid;"></a></p>
<p class="MediaContainer PhotoContainer">Photo Credit: <a href="http://www.ar15.com/forums/t_1_139/1363315_Next_up_on_the_Honey_Do_list__Antique_chair_repair__The_Series.html" target="_blank">User Superreverb on ar15.com</a></p>
<p>In most cases, what I saw was a jute webbing as an underlayment, following by a single or double layer of burlap over top of the jute. In some cases, the jute was stretched taught across the chair, while in others it was hanging in a looser configuration. But in all cases, I was able to see how the webbing should be installed by taking clues from our chair and comparing with reference photos of other chairs. </p>
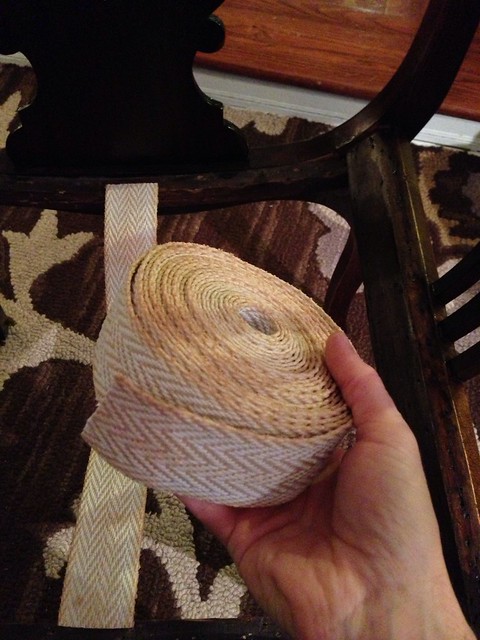
<p>Through my various on again - off again research, I was able to locate a furniture webbing from Rockler that looked like it would fit the bill.&nbsp;</p>
<p>
</p>
<div class="MediaContainer PhotoContainer"><a href="http://farm9.staticflickr.com/8477/8239213237_472063bf3f_z.jpg" rel="PhotoPopup" popupheight="640" popupwidth="480"><img alt="" src="https://farm9.staticflickr.com/8477/8239213237_472063bf3f.jpg" width="375" height="500" style="border-width: 0px; border-style: solid;"></a></div>
<p>At the time I didn't realize I could have just used a roll of heavy duty jute (this was a while ago, before I discovered what jute was), so I went ahead and bought enough for the webbing. It ended up not being nearly as cheap as the jute could have been, but it's a bit thicker and seems more solid. To be totally honest, I wish I had known about the jute, as I may have opted for that instead. </p>
<p>A few weeks ago, after the years of debate had raged on, Wendy tired of the ongoing argument and allowed her desire for a "finished" chair in time for the home tour to trump her desire to send it out to have it upholstered. My desire to provide this finished (enough) project for Wendy inspired me to wake up on only about four hours sleep the morning of the home tour and attempt to install the webbing while doing the remaining items on our lengthy to do list. </p>
<p>I grabbed our roll of chair webbing, a pair of scissors, and our <a href="http://www.oldtownhome.com/2011/12/20/Toolbox-Tuesday-Getting-Crafty-With-My-Staple-Gun/index.aspx">electric stapler</a>. </p>
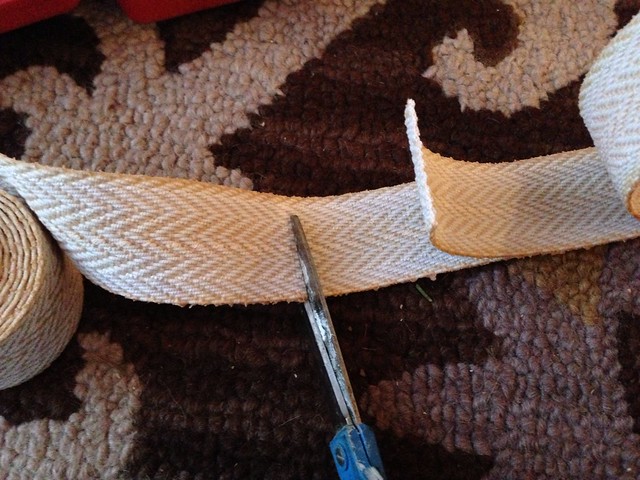
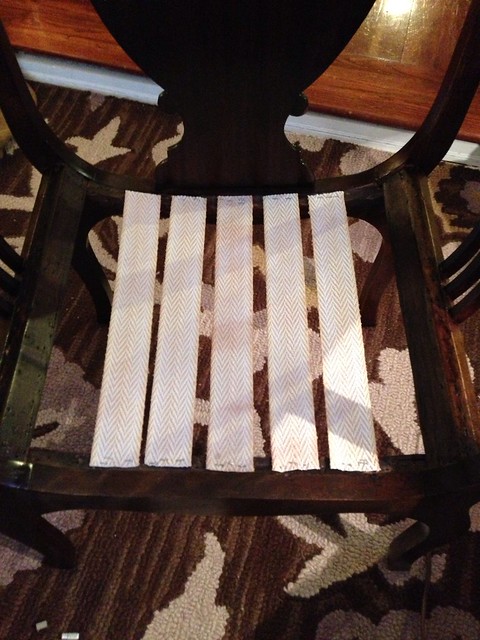
<p>My first step was to cut the front to back strips of webbing since these would need to be stretched a bit to provide the majority of the chair's seat support.  </p>
<p>
</p>
<div class="MediaContainer PhotoContainer"><a href="http://farm9.staticflickr.com/8058/8239220045_96bc73f7c1_z.jpg" rel="PhotoPopup" popupheight="480" popupwidth="640"><img alt="" src="https://farm9.staticflickr.com/8058/8239220045_96bc73f7c1.jpg" width="500" height="375" style="border-width: 0px; border-style: solid;"></a></div>
<p>Starting with middle piece, I began working out in either direction. </p>
<p>
</p>
<div class="MediaContainer PhotoContainer"><a href="http://farm9.staticflickr.com/8199/8240279128_8d1f94476d_z.jpg" rel="PhotoPopup" popupheight="640" popupwidth="480"><img alt="" src="https://farm9.staticflickr.com/8199/8240279128_8d1f94476d.jpg" width="375" height="500" style="border-width: 0px; border-style: solid;"></a></div>
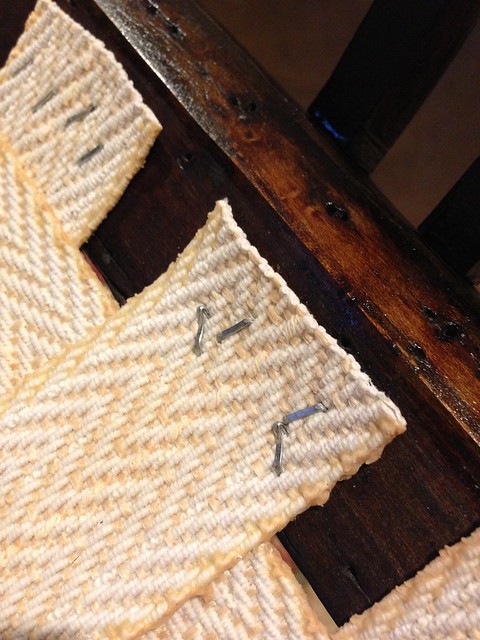
<p>Let me just say, I don't know how I didn't freak out and destroy our electric stapler. This stapler had worked so well on projects in the past, but now, when I needed it the most, all of the staples seemed to be going into the chair in a bent, mangled, gnarly fashion. I wanted nothing more than for the stapler to come alive just so that I could strangle its life from it. </p>
<p>
</p>
<div class="MediaContainer PhotoContainer"><a href="http://farm9.staticflickr.com/8081/8268026987_64fc76e7f0_z.jpg" rel="PhotoPopup" popupheight="640" popupwidth="480"><img alt="" src="https://farm9.staticflickr.com/8081/8268026987_64fc76e7f0.jpg" width="375" height="500" style="border-width: 0px; border-style: solid;"></a></div>
<p>I knew I didn't have time for another solution, so I grabbed my needle nosed pliers and started pulling out the particularly bad staples, but for the most part, I just said "screw it for now" and soldiered through. </p>
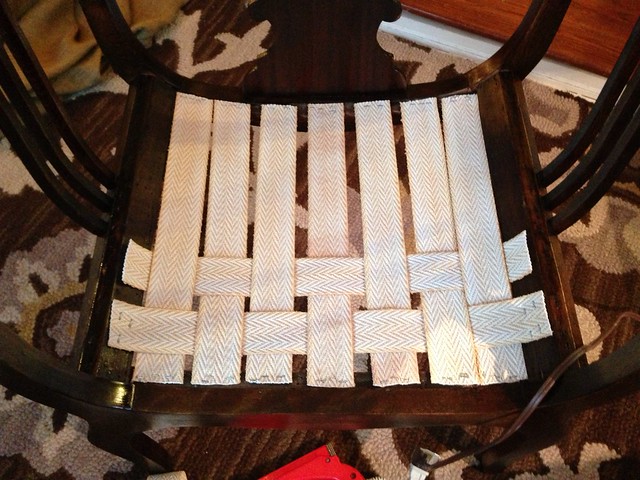
<p>Once the main front to back pieces were in place, I began weaving in the side to side pieces. Since the chair's bottom follows the slight curve of the seat, I didn't want to stretch these pieces, but instead I just wanted to staple them in place in a manner that would allow the bottom of the seat to lay naturally with the curve of the wood. </p>
<p>
</p>
<div class="MediaContainer PhotoContainer"><a href="http://farm9.staticflickr.com/8487/8240285770_ba46707905_z.jpg" rel="PhotoPopup" popupheight="480" popupwidth="640"><img alt="" src="https://farm9.staticflickr.com/8487/8240285770_ba46707905.jpg" width="500" height="375" style="border-width: 0px; border-style: solid;"></a></div>
<p>After about an hour of cutting, stretching, and stapling, I had a completed chair bottom. </p>
<p>
</p>
<div class="MediaContainer PhotoContainer"><a href="http://farm9.staticflickr.com/8487/8239221669_5bdd0c4b5a_z.jpg" rel="PhotoPopup" popupheight="640" popupwidth="480"><img alt="" src="https://farm9.staticflickr.com/8487/8239221669_5bdd0c4b5a.jpg" width="375" height="500" style="border-width: 0px; border-style: solid;"></a></div>
<p>I nervously tested it out, first by pushing with my hands, then gingerly sitting on the woven straps, and then finally giving in and putting my full weight down. Our chair that had once been a forgotten and wobbly mess was now a beautiful piece of functional heirloom furniture. </p>
<p>At this point we threw a pillow on it and called it "good enough" for the home tour. We didn't expect anyone to actually sit in it, so we figured we didn't need to worry all that much. Boy were we wrong. </p>
<p>
</p>
<div class="MediaContainer PhotoContainer"><a href="http://farm9.staticflickr.com/8481/8246696831_dd0f6f1659_z.jpg" rel="PhotoPopup" popupheight="640" popupwidth="639"><img alt="" src="https://farm9.staticflickr.com/8481/8246696831_dd0f6f1659.jpg" width="500" height="500" style="border-width: 0px; border-style: solid;"></a></div>
<p>Throughout the tour I bet there were dozens of people that sat in this little antique chair. When we arrived home the pillows were askew and the chair slightly moved. The best news of all was that the chair's webbing was in place, crinkled staples and all. </p>
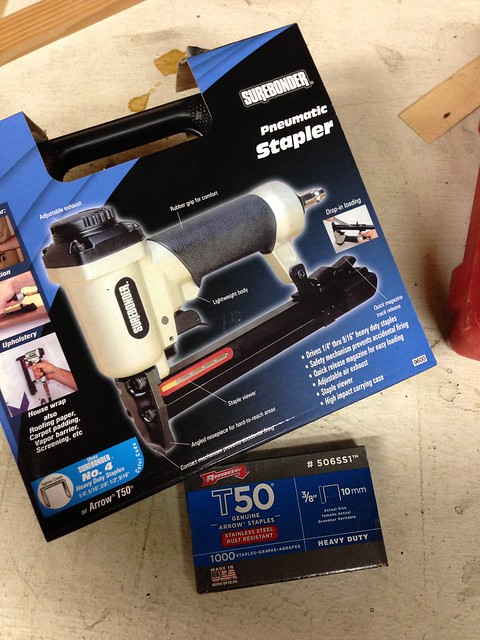
<p>Though the chair had survived its major test, I'm often a bit of a perfectionist on items like this. Rather than leave well enough alone, I figured it was high time to put my "one new tool for every project" mantra to good use. I've long thought about getting a pneumatic stapler, and now that our electric stapler had turned into a giant disappointment and failed so miserably from an upholstery standpoint, I was ready to take it to the next level. I ordered an inexpensive upholstery stapler and it arrived a few days later. </p>
<p>
</p>
<div class="MediaContainer PhotoContainer"><a href="http://farm9.staticflickr.com/8223/8268030343_6b7981cef4_z.jpg" rel="PhotoPopup" popupheight="640" popupwidth="480"><img alt="" src="https://farm9.staticflickr.com/8223/8268030343_6b7981cef4.jpg" width="375" height="500" style="border-width: 0px; border-style: solid;"></a></div>
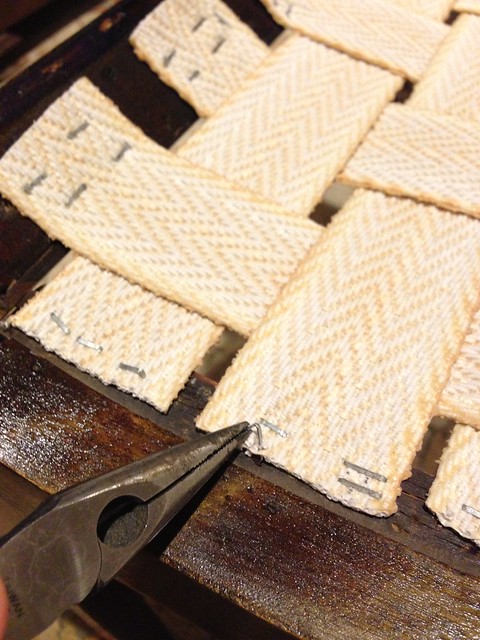
<p>At this point, our chair was covered in bad staples, so I grabbed my needle nose pliers and got to work. I pulled out most staples from each area leaving one or two critical staples in place on each piece of fabric. This allowed me to staple with the new gun without losing any stretch or form of the weave. </p>
<p>
</p>
<div class="MediaContainer PhotoContainer"><a href="http://farm9.staticflickr.com/8363/8268025981_562c41c431_z.jpg" rel="PhotoPopup" popupheight="640" popupwidth="480"><img alt="" src="https://farm9.staticflickr.com/8363/8268025981_562c41c431.jpg" width="375" height="500" style="border-width: 0px; border-style: solid;"></a></div>
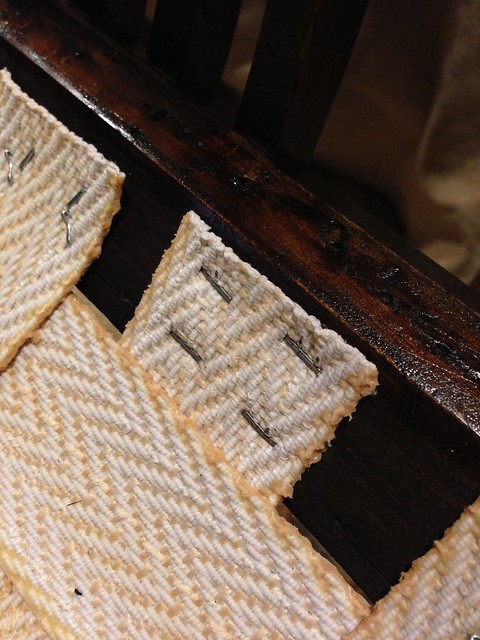
<p>The staples went in perfectly. Flat, smooth, predictable, and therefore were far fewer thoughts of tool homocide, I assure you. </p>
<p>
</p>
<div class="MediaContainer PhotoContainer"><a href="http://farm9.staticflickr.com/8059/8268026567_04beb51e91_z.jpg" rel="PhotoPopup" popupheight="640" popupwidth="480"><img alt="" src="https://farm9.staticflickr.com/8059/8268026567_04beb51e91.jpg" width="375" height="500" style="border-width: 0px; border-style: solid;"></a></div>
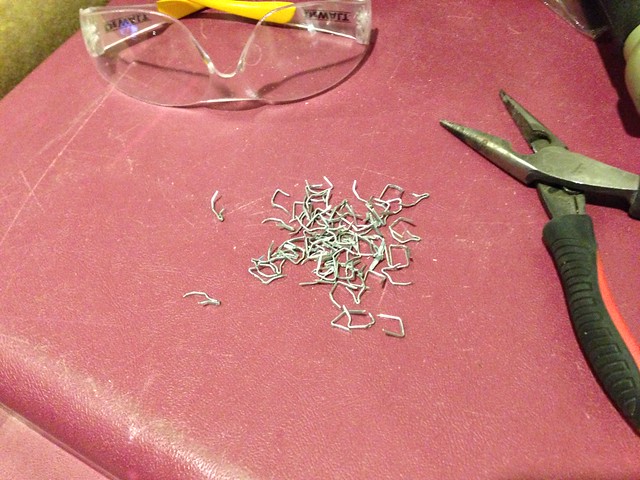
<p>After a whole lot of effort in carefully removing and re-stapling, I had a neat pile of silver carnage...</p>
<p>
</p>
<div class="MediaContainer PhotoContainer"><a href="http://farm9.staticflickr.com/8355/8268025561_d9eb6d39e7_z.jpg" rel="PhotoPopup" popupheight="480" popupwidth="640"><img alt="" src="https://farm9.staticflickr.com/8355/8268025561_d9eb6d39e7.jpg" width="500" height="375" style="border-width: 0px; border-style: solid;"></a></div>
<p>...but also a much more organized and workable basket weave, ready to stand up to all the rear ends that will meet this chair.&nbsp;</p>
<p>The final step to completing the chair's seat base was to apply a covering of burlap to the top of the basket weave. I'm not sure why this step is necessary, but I saw it in enough pictures to know I should do it. My guess, it has to do with keeping the basket weave from getting disturbed by the seat cushion upon repeated sitting. </p>
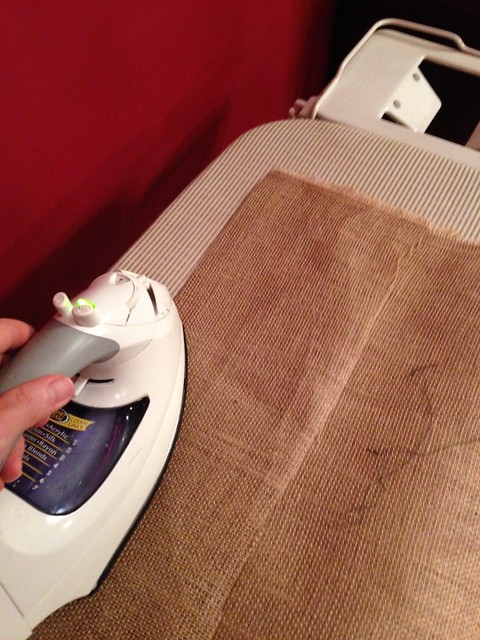
<p>We cut a piece of burlap that was larger than the dimensions of the chair, then folded the sides under prior to stapling. We used an iron to get a nice crase in the fabric and to give the burlap edges a much tidier look. </p>
<p>
</p>
<div class="MediaContainer PhotoContainer"><a href="http://farm9.staticflickr.com/8495/8269080040_db9f4cb222_z.jpg" rel="PhotoPopup" popupheight="640" popupwidth="480"><img alt="" src="https://farm9.staticflickr.com/8495/8269080040_db9f4cb222.jpg" width="375" height="500" style="border-width: 0px; border-style: solid;"></a></div>
<p>We also doubled the burlap over, effectively giving ourselves two layers of covering from a single piece if fabric. </p>
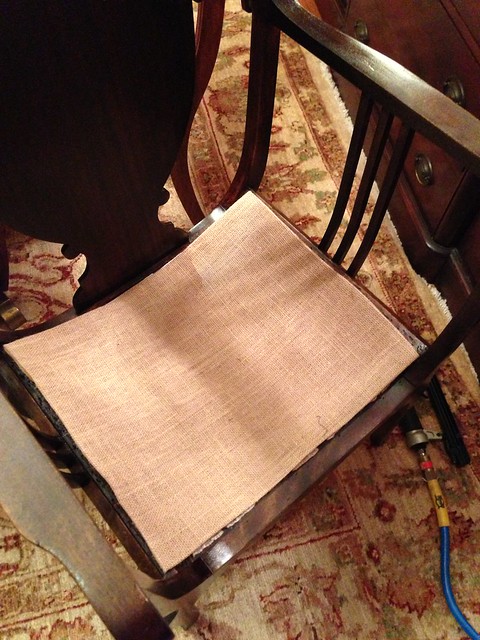
<p>After a quick test fit...</p>
<p>
</p>
<div class="MediaContainer PhotoContainer"><a href="http://farm9.staticflickr.com/8209/8269079020_c268acbaf1_z.jpg" rel="PhotoPopup" popupheight="640" popupwidth="480"><img alt="" src="https://farm9.staticflickr.com/8209/8269079020_c268acbaf1.jpg" width="375" height="500" style="border-width: 0px; border-style: solid;"></a></div>
<p>...and a few more (dozen) staples, we had ourselves a good looking chair that just needed a nice upholstered cushion. After a final "Alex's butt test," I gave our burlap and webbing base our seal of approval. </p>
<p>
</p>
<div class="MediaContainer PhotoContainer"><a href="http://farm9.staticflickr.com/8492/8268009271_aa906033d5_z.jpg" rel="PhotoPopup" popupheight="640" popupwidth="480"><img alt="" src="https://farm9.staticflickr.com/8492/8268009271_aa906033d5.jpg" width="375" height="500" style="border-width: 0px; border-style: solid;"></a></div>
<p>And do you know why this project is perfect for blogging? Because it involves burlap, and the Internet are IN LOVE WITH BURLAP. I know, I've seen it first hand. This is definitely something Lulu has in common with the whole home decor blogosphere. </p>
<p>
</p>
<div class="MediaContainer PhotoContainer"><a href="http://farm9.staticflickr.com/8345/8268012093_675538f222_z.jpg" rel="PhotoPopup" popupheight="640" popupwidth="480"><img alt="" src="https://farm9.staticflickr.com/8345/8268012093_675538f222.jpg" width="375" height="500" style="border-width: 0px; border-style: solid;"></a></div>
<p>The final step will be to have a cushion made to sit atop the burlap seat. Wendy ordered a couple yards of fabric from West Elm, and the gray textured fabric has arrived. We might tackle this final step after the holiday madness has subsided.</p>
<p>
</p>
<div class="MediaContainer PhotoContainer"><a href="http://farm9.staticflickr.com/8360/8268024341_dbcca36102_z.jpg" rel="PhotoPopup" popupheight="640" popupwidth="480"><img alt="" src="https://farm9.staticflickr.com/8360/8268024341_dbcca36102.jpg" width="375" height="500" style="border-width: 0px; border-style: solid;"></a></div>
<p>What do you think, do we have a good and long lasting base for our chair? Do you think it was the right move to remove the messed up staples and redo everything, or would you have left it the way it was since it would ultimately be hidden under the burlap? Have you ever had a less than&nbsp;desirable&nbsp;outcome from a step in a project, and have opted to take a step back and correct/rework the issue? It pained us to do so in the moment because of the lost time and expense of a new tool, but now that it's done "right" we'll sleep better at night.</p><p><a href="https://www.oldtownhome.com/2012/12/17/Webbing-and-Burlap-Restoring-the-Seat-of-Wendys-Great-Grandfathers-Chair/">Read Full Post</a></p>]]></content>
    <category term="Chair Restoration" />
    <category term="Family Heirlooms" />
    <category term="Header Image" />
    <category term="Projects:Salvage" />
    <category term="Salvage" />
    <category term="Sun Porch" />
    <PostImage>http://farm9.staticflickr.com/8207/8279097085_ed3cd3436a.jpg</PostImage>
    <media:thumbnail url="https://farm9.staticflickr.com/8207/8279097085_ed3cd3436a_t.jpg" />
    <ExtensionElements>
      <Item>PostImage</Item>
      <Item>media:thumbnail</Item>
    </ExtensionElements>
  </entry>
  <entry>
    <guid>97abc8ac-c638-4f5e-b039-9f8051c98d50</guid>
    <id>https://www.oldtownhome.com/2012/12/5/Using-Aniline-Dye-to-Breathe-Life-Into-a-Forgotten-Family-Heirloom/</id>
    <title>Using Aniline Dye to Breathe Life Into a Forgotten Family Heirloom</title>
    <summary type="html"><![CDATA[<p>We'll be back a little later today with the second of our <a href="http://www.oldtownhome.com/content/Twelve-Days-of-Christmas-Giveaway-2012/" target="_blank">Twelve Days of Christmas Giveaway</a> posts, so stay tuned. If you've not entered yesterday's First Day giveaway for a <a href="http://www.oldtownhome.com/2012/12/4/On-the-First-Day-of-Christmas-Reader-Reward-for-Bishop-Boutique/index.aspx" target="_blank">$50 gift certificate to Bishop Boutique</a>, be sure to head on over and leave a comment.</p><p>In our <a href="http://www.oldtownhome.com/2012/11/27/Breathing-Life-into-a-Forgotten-Family-Heirloom/index.aspx">last post about Wendy's great-grandfather's chair</a>, we filled you in on the chair's history, as well as the journey it had taken from basement to basement until it reached our home in need of a little TLC.</p><p>
</p><div class="MediaContainer PhotoContainer"><a href="http://farm6.staticflickr.com/5144/5663901313_ef7739aba8_z.jpg" rel="PhotoPopup" popupheight="640" popupwidth="480"><img alt="" src="https://farm6.staticflickr.com/5144/5663901313_ef7739aba8.jpg" width="375" height="500" style="border-width: 0px; border-style: solid;"></a></div><p>The chair has transferred hands several times in the last 40-50 years, each owner having full intentions to refinish and repair the chair back to a functional piece of furniture. Who knows how long it had been in the state it was in, but to the recollection of Wendy's mother, it was even in the Wendy's great-grandfather's basement for quite a bit of time. </p><p class="MediaContainer PhotoContainer"><a href="http://farm9.staticflickr.com/8342/8247639098_8aef1b1570_z.jpg" rel="PhotoPopup" popupheight="540" popupwidth="640"><img alt="" src="https://farm9.staticflickr.com/8342/8247639098_8aef1b1570.jpg" width="500" height="422" style="border-width: 0px; border-style: solid;"></a></p><p class="MediaContainer PhotoContainer"><em>Wendy's Great-Grandfather and Great-Grandmother are in the back row, 3rd and 4th from the right, holding her great-aunt Marge.</em></p> <a href="https://www.oldtownhome.com/2012/12/5/Using-Aniline-Dye-to-Breathe-Life-Into-a-Forgotten-Family-Heirloom/">more</a>]]></summary>
    <published>2012-12-05T11:26:00.000-05:00</published>
    <updated>2012-12-05T11:26:00.000-05:00</updated>
    <link rel="alternate" href="https://www.oldtownhome.com/2012/12/5/Using-Aniline-Dye-to-Breathe-Life-Into-a-Forgotten-Family-Heirloom/" />
    <author>
      <name>Alex</name>
    </author>
    <content type="html"><![CDATA[<p>We'll be back a little later today with the second of our <a href="http://www.oldtownhome.com/content/Twelve-Days-of-Christmas-Giveaway-2012/" target="_blank">Twelve Days of Christmas Giveaway</a> posts, so stay tuned. If you've not entered yesterday's First Day giveaway for a <a href="http://www.oldtownhome.com/2012/12/4/On-the-First-Day-of-Christmas-Reader-Reward-for-Bishop-Boutique/index.aspx" target="_blank">$50 gift certificate to Bishop Boutique</a>, be sure to head on over and leave a comment.</p>
<p>In our <a href="http://www.oldtownhome.com/2012/11/27/Breathing-Life-into-a-Forgotten-Family-Heirloom/index.aspx">last post about Wendy's great-grandfather's chair</a>, we filled you in on the chair's history, as well as the journey it had taken from basement to basement until it reached our home in need of a little TLC.</p>
<p>
</p>
<div class="MediaContainer PhotoContainer"><a href="http://farm6.staticflickr.com/5144/5663901313_ef7739aba8_z.jpg" rel="PhotoPopup" popupheight="640" popupwidth="480"><img alt="" src="https://farm6.staticflickr.com/5144/5663901313_ef7739aba8.jpg" width="375" height="500" style="border-width: 0px; border-style: solid;"></a></div>
<p>The chair has transferred hands several times in the last 40-50 years, each owner having full intentions to refinish and repair the chair back to a functional piece of furniture. Who knows how long it had been in the state it was in, but to the recollection of Wendy's mother, it was even in the Wendy's great-grandfather's basement for quite a bit of time. </p>
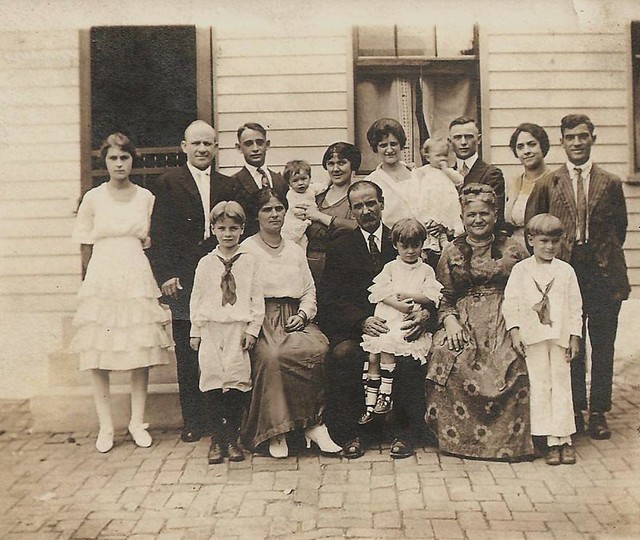
<p class="MediaContainer PhotoContainer"><a href="http://farm9.staticflickr.com/8342/8247639098_8aef1b1570_z.jpg" rel="PhotoPopup" popupheight="540" popupwidth="640"><img alt="" src="https://farm9.staticflickr.com/8342/8247639098_8aef1b1570.jpg" width="500" height="422" style="border-width: 0px; border-style: solid;"></a></p>
<p class="MediaContainer PhotoContainer"><em>Wendy's Great-Grandfather and Great-Grandmother are in the back row, 3rd and 4th from the right, holding her great-aunt Marge.</em></p>
<p>As legend has it, one day Wendy's great-grandfather locked himself out of the house. As a spry 80 something, he was able to jimmy open a basement window and crawl through to gain access to the house. The chair was apparently sitting below this window, and was the only thing that allowed him to step into the basement rather than fall. Perhaps this is where it developed its signature wobble. </p>
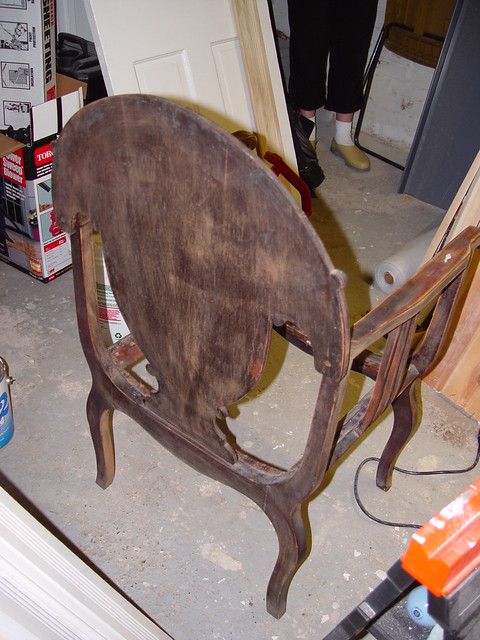
<p>Having sanded and prepared the chair for finishing (and correcting the wobble), it came to a point where we were ready to apply a stain. Wendy had hinted that she wanted to paint the chair at one time, and since I had just spent a significant amount of time sanding it, I simply didn't feel this was a viable (or reasonable) option. Rather than paint, I suggested we stain the chair a very dark brown, with which Wendy agreed. Okay, maybe Wendy begrudgingly agreed. </p>
<p>
</p>
<div class="MediaContainer PhotoContainer"><a href="http://farm9.staticflickr.com/8482/8223230046_9f84bf4940_z.jpg" rel="PhotoPopup" popupheight="640" popupwidth="480"><img alt="" src="https://farm9.staticflickr.com/8482/8223230046_9f84bf4940.jpg" width="375" height="500" style="border-width: 0px; border-style: solid;"></a></div>
<p>I began researching the type of stain we'd want to use to achieve the dark look. We've only ever used oil based wood stain before (and I believe gel stain on one project at some point), but the use of dyes has intrigued me for some time. I know it's a far more effective way to really get those deep and dark colors, as well as a way to make certain species of wood look like other more expensive species, but I was a bit nervous to try something new on something old the cherished heirloom.</p>
<div class="ToolItem">
<iframe src="http://rcm.amazon.com/e/cm?t=oltoho-20&amp;o=1&amp;p=8&amp;l=as1&amp;asins=B008SBFS8M&amp;IS1=1&amp;ref=qf_sp_asin_til&amp;fc1=3A3128&amp;lt1=_blank&amp;m=amazon&amp;lc1=61838A&amp;bc1=FAFAF8&amp;bg1=FAFAF8&amp;f=ifr" style="width: 120px; height: 240px;" scrolling="no" marginwidth="0" marginheight="0" frameborder="0"></iframe>
</div>
<p>After doing a lot of research and seeking a significant amount of advice from several people, I felt I was armed with the info we'd need to proceed. Though a reader or two had cautioned us against the possible perils of using dye, we threw caution to the wind and opted to go for it.</p>
<p>If you're not familiar, dye is a tried and true means for coloring wood, and one that's been in use for centuries. Oil stain is actually a rather recent invention. In our case, we opted to use a water soluble aniline dye. Though we chose water soluble, there are also alcohol and shellac based options, each with their own unique properties. </p>
<p>In the case of dye, when you apply it to the wood it actually absorbs into the wood and changes the color. Typical stains or cut shellac essentially mask over the surface with the color, this is why you can't drastically make a stain darker by applying additional coats. The aniline dyes will dye the wood with each coat, making it darker with each application. The advantage, in my eyes, is that it actually changes the wood, and you can use dyes to make the wood you're working with look like a different species.</p>
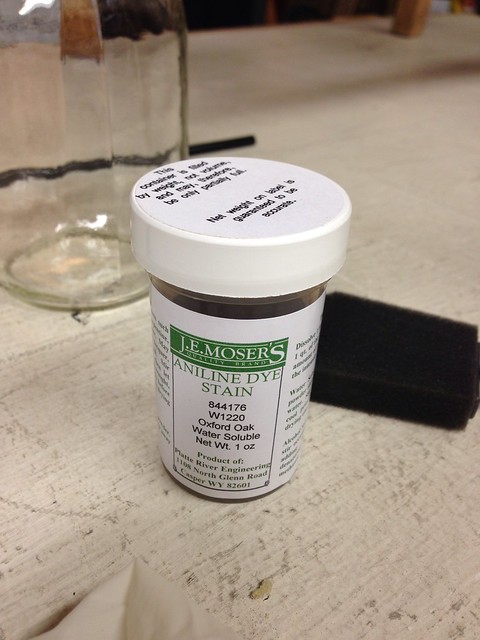
<p>We ordered a small one ounce vial of dye from Woodworker's Supply. The aniline dyes actually come as powder that you mix by volume. The more powder, the darker the color. </p>
<p>
</p>
<div class="MediaContainer PhotoContainer"><a href="http://farm9.staticflickr.com/8067/8240197778_6f366981e9_z.jpg" rel="PhotoPopup" popupheight="640" popupwidth="480"><img alt="" src="https://farm9.staticflickr.com/8067/8240197778_6f366981e9.jpg" width="375" height="500" style="border-width: 0px; border-style: solid;"></a></div>
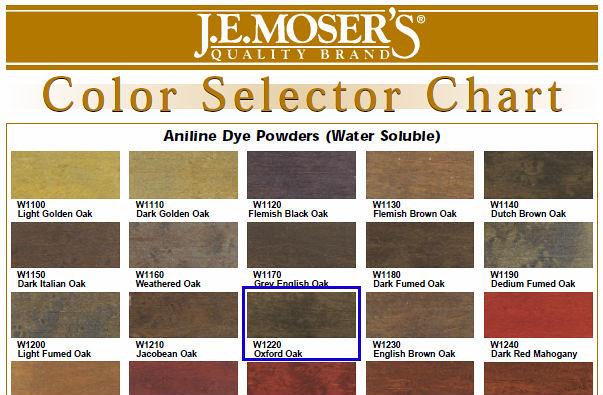
<p>The color we selected is called Oxford Oak and it looked to be a very dark brown. </p>
<p>
</p>
<p class="MediaContainer PhotoContainer"><a href="http://farm9.staticflickr.com/8207/8247705998_be02a20e3f_z.jpg" rel="PhotoPopup" popupheight="395" popupwidth="603"><img alt="" src="https://farm9.staticflickr.com/8207/8247705998_be02a20e3f.jpg" width="500" height="328" style="border-width: 0px; border-style: solid;"></a></p>
<p class="MediaContainer PhotoContainer"><em>For a complete listing of colors (and there are a ton), check out the <a href="http://woodworker.com/pdf/clrcharth2o.pdf" target="_blank">full color chart</a>.</em></p>
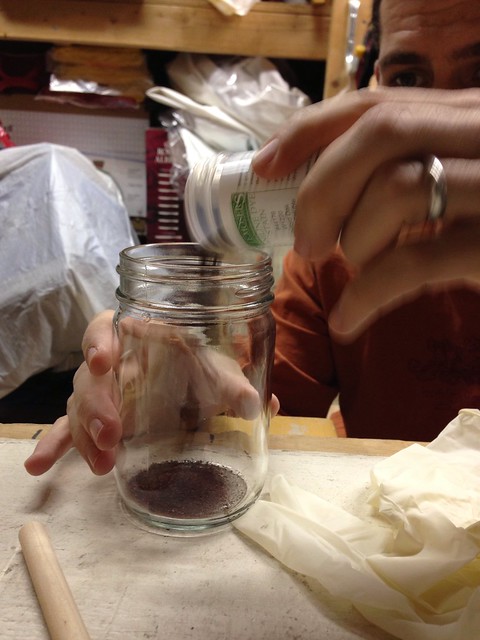
<p>To properly gauge how much dye we were mixing I made pen marks at the quarter lines of the vial. This way I'd be able to see when I had placed the proper amount in the glass jar.</p>
<p>
</p>
<div class="MediaContainer PhotoContainer"><a href="http://farm9.staticflickr.com/8203/8239133189_d771a04dc9_z.jpg" rel="PhotoPopup" popupheight="640" popupwidth="480"><img alt="" src="https://farm9.staticflickr.com/8203/8239133189_d771a04dc9.jpg" width="375" height="500" style="border-width: 0px; border-style: solid;"></a></div>
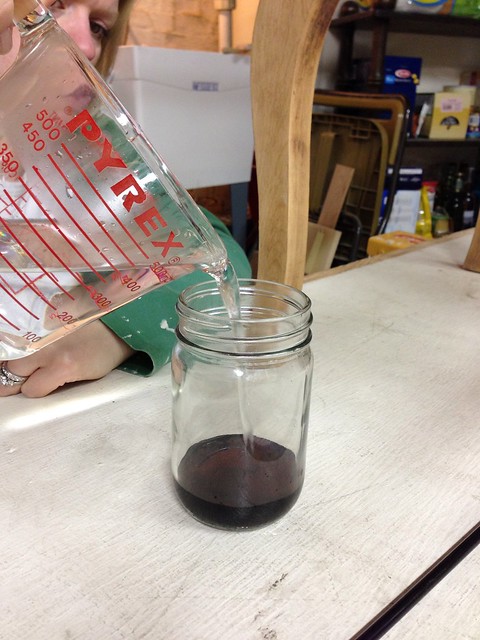
<p>Following the instructions we used very hot (but not boiling) water and mixed it into the powder.</p>
<p>
</p>
<div class="MediaContainer PhotoContainer"><a href="http://farm9.staticflickr.com/8342/8240210448_ebe51ab9d8_z.jpg" rel="PhotoPopup" popupheight="640" popupwidth="480"><img alt="" src="https://farm9.staticflickr.com/8342/8240210448_ebe51ab9d8.jpg" width="375" height="500" style="border-width: 0px; border-style: solid;"></a></div>
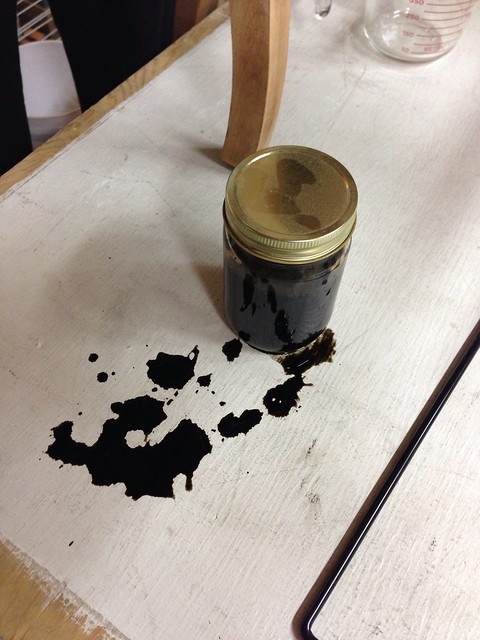
<p>It instantly became a very dark color. We put the lid on the jar and shook. <em>Note: Use correct lid and tighten, otherwise this happens.&nbsp;</em></p>
<p>
</p>
<div class="MediaContainer PhotoContainer"><a href="http://farm9.staticflickr.com/8070/8240218316_ae11a1f639_z.jpg" rel="PhotoPopup" popupheight="640" popupwidth="480"><img alt="" src="https://farm9.staticflickr.com/8070/8240218316_ae11a1f639.jpg" width="375" height="500" style="border-width: 0px; border-style: solid;"></a></div>
<p>Also, be sure to wear gloves, otherwise your nail beds will look like you're a garage mechanic for the next two weeks.&nbsp;</p>
<p>After a good mixing, we poured the dye solution through a strainer to remove any of the&nbsp;undissolved&nbsp;or gritty dye particles.</p>
<p>
</p>
<div class="MediaContainer PhotoContainer"><a href="http://farm9.staticflickr.com/8061/8239159571_b55bdf95b4_z.jpg" rel="PhotoPopup" popupheight="640" popupwidth="480"><img alt="" src="https://farm9.staticflickr.com/8061/8239159571_b55bdf95b4.jpg" width="375" height="500" style="border-width: 0px; border-style: solid;"></a></div>
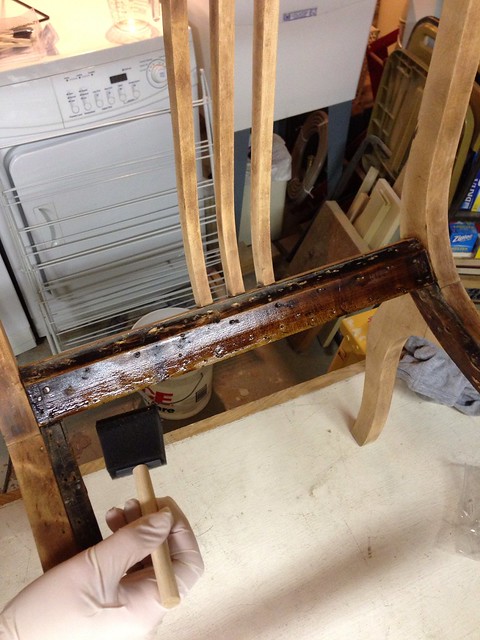
<p>Once the dye was mixed we began applying the mixture to the chair. We both started in out of way locations that we knew would be covered by the chair pad. We did this to be sure the color was what we wanted, but would allow ourselves an out if it was looking horrible. Luckily, the color was exactly what we were looking for.</p>
<p>
</p>
<div class="MediaContainer PhotoContainer"><a href="http://farm9.staticflickr.com/8337/8239160125_6490ab4900_z.jpg" rel="PhotoPopup" popupheight="640" popupwidth="480"><img alt="" src="https://farm9.staticflickr.com/8337/8239160125_6490ab4900.jpg" width="375" height="500" style="border-width: 0px; border-style: solid;"></a></div>
<p>We continued by methodically working our way around the chair using foam brushes. </p>
<p>
</p>
<div class="MediaContainer PhotoContainer"><a href="http://farm9.staticflickr.com/8203/8240228246_79e0fc83fc_z.jpg" rel="PhotoPopup" popupheight="640" popupwidth="480"><img alt="" src="https://farm9.staticflickr.com/8203/8240228246_79e0fc83fc.jpg" width="375" height="500" style="border-width: 0px; border-style: solid;"></a></div>
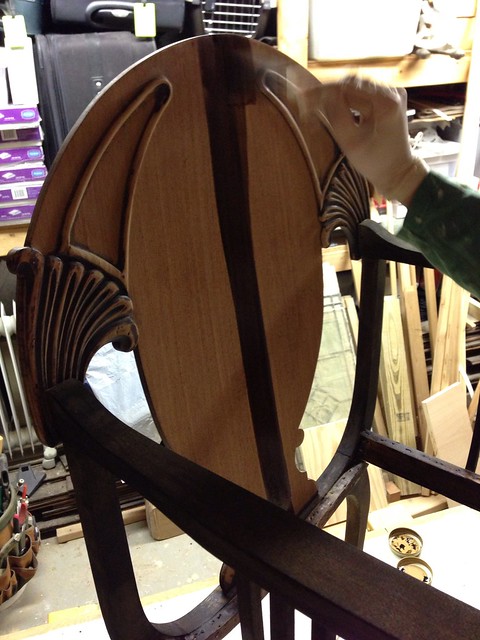
<p>Much like painting, you want to maintain a wet edge. This way you're not doubling up coats of dye. If you double up on an area that has already started to dry, you may end up with some splotchiness. </p>
<p>We were both really loving the rich color of the dye. One small mistake was how Wendy started the back of the chair. She began with a strip right down the middle. This made it difficult to cover the right and then the left without accidentally doubling up on dried stain. It would have been better to work from one very edge to the other. Lesson learned. </p>
<p>
</p>
<div class="MediaContainer PhotoContainer"><a href="http://farm9.staticflickr.com/8057/8240249072_f70ffe6f6a_z.jpg" rel="PhotoPopup" popupheight="640" popupwidth="480"><img alt="" src="https://farm9.staticflickr.com/8057/8240249072_f70ffe6f6a.jpg" width="375" height="500" style="border-width: 0px; border-style: solid;"></a></div>
<p>The other problem we kept running into was drips. In retrospect, it would have been better to work from top to bottom, correcting drips as they occur. We were working from the bottom of the legs and working up, so gravity was against us, and any drips had the chance to go over already applied dye. We had to be very diligent in our inspection and proactive with our corrections. </p>
<p>
It's also important to note that our application was done using a foam brush, but a sprayer may have been much better at giving a more even consistent covering. </p>
<p>Once we finished the first overall coat the directions dictated a 12 hour dry time. During this point, we actually grew a little concerned. As the dye dried, the color changed from the deep and rich brown to an almost green hued brown.&nbsp;</p>
<p>
</p>
<div class="MediaContainer PhotoContainer"><a href="http://farm9.staticflickr.com/8346/8239182823_4d402158ca_z.jpg" rel="PhotoPopup" popupheight="640" popupwidth="480"><img alt="" src="https://farm9.staticflickr.com/8346/8239182823_4d402158ca.jpg" width="375" height="500" style="border-width: 0px; border-style: solid;"></a></div>
<p>We also had to keep telling ourselves that it would look better once we applied a topcoat. We had also planned on applying a second coat of dye, since the instructions suggested it.</p>
<p>Once the whole chair had dried, we were actually a little more than concerned. The stripe down the middle of the chair's back was obvious, you could see a few areas of overlap on other parts of the chair, and the color was somewhat inconsistent from spot to spot. Though troubling, I resisted the "OMG I'm totally freaking out," response I would have normally gone for. </p>
<p>
</p>
<div class="MediaContainer PhotoContainer"><a href="http://farm9.staticflickr.com/8070/8239184283_d42ffd50af_z.jpg" rel="PhotoPopup" popupheight="640" popupwidth="480"><img alt="" src="https://farm9.staticflickr.com/8070/8239184283_d42ffd50af.jpg" width="375" height="500" style="border-width: 0px; border-style: solid;"></a></div>
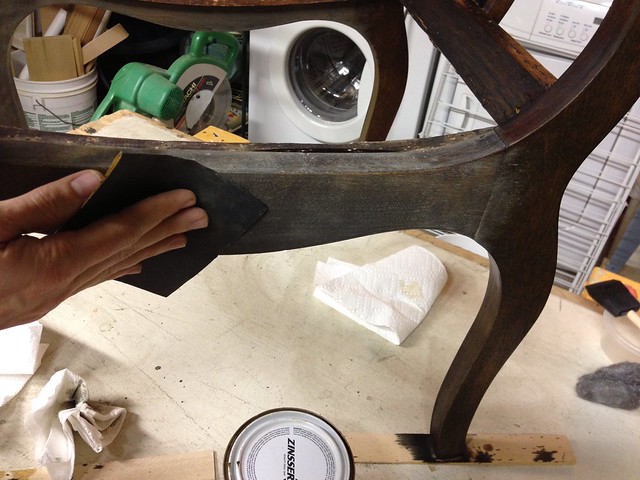
<p>Since the dye is a water based dye, it had slightly raised the grain (fuzz) of the wood. This gave the previously smooth chair a bit of a rough feeling. I knew we'd need to give the whole thing a light sand, so I was holding out hope that this sanding process might be able to correct the issues. I grabbed a bit of 400 grit sandpaper and got to work. </p>
<p>It's important to note that all of this sanding was done by hand. I just wanted to smooth out the problem areas and remove the fuzz of the wood.  When I hit the areas of blotchiness or overlap of dye coats, I could see the harsh transitions fade just a bit. The key to the success of correcting the issues was actually dropping down and using 200 grit sandpaper in the very dark areas that I wanted to slight lighten. Then going back over those areas with the 400 grit paper evened it all out a bit more.</p>
<p>After the initial sand we looked over the whole chair and made the executive decision (collectively as executives of our house...no, Lulu and Mel didn't have a say because they aren't allowed in the disaster of a basement) to forego application of the second coat of dye. It would have required an extra day to dry, as well as mixing a much lighter batch of dye, and we were satisfied with the color. Besides, we still had some sliver of hope that we'd be able to put the chair out during <a href="http://www.oldtownhome.com/2012/12/3/Its-Christmastime-in-the-City-Designer-Home-Tour-Behind-the-Scenes/index.aspx">last weekend's home tour</a>. Rather than a second coat of dye, we moved right onto topcoat application. </p>
<p>
</p>
<div class="MediaContainer PhotoContainer"><a href="http://farm9.staticflickr.com/8069/8231564255_93d80dc2dc_z.jpg" rel="PhotoPopup" popupheight="640" popupwidth="480"><img alt="" src="https://farm9.staticflickr.com/8069/8231564255_93d80dc2dc.jpg" width="375" height="500" style="border-width: 0px; border-style: solid;"></a></div>
<p>We had several different options for the topcoat. We could use an oil- or water-based polyurethane, as we've done for several other projects, but this didn't feel right to us. We could have also used lacquer, but I sort of had my mind set on shellac. </p>
<p>Shellac has a few qualities that I really like about  using it as a finish for this project. First, it's an alcohol based topcoat. Since the dye is water based, we needed to use an oil- or alcohol-based topcoat. Second, it's an old, tried and true product. Shellac has been used in wood finishing since the early 19th century. It was replaced in the 1920s and 30s by lacquer, and more recently, polyurethane. Third, the dye we used had almost no reddish color to it. Using shellac would add a slight amber color to the final product that we thought might be appealing and help us land on just color we were looking to achieve. </p>
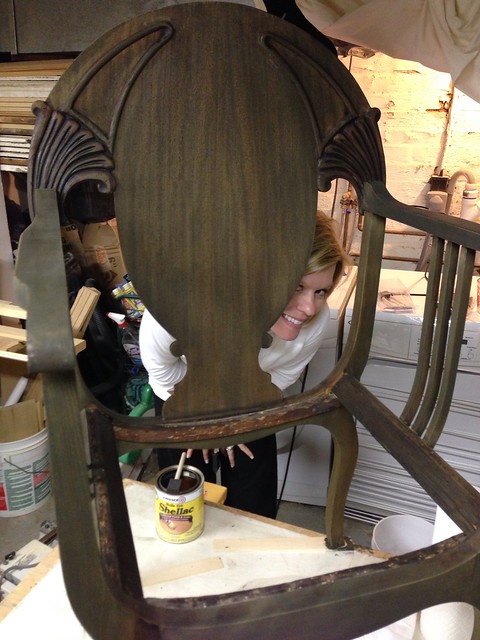
<p>We went ahead and applied two coats of shellac with a 24 hour dry time in between. We also sanded the first coat of shellac with 400 grit sandpaper to give the second coat a really smooth finish. </p>
<p>
</p>
<div class="MediaContainer PhotoContainer"><a href="http://farm9.staticflickr.com/8348/8232627730_3ab0fcf537_z.jpg" rel="PhotoPopup" popupheight="480" popupwidth="640"><img alt="" src="https://farm9.staticflickr.com/8348/8232627730_3ab0fcf537.jpg" width="500" height="375" style="border-width: 0px; border-style: solid;"></a></div>
<p>The timing of the second coat meant we were actually applying the second coat of shellac on Friday, the day before the home tour. To say we were cutting it close is an understatement. </p>
<p>
</p>
<div class="MediaContainer PhotoContainer"><a href="http://farm9.staticflickr.com/8200/8239188407_7b0b659078_z.jpg" rel="PhotoPopup" popupheight="640" popupwidth="480"><img alt="" src="https://farm9.staticflickr.com/8200/8239188407_7b0b659078.jpg" width="375" height="500" style="border-width: 0px; border-style: solid;"></a></div>
<p>After a few hours of dry time we brought the chair upstairs and put it in its final resting location to see how it looked. The verdict? We love it!</p>
<p>
</p>
<div class="MediaContainer PhotoContainer"><a href="http://farm9.staticflickr.com/8481/8246696831_dd0f6f1659_z.jpg" rel="PhotoPopup" popupheight="640" popupwidth="639"><img alt="" src="https://farm9.staticflickr.com/8481/8246696831_dd0f6f1659.jpg" width="500" height="500" style="border-width: 0px; border-style: solid;"></a></div>
<p>There are a few small areas on the very top part of the back that have a slight discoloration due to damage to the plywood, but those are easily overlooked since there's little we could do. </p>
<p>The color, scale, look, everything, is exactly what we were hoping for in using the dye. I'm officially a fan of what you can do with dye. I'm excited to try it on a few other projects and see what I can do about making something new that's made out of poplar look old. </p>
<p>We still had to place the chair's seat base in place, but we were getting close to having a functional chair. Though we had somewhat given up on using it during the home tour, we were still happy with the outcome. But we were both secretly hoping we'd be able to complete it. </p>
<p>We'll fill you in on the next step in another post, but until then, what do you think? Are you a fan of the dark wood? Or do you prefer a lighter stain? Have you ever used the dyes, or are you primarily a stain person? What about paint? Do you think I should have given in to Wendy's impulse to paint the chair? So many questions. Weigh in and give me your two cents. </p><p><a href="https://www.oldtownhome.com/2012/12/5/Using-Aniline-Dye-to-Breathe-Life-Into-a-Forgotten-Family-Heirloom/">Read Full Post</a></p>]]></content>
    <category term="Exclude-Teaser-Projects:Woodworking" />
    <category term="Family Heirlooms" />
    <category term="Header Image" />
    <category term="Projects:Salvage" />
    <category term="Projects:Woodworking" />
    <category term="Salvage" />
    <category term="Sun Porch" />
    <PostImage>http://farm9.staticflickr.com/8481/8246696831_dd0f6f1659.jpg</PostImage>
    <media:thumbnail url="https://farm9.staticflickr.com/8481/8246696831_dd0f6f1659_t.jpg" />
    <ExtensionElements>
      <Item>PostImage</Item>
      <Item>media:thumbnail</Item>
    </ExtensionElements>
  </entry>
  <entry>
    <guid>7d6a49cc-4ebf-4d4c-b13a-6a1ff8cbbcfc</guid>
    <id>https://www.oldtownhome.com/2012/11/27/Breathing-Life-into-a-Forgotten-Family-Heirloom/</id>
    <title>Breathing Life into a Forgotten Family Heirloom</title>
    <summary type="html"><![CDATA[<p>This is the story of a chair. It's not just any chair,  it's a special chair. No, it won't fly us around the room, it won't grant us wishes, and it won't run errands or do chores for us, no matter how nicely we ask. But if it won't do any of that, then how is it special? Well, this chair is a time machine of sorts. The chair I'm speaking of is Wendy's great grandfather's rectory chair. </p><p>
</p><div class="MediaContainer PhotoContainer"><a href="http://farm6.staticflickr.com/5144/5663901313_ef7739aba8_z.jpg" rel="PhotoPopup" popupheight="640" popupwidth="480"><img alt="" src="https://farm6.staticflickr.com/5144/5663901313_ef7739aba8.jpg" width="375" height="500" style="border-width: 0px; border-style: solid;"></a></div><p>As children of families with deep heritage and histories, we both know stories and have knowledge of our lineage. Neither of us are from any sort of famous, powerful, or particularly wealthy families, and both of our families represent an eclectic mix of hard working individuals. The various sides of our families' roots in the United States were&nbsp;established&nbsp;anywhere from the industrial revolution to the Revolutionary War, all depending on the branch of our respective trees. But no matter the situation, each of our families came here with little, in hopes of providing more for their loved ones. For this very reason, antiques, keepsakes, and heirloom pieces passed from generation to generation are rare and treasured.</p><p>As a young girl, Wendy remembers this old, dirty, and wobbly chair sitting in her parents' basement. As the story goes, this chair once sat in a church rectory, and somehow ended up in her great grandfather's possession. Dark and splintered wood, worn with age and use, faded and torn fabric seat, and tattered burlap seat straps did little to tell the story of the possibly rich history the chair possesses. Instead, its current condition acted as more of a footnote to its largely unknown legend. </p><p>
</p><div class="MediaContainer PhotoContainer"><a href="http://farm6.staticflickr.com/5069/5663901815_f3b15792c0_z.jpg" rel="PhotoPopup" popupheight="640" popupwidth="480"><img alt="" src="https://farm6.staticflickr.com/5069/5663901815_f3b15792c0.jpg" width="375" height="500" style="border-width: 0px; border-style: solid;"></a></div><p>As a child, Wendy was unaware of the chair's eventual meaning to her. She always knew it was her great grandfather's chair, but figured it was a lost cause from a furniture or seating standpoint and was only being held onto for some sentimental purposes. </p> <a href="https://www.oldtownhome.com/2012/11/27/Breathing-Life-into-a-Forgotten-Family-Heirloom/">more</a>]]></summary>
    <published>2012-11-27T11:12:00.000-05:00</published>
    <updated>2012-11-27T11:12:00.000-05:00</updated>
    <link rel="alternate" href="https://www.oldtownhome.com/2012/11/27/Breathing-Life-into-a-Forgotten-Family-Heirloom/" />
    <author>
      <name>Alex</name>
    </author>
    <content type="html"><![CDATA[<p>This is the story of a chair. It's not just any chair,  it's a special chair. No, it won't fly us around the room, it won't grant us wishes, and it won't run errands or do chores for us, no matter how nicely we ask. But if it won't do any of that, then how is it special? Well, this chair is a time machine of sorts. The chair I'm speaking of is Wendy's great grandfather's rectory chair. </p>
<p>
</p>
<div class="MediaContainer PhotoContainer"><a href="http://farm6.staticflickr.com/5144/5663901313_ef7739aba8_z.jpg" rel="PhotoPopup" popupheight="640" popupwidth="480"><img alt="" src="https://farm6.staticflickr.com/5144/5663901313_ef7739aba8.jpg" width="375" height="500" style="border-width: 0px; border-style: solid;"></a></div>
<p>As children of families with deep heritage and histories, we both know stories and have knowledge of our lineage. Neither of us are from any sort of famous, powerful, or particularly wealthy families, and both of our families represent an eclectic mix of hard working individuals. The various sides of our families' roots in the United States were&nbsp;established&nbsp;anywhere from the industrial revolution to the Revolutionary War, all depending on the branch of our respective trees. But no matter the situation, each of our families came here with little, in hopes of providing more for their loved ones. For this very reason, antiques, keepsakes, and heirloom pieces passed from generation to generation are rare and treasured.</p>
<p>As a young girl, Wendy remembers this old, dirty, and wobbly chair sitting in her parents' basement. As the story goes, this chair once sat in a church rectory, and somehow ended up in her great grandfather's possession. Dark and splintered wood, worn with age and use, faded and torn fabric seat, and tattered burlap seat straps did little to tell the story of the possibly rich history the chair possesses. Instead, its current condition acted as more of a footnote to its largely unknown legend. </p>
<p>
</p>
<div class="MediaContainer PhotoContainer"><a href="http://farm6.staticflickr.com/5069/5663901815_f3b15792c0_z.jpg" rel="PhotoPopup" popupheight="640" popupwidth="480"><img alt="" src="https://farm6.staticflickr.com/5069/5663901815_f3b15792c0.jpg" width="375" height="500" style="border-width: 0px; border-style: solid;"></a></div>
<p>As a child, Wendy was unaware of the chair's eventual meaning to her. She always knew it was her great grandfather's chair, but figured it was a lost cause from a furniture or seating standpoint and was only being held onto for some sentimental purposes. </p>
<p>As we grew older and began to build an appreciation for our families' history, we both started searching for items that can hold a special meaning in our lives, and in the history of our families. At one point, Wendy asked her parents if they had any plans for the abandoned chair in their basement, and if they didn't, could we have it?&nbsp;Wendy's parents generously gifted the worn and tired chair and wished us luck.</p>
<p>We received the chair in 2004 and began work on it almost immediately. We had hoped to salvage it in some way, but were unsure given the tough shape much of the wood was in. Dry, cracked, splintered, and wobbly, the chair had seen better days.&nbsp;While working on nail removal, one of the pegs slipped from the chair's arm revealing a completely failed glue joint. This joint failure explained the wobbly nature of the chair's structure.&nbsp;We knew we'd need to do a little bit more aggressive of chair surgery if we were going to be able to use the piece for its intended purpose.</p>
<p>After we completely disassembled the chair, we were able to begin working on the chair in earnest.&nbsp;Though we had every intention to restore the chair to its former glory, we had little&nbsp;know how&nbsp;at the time. Still newlyweds and with a "new" very old house, we had a project list longer than we could fathom and few specialized tools (such as cabinet clamps) that would be necessary. We had gotten off to a decent&nbsp;start, but we put the project off to the side, where it sat for an additional eight years.</p>
<p>As luck would have it, our kitchen/sun porch "rethink" rolled around this summer. <a href="http://www.oldtownhome.com/2012/11/13/Times-a-Tickin-The-Quest-for-Sun-Porch-Chairs/index.aspx">Knowing we'd need additional seating</a>, Wendy raised the idea of using her great grandfather's chair for the room. She was hopeful we could work it in, but figured it would be more of a decorative element than functional. It's old wobble was so severe, she assumed we wouldn't be able to use it as viable seating.&nbsp;After disassembling the chair, we were left with four pieces that needed a complete sanding and prep.</p>
<p>
</p>
<div class="MediaContainer PhotoContainer"><a href="http://farm9.staticflickr.com/8209/8222152693_869828cdde_z.jpg" rel="PhotoPopup" popupheight="480" popupwidth="640"><img alt="" src="https://farm9.staticflickr.com/8209/8222152693_869828cdde.jpg" width="500" height="375" style="border-width: 0px; border-style: solid;"></a></div>
<p>I did the majority of the remaining sanding using my <a href="http://www.oldtownhome.com/2012/4/3/Toolbox-Tuesday-A-Multipurpose-Wonder-Tool/">Fein Multimaster oscillating tool</a> and sanding pads I had cut to a more manageable size.&nbsp;I found using the oscillating tool to be a bit slower, but it allowed me to get into the detail areas of the chair. I also found it was much less likely to leave those tiny little swirl marks you often see with an orbital sander.</p>
<p>
</p>
<div class="MediaContainer PhotoContainer"><a href="http://farm9.staticflickr.com/8198/8223225628_b1a6bca157_z.jpg" rel="PhotoPopup" popupheight="640" popupwidth="480"><img alt="" src="https://farm9.staticflickr.com/8198/8223225628_b1a6bca157.jpg" width="375" height="500" style="border-width: 0px; border-style: solid;"></a></div>
<p>After a few more hours the chair's sanding was complete. I went over the whole chair with 220 grit paper and "00" steel wool, we were ready for reassembly. </p>
<p>I've had an internal struggle over sanding this chair for quite some time. I mentioned in a prior post that my inexperience in what we're doing really showed when we were given the chair. Back in 2004 I was sanding everything raw, caulking gaps all over the place, and pocket hole screwing&nbsp;everything&nbsp;to death. I didn't yet have an appreciation for the patina and character that comes with "old."&nbsp;Once I started to gain this appreciation, I began to regret my decision to take off all of the chair's original finish. Perhaps there was something I could have done to better preserve the chair's character?</p>
<p>
</p>
<div class="MediaContainer PhotoContainer"><a href="http://farm9.staticflickr.com/8486/8222152221_a835507202_z.jpg" rel="PhotoPopup" popupheight="640" popupwidth="480"><img alt="" src="https://farm9.staticflickr.com/8486/8222152221_a835507202.jpg" width="375" height="500" style="border-width: 0px; border-style: solid;"></a></div>
<p>Through much soul searching I came to a final conclusion. (Can you tell I take this chair seriously?) I determined that, if I had it to do over again I would not have sanded the chair so&nbsp;aggressively. But what's done is done, and I know better for the next time, I just need to be sure I put as much effort into making this chair exactly what it should be with what I have to work with.</p>
<p>With the chair ready to assembly, I broke out my various cabinet clamps. These clamps were absolutely necessary in ensuring my ability to assemble the chair the way it once was and should always be. </p>
<p>I painted wood glue on the various dowels of the chair and also applied glue on the surfaces that accept the dowels. </p>
<p>
</p>
<div class="MediaContainer PhotoContainer"><a href="http://farm9.staticflickr.com/8059/8223228766_5d4fb5e918_z.jpg" rel="PhotoPopup" popupheight="640" popupwidth="480"><img alt="" src="https://farm9.staticflickr.com/8059/8223228766_5d4fb5e918.jpg" width="375" height="500" style="border-width: 0px; border-style: solid;"></a></div>
<p>Painting on the glue rather than just slopping it into place allows the joint to be securely made without having glue squeeze out all over the place.&nbsp;Once all of the glue was applied, I made the necessary connections and clamped the whole chair back together.</p>
<p>
</p>
<div class="MediaContainer PhotoContainer"><a href="http://farm9.staticflickr.com/8070/8222155107_2bffea8636_z.jpg" rel="PhotoPopup" popupheight="640" popupwidth="480"><img alt="" src="https://farm9.staticflickr.com/8070/8222155107_2bffea8636.jpg" width="375" height="500" style="border-width: 0px; border-style: solid;"></a></div>
<p>The rear of the chair has two steel slot head screws that were the final pieces I had to insert. Once in place, I was able to take a step back at the famed chair finally reassembled.</p>
<p>
</p>
<div class="MediaContainer PhotoContainer"><a href="http://farm9.staticflickr.com/8477/8223229656_954a820668_z.jpg" rel="PhotoPopup" popupheight="640" popupwidth="480"><img alt="" src="https://farm9.staticflickr.com/8477/8223229656_954a820668.jpg" width="375" height="500" style="border-width: 0px; border-style: solid;"></a></div>
<p>After allowing several hours of dry time I removed the clamps and inspected the work. The chair was secure and sturdy. Even without a seat I could tell it would be plenty sturdy to act as actual seating. I brought the chair into the sun porch to see how it might eventually look in the space. It was nearly perfect.</p>
<p>
</p>
<div class="MediaContainer PhotoContainer"><a href="http://farm9.staticflickr.com/8482/8223230046_9f84bf4940_z.jpg" rel="PhotoPopup" popupheight="640" popupwidth="480"><img alt="" src="https://farm9.staticflickr.com/8482/8223230046_9f84bf4940.jpg" width="375" height="500" style="border-width: 0px; border-style: solid;"></a></div>
<p>I surprised Wendy by completing the chair assembly and putting it in place and I can't tell you how happy she was when she arrived home and saw it. She danced around and gave me a huge hug. We had longed talked about getting this chair back in place and it was finally becoming a reality.</p>
<p>We still have a fair amount of work left before we can call the project done. We need to stain the chair as well as install jute webbing, a burlap cover, and a seat cushion, but we can see the whole thing taking shape. We're planning to stain it a very dark brown a little later this week. We'll be sure to update you on progress.</p>
<p>What do you think of our sentimental heirloom and its placement in our sun porch? Do you have a piece of furniture in your home, that has been passed down from generation to generation? Maybe a family heirloom that you've worked to restore? If so, we'd love to hear all about it.</p><p><a href="https://www.oldtownhome.com/2012/11/27/Breathing-Life-into-a-Forgotten-Family-Heirloom/">Read Full Post</a></p>]]></content>
    <category term="Family Heirlooms" />
    <category term="Header Image" />
    <category term="Projects:Salvage" />
    <category term="Salvage" />
    <category term="Sun Porch" />
    <PostImage>http://farm9.staticflickr.com/8208/8223546975_876cbafd0d.jpg</PostImage>
    <media:thumbnail url="https://farm9.staticflickr.com/8208/8223546975_876cbafd0d_t.jpg" />
    <ExtensionElements>
      <Item>PostImage</Item>
      <Item>media:thumbnail</Item>
    </ExtensionElements>
  </entry>
</feed>