Our heads are spinning when we start to walk through our mental to do lists.
While we've made substantial progress in the last week to work towards repairing the whole house plumbing and HVAC disaster, we don't want work at the new house to come to a complete standstill. We've been trying to tackle smaller projects each weekend, as well as make progress on the living room renovation.
Some of the smaller projects have included a bit of a garden cleanup, painting the front door a pale sea glass color (Benjamin Moore's Wythe Blue), and starting the prep work on finishing our adirondack chairs. In addition to these ongoing items, we have another minor facelift in the works. While we realize there are a million other things we'd like to address, I couldn't help but (constantly) notice that the little shed next to our house has seen better days.
In the grand scheme of priorities, this one would be pretty low. But there are three factors that encouraged us to start on it now.
- The shed is the first thing you see when you pull into the driveway and a mere 10 yards or so from the side porch (which we plan on using as our primary outdoor dining area when the weather is nice). With it's prominent placement in the center of our yard's most highly trafficked area, it would be a lot more enjoyable to look at a freshly spruced up shed.
- We're keeping our fingers crossed that we'll soon have a contractor hired to begin the whole house re-plumbing and HVAC project. This minor project will keep us out of the way and isn't at risk of being torn apart by the work inside.
- My dad has generously offered to prime and paint the shed the next time my parents come to town. Knowing we'll have a helping hand also gave us the nudge to get things prepped and ready so we can hand the project over for completion.
We're also trying to be realistic about this project. We're keeping in mind that it was installed completely out of level on a sloped piece of asphalt that was once a boat launch ramp right next to the house. We're ignoring the fact that some of the trim boards have never seen a coat of paint, or that the sheets of pressed board have long deteriorated and now resemble flaky, peeling skin after a major vacation sunburn. We're also not going to obsess that the person or company who installed the shed years ago didn't care much about lining up joints, caulking seams, or mitering corners.
Did I mention that we're not even going to focus on the missing asphalt shingle? Well, for now anyway.
Basically, I'm saying that we're going to be approaching this project with a mentality that's somewhat rare in our home. We're going to be saying, "Eh...good enough!"
So we're setting out to improve the look of this sad structure while only devoting a couple days and less than $100 to the effort. It won't ever be a gorgeous outbuilding, but we still think we can take it from bad to (slightly) better.
Before my dad grabs brushes and rollers I knew I wanted to do a bit of work first. Alex and I talked it over and decided that adding a few trim pieces, mainly a skirt trim board and a few corner boards, would make this shabby shed a bit more makeover ready. And as much as it pains us, we're not even going to rip apart or redo the warped trim pieces around the doors. We don't want this small side project to turn into weekends of work.
We stopped at the paint store to get a gallon of the paint we'll need, and after dropping me off at the house mid-afternoon, Alex shopped for the treated wood that we'd need to begin the makeover. A major rain storm was bearing down on us, and by the time we had all our supplies in hand, we were racing against time.
We finalized our game plan. We started by installing the 1x6 pressure treated skirt board around the bottom of the side of the shed. The shed is a bit longer than the length of the boards, so we identified where we'd place a nice 45 degree mitered joint.
We also determined we'd install it a little lower than the corner boards on the left, which allowed our efforts to better disguise the uneven and peeling sheathing. This is exactly the approach we preferred on this whole project. If there were problems, we aimed to cover them up.
As you can see from the following photo, the corner boards to both the left and right rear sides were mysteriously omitted from the existing shed. Our goal was to add this missing detail, as well as a skirt board on the back to complete the look.
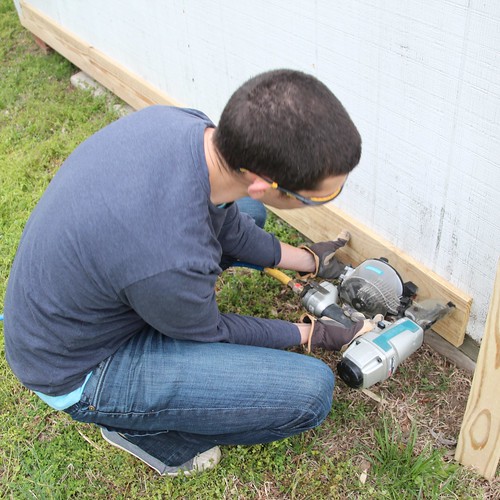
While Alex worked the saw on some of the more complicated mitered cuts to get us started, I prepped the area, measured what we'd need, passed him tools, marked cut lines, and generally assisted.
He then nailed the cut boards into place using our siding nailer (that we bought back in 2005 and almost never have a good excuse to use).
We quickly got into a groove and we were able to make nice and fast progress. Once the first few boards were in place and we had a good system going, Alex continued to measure and then passed the boards up to me on the porch so I could take over with the miter saw. One of these days we're going to get a miter saw stand so we aren't always crouching like cavemen when we're using the miter saw.
In case you're wondering, Lulu was tucked safely inside at this point. She HATES the air compressor, and wanted nothing to do with this project as soon as she saw it being set up. As soon as she sees Alex carrying the compressor anywhere, she pretty much runs and hides. It doesn't even need to be turned on. We continued in the misty air as the rain was just off in the distance, and were able to get the boards on the rear of the shed in place.
Here's a look from behind. You can see the unpainted boards I mentioned earlier around the roofline.
The final step was to add skirt boards to the front of the shed, and this proved to be the most challenging part in terms of planning. Remember when I referenced the uneven installation and the sloped yard? It's very apparent from the front right corner.
We debated the design of the new boards for a few minutes, and then decided we'd install the 1x6 board on the right, and a 1x4 board on the left, to account for the difference in clearance between the two corners of the shed and the ground beneath it. To bridge the hight difference between the bottom of the door's trim and the bottom of the corner on the right side, we opted to make an angled cut to make the height difference look more intentional.
The rain held off just long enough but finally started to really come down. As Murphy's law would have it, this came just as we realized we ran out of nails before we could attach the last piece on the left. We rushed to put the extra wood in the shed and pull the tools inside, and Alex grabbed a few screws so we could finish the job.
The skirt boards look a little odd at this point (especially because the last photo we took doesn't show the left side attached), but once we get a fresh coat of white paint over the entire shed I think it will look a lot better. I'm thinking about planting a bush or two on the right side to help disguise the gap and slope of the yard. I'm also debating whether the entire shed should be painted white, or should we paint the doors or door trim boards the same Wythe Blue as the house? What do you think?
All in all, for roughly two hours of work, the shed is now prepped and ready for its new coat of paint. While big renovation projects are exciting, I really love the small projects too. It's nice to feel like we accomplished something when the inside of the house feels so completely beyond our control.