A little while ago we were weighing our options in restoring the uncovered plaster in the living room of our new house.
This all stemmed from the partial wall removal in that room where we realized the room's original plaster had been covered over by a layer of drywall. And when we removed the drywall, we learned that the vast majority of the plaster was completely intact.
The interesting thing about this plaster is a top or finish coat had never been applied. Old plaster is typically a three part system. You have the scratch coat, brown coat, and finally, a top coat to smooth everything out. But often, if the plan was to apply wallpaper to the wall rather than paint, the top coat was omitted and the paper was applied as a sort of top coat of its own.
This was the case in our house. We could see layer after layer of wallpaper over large sections of the wall. And overall, this wallpaper had been painted over, scraped off, or badly damaged from years of neglect or water damage. Ultimately, I think that's the reason for the drywall overlay. The wallpaper was just in such bad shape that nobody wanted to deal with it.
To add insult to injury, the person who poorly applied the drywall overlay to the room had used copious amounts of liquid nails in a failed attempt to secure the drywall to the plaster. In most cases the liquid nails didn't even touch the drywall and just left large hard blobs of adhesive stuck to the plaster once the drywall was removed.
At any rate, if we ultimately want to skim coat the whole room and give ourselves that great authentic feeling of plaster, we'll need to remove both the wallpaper and liquid nails all over the room to give us a good surface to work on.
Obviously the liquid nails needed to be removed since it was bumpy, but the wallpaper is an even more critical item to remove, even though it may not be as obvious. The wallpaper is a sponge and absorbs water like crazy. If we were to skim over the wallpaper the paper would suck the water right out of the plaster, lose it's adhesion on the backing, then fall right off the wall with the skim coat of plaster. If it didn't happen sooner, it would happen later with cracking and sagging on the walls. In other words, it would be a complete disaster.
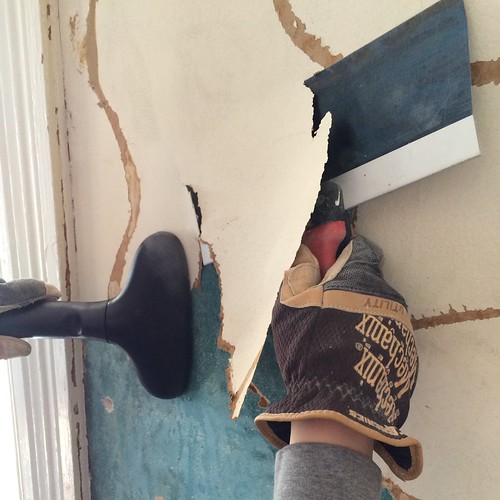
After the difficult wallpaper removal process in the downstairs bathroom, and knowing how much more wallpaper was all over this living room, we decided to spring for a tool that would help with this wallpaper removal project. We picked up a Jiffy Wallpaper/Garment Steamer that I think will be one really useful tool for more than paper removal.
Only a few minutes after firing it up, it was clear that this had been missing from our lives. The steamer was making short work of the wallpaper removal, allowing massive sections of wallpaper to more or less jump off of the wall.
I wouldn't say the overall removal of all of the paper was quick by any means, but it was at least bearable and felt fast compared to what it would/could have been without the steamer.
We were also able to use the steamer to soften the liquid nails and scape off the large chunks around the room. This took far more time than the wallpaper, but after a few weekends of work we had ourselves a room free of wallpaper and large bumpy liquid nails residue.
The only real difficulty of this whole process had to do with getting the steamer hose up near the ceiling since the host is only about six feet long. We ended up putting the steamer unit on a step stool and hooked the roller wheels over the edge of the stool and against the handrail, which gave the extra height necessary while allowing the steamer to be secured in place.
So we're well on our way to restoring the plaster in this room. If you'll notice, all of the blue throughout the room's walls is the original plaster scratch coat. Anything that's not blue is a patch or an area that's been painted over at some point in the past.
We also have quite a few areas that are damaged, crumbling, or just plain missing that we need to patch and repair. But overall, the room is probably about 80% original plaster, which makes me feel great about our progress in the room, especially given how it started after removing the drywall.
I have some plans that will ensure we're skim coating over all of this plaster in the right way, and will end up giving ourselves an authentic and appropriate plaster surface. I won't be using joint compound as I've outlined before, as this isn't really the "right" way to restore or resurface true lime gypsum plaster.
But is it weird that a little part of us was sad to remove the old dingy and damaged wallpaper? Don't worry, we saved a few bits and pieces to have for posterity. I mean, floral borders have apparently been a part of this house since the beginning.
Stay tuned in the coming weeks as we tackle the repair and patching of the missing sections and the next critical steps in restoring this room's original walls to something we can truly be proud of!