If there's a group of people we understand and identify with the most, it's easily the relatively small community of old home owners who are undertaking renovations either partially or fully on their own. It's one thing to own an old house, another to renovate it, but it's a whole other world to take on part or all of the work on your own. Any time we get together, either in person or virtually, I swear it's half party and half support group meeting.
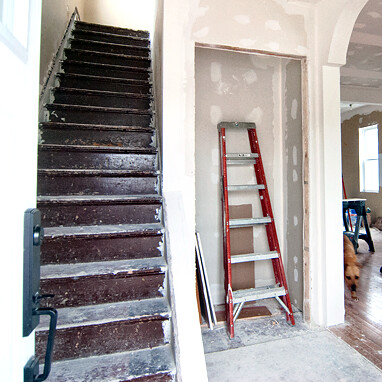
Last week we were contacted by the fellow old house renovators and bloggers of Yellow Brick Home. Kim and Scott had a staircase dilemma. Their 120 year old Chicago home's stairs had seen better days. After removing the burgundy carpet that covered the stairs when they purchased the home (and undertaking a rather large renovation that included opening up the entryway), the treads and risers were chipped, pitted, and covered with cracked paint. After going through the many different options in their heads, Kim reached out to us for our two cents on how to handle their stairway conundrum.
Scott and I keep going back and forth on a project, and we're just feeling really, really stuck. After consuming way too many hours trying to figure out the best way to do this, I thought I'd give it a try and ask you guys what you thought. Any input would be very, very much appreciated - so thank you in advance.
Okay, the project is our staircase! We simply want to paint the risers white and the treads black. The problem? We did a lead test on them, and the stairs are currently covered in lead paint. They're really pocked and chipped in a ton of places, so we would have to really lay on wood filler and sand, sand, sand - which we can't do with lead paint! So, we considered using Peel Away (1 or 7?) to get rid of it, but we've never used that before, and to be honest, we're worried it's going to be a MASSIVE task (not that we're looking for an easy way out, but removing lead paint is so far from our idea of a good time).
The other option would be to replace the risers and treads. I started pulling apart the top 2 steps tonight, and it took me about 30-40 minutes to do that, but I still need to pull out the rusty, 100 year old nails. So, suffice it to say that we have 16 steps, it would be an entire day of just pulling up the stairs, then potentially another day or two to put together treads and risers (we found treads at Lowes for $10/ea). Then we got nervous that maybe there's more of a science to building stairs then just that...
Have you encountered anything like this? Would you say that Peel Away is easy enough to use so we can fill/sand the stairs and paint them so they look decent? Or would it be so much of a nightmare, that building new treads/risers would actually be the better choice?
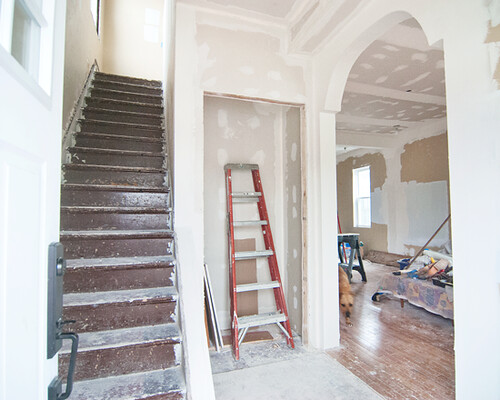
Photo Credit: Yellow Brick Home
Well, talk about a question that is absolutely and 100% right in our wheelhouse! We've both been there and done that, and we know exactly the dilemma they're dealing with. Back when we bought our house our stairs were covered in ugly carpet, and we had dreams of removing the carpet to find beautiful stairs that didn't need any work (I think we had been watching too many renovation reality shows).
Instead, we found great treads that needed to be refinished and risers full of lumpy paint, some of which was likely lead based.
We were thoroughly discouraged, but we threw our apprehension to the wind (while maintaining our caution in dealing with the lead paint) and decided to take the bull by the horns and strip the risers using Peel Away 7.
It wasn't an easy task by any means, but it turned out absolutely great, and our stairs are one of the aspects of our home, cracks, dings, and all, that keep the soul of the house intact and provide that real old house charm and character.
If you want to read more about our stairs, be sure to check out our entry hall posts, but the reason for today's Ask Old Town Home has to do with Kim and Scott's stairs.
In looking over Kim's email I was brought right back to our early days in working on our house and the decisions we made. While we're happy with our outcome, Kim's end goal of black painted treads and white risers meant that she could entertain several different approaches to satisfy her desired outcome.
In my response I first climbed onto my old house soap box and supported the idea of keeping the old stairs intact and then laid out the two different scenarios I would consider if I were tackling their project with their goals in mind. They ranged from intensive and very time consuming to, well, slightly less intensive and mildly time consuming.
(Remember, almost nothing when working on an old house should ever truly be fast and easy. If it's fast and easy, there's a good chance it may not be a very good solution. Sad fact.)
Old House Soap Box
Honestly, I can empathize with Kim's hesitation, and thoughts on taking out and possibly replacing the stairs, we had similar initial thoughts when looking at our slanted and slightly damaged stairs, but I'm pretty much going to absolutely suggest against that approach for several reasons (beyond the fact that I'm simply an old house nut and would hate to see those stairs go, in part or in whole).
The thing to remember is the age of the stairs, they were built to last. Sure, they might be chipped, pitted, and covered with lead based paint, but the stairs and parts themselves, at 120 plus years old, are likely in good shape.
First, old stairs are truly built to last, and the parts you can find at big boxes and normal lumber yards are not the old growth pine old homes are blessed with. The new stuff is unstable, tends to easily warp/splinter, and isn't cut to the correct dimensions for older homes. And if the stairs are sound structurally, without major cracks in treads, wobbly pieces, or significant damage, they're worth saving over covering or replacing.
Second, to properly replace treads and risers you essentially need to take apart the entire stair assembly, and the baseboards, and possibly other items that get into the whole "old house can of worms" that can easily spiral into a whole host of other unwanted projects (and you'd also have no way to get upstairs for a while).
And third, rebuilding stairs is just plain hard, especially when I'm willing to bet that the risers and treads are all slightly different size, shape, etc. Not significant differences, but old home differences, enough to throw you off by an inch or two once you reach the top in a full rebuild with consistent dimensions.
Given my feelings on "older is almost always better," I think you can probably also guess my feelings on re-covering treads and risers with new wood, it's sacrilege. As I've said, I think old stairs are part of the true soul of an old house, and covering them with new wood is unnecessarily robbing a piece of that soul. Not to mention that it's something you can't just undo. When you cover old stairs you need to cut off the bullnose overhang of each tread. I just don't like it.

This is what happens when you suggest taking out old stairs.
Okay, I'm off of the "old is always awesome" soap box again and ready to offer up a few constructive solutions to achieve the stair goals Kim and Scott are looking for.
As I see it, given their desire to have painted stairs, there are two very doable options. One is relatively straight forward and one is...not at easy.
Option 1 -- The Not As Easy Approach
Strip all of that old paint off of the stairs, top to bottom, and then repaint. This will give you perfectly smooth stairs that are free of lead paint, but this obviously has it's significant drawbacks.
Speaking as someone who was exposed to lead during a summer job, I'm personally both paranoid about additional lead exposure, and also comforted that my issue was 17 years ago and I've not cut my ear off or otherwise gone mad at this point, and I spent 8 hours a day, 5 days a week, for 3 months breathing in lead dust without a mask or anything else to protect me.
That being said, lead paint removal isn't like nuclear waste removal, and a DIYer can still take care of the job as long as proper precautions are taken. You'll need to check with your local jurisdiction on guidelines and preferred approaches for lead paint removal, as well as friendly advice. They'll likely recommend things like removing the paint using a paint stripper that is made for lead paint removal,sanding the surface by properly protecting the surrounding area and while using a mask that's rated for lead paint (and then thoroughly washing your clothes when you're done), and properly disposing of the paint and debris in accepted locations and correct vessels. All said, this type of paint stripping is definitely within reason for two capable adults, and far less of a massive undertaking than replacing stair risers and treads, you just need to be prepared to do the research and take the necessary precautions.
Given that we stripped the paint off the risers and stringer baseboards on our stairs when we bought the house 11 years ago, I can say that it's both doable and tedious, but the stairs look awesome when you're done.
If I were doing it today I would use the product called SmartStrip instead of Peel Away 1 or 7. You put it on, cover it with wax paper, then let it sit for about 18-24 hours. Then, come back with a flat pull scraper and scrape off what will come off. I scrape leaving the wax paper on and just scrape the paper right off with the paint. The first coat will likely not get more than the first few layers of paint. I wouldn't try to scrape more than that as you'll get into the lead dust zone, just take off what will come off. Then, put another coat of the SmartStrip, let it sit covered in wax paper again for 18-24 hours, then come back with the scraper. After the 2nd coat with this stuff I've had great luck in getting almost full removal. Stairs are also not horribly difficult since it's all flat surfaces, except for the nose of the treads, so you won't have to resort to dental tools for detailed areas.
As you work you'll want a garbage bag nearby so you can throw the wax paper and paint residue away right away. It's like a gross sludge, but that's what makes it so lead dust isn't an issue. The sludge means low/no dust since heat and sanding are not involved. One thing to consider, expect the sludge to get on your clothes, which will not wash out.
I'd try it out on a few stairs just to see how it goes. If you think you can tackle it do every other stair for the first round. That way you can still use the stairs while the stripper is on. Once you have it all stripped then do the stairs that you didn't complete already. After you've done the treads and risers, come back through and do the baseboards (actually can't quite tell if they're still there or not from the photo).
That being said, I'd really only take this route if you wanted to strip the stairs and stain them, or if the paint on them is so thick that you simply cant live with all of the drips (which was our case).
Option 2 -- The "easier" approach
My second, and much easier proposed approach is to go ahead and paint them, covering up the lead based paint. (The term of the day is "encapsulation.")
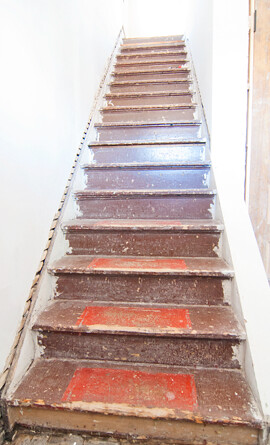
Photo Credit: Yellow Brick Home
I know there are dings and such, but the bad ones are easy to fill, and the sanding needed to smooth the wood filler wouldn't end up throwing up Pigpen style clouds of lead if you take the right approach.
To get started, grab the supplies you'll need. An alkyd/oil based primer, a random orbit sander attached to a Shop-Vac with a HEPA filter attached to it, plastic for protecting the surrounding rooms, and a dust mask rated for lead exposure. That will take care of the lead issues, especially if you get a long Vac hose and have the vacuum sit in an enclosed area away from you while you're sanding. The key here is that you're not sanding the paint, you're sanding the filler.
Next, paint the stairs with your high quality alkyd/oil exterior primer (interior/exterior works too). Paint before filling any of the chips or gaps. Once the paint dries, fill all of the things you need to fill with a high quality wood filler. I don't have a specific brand that I like for this, but it should be something stable that won't shrink or crack. It doesn't need to be epoxy, but that it needs to stand up to foot traffic.
Once the wood filler spots have dried, sand the wood filler smooth with the sander, but since you painted the stairs with the oil based primer, you're not throwing dust all over the place, the primer is your barrier. Still, wear a good mask while doing this.
Once smooth, prime the stairs with another coat of oil based primer to cover any primer you sanded off and the new wood filler. You'll need to let the primer dry completely, which can take a while for the oil based stuff, and it can be pretty stinky, but it's worth it for the top coat.
Finally, paint the stairs with a high gloss exterior grade oil enamel (like the stuff they use on porches). This is why I suggest the oil primer, as it's necessary for the oil top coat. Be sure the paint you select is meant for wood, because several stores have been trying to pass off the formula for metal as an "all purpose." The best part about this paint is that It will dry really hard and will seal in any lead paint.
If you're painting the risers and stringer white, but the treads black, I'd actually paint the whole stairs white for the first coat, then start working on the different colors. I'd probably end up doing about three total top coats with a 24 hour dry time between coats. This obviously makes walking up and down the stairs a challenge, so timing of all of this is key.
In the end, I'm rather sure you'll have exactly the look you want, with a little added old house character in the way of pits and bumps.
This is easily the most economical, easiest, and most effective. Taking this approach also leaves the stairs intact, as you aren't cutting off the nose of each tread, and aren't changing the height of the first step or top stair riser. The best news is that you can always take another approach later if you're not happy with the results.
What do you think? If you were doing Kim's stairs and wanted black painted treads and white risers, how would you have gone about accomplishing it? Would you have primed, filled, and painted, or would you go the whole route of stripping? Or would you try your hand at modifying and resurfacing?
If you want to see how Kim and Scott ended up handling the situation, check out their blog post about their weekend's worth of efforts. I'd say it turned out pretty great.

Disclaimer: Ask Old Town Home is meant simply as a friendly bit of advice and is provided free of charge. It is your responsibility to fully research any and all items related to projects or suggestions to ensure proper safety and code precautions and regulations are fully followed. In other words, any advice we provide is just our opinion, and our opinion is only worth the price we charge for it. :-)