As you may know if you've seen any of the past week's posts (since we can't seem to shut up about this project), Wendy and I decided to greatly expand the usable storage space in our kitchen with the purchase of several IKEA cabinets and a 6 foot section of butcher block counter top. Though we never really considered the use of IKEA cabinets in the past, our need for a quick and easy temporary solution for storage, and one that didn't break the bank, led us to the massive Scandanavian home store in search of...well, whatever we'd find.
Though much of what we saw wouldn't necessarily fit in with our home's decor, after quite a bit of exhaustive shopping, we had ourselves a purchase. The end result of our adventure was one 30" cabinet with two small and two large drawers, and one 15" cabinet with a lower drawer for garbage, and an upper concealed tray drawer for supplies. We opted for white carcasses and white raised panel MDF drawer and door fronts to try to match the style of our existing cabinets.
Ideally we would have used some of their wood door and drawer fronts, but that would have required us to either paint them ourselves or have them sprayed (I still don't have a sprayer, grumble grumble grumble, but I really need one). Had we gone that route, painting would add unwanted delay to our "quick" project that we're trying to knock out, and since it's a purely temporary solution until we do a full renovation in a couple years, we opted for the MDF. If we ever feel very strongly about it in the future, such as if our quick and temporary solutions lasts for many years, we can always replace the drawers and door fronts at a later time. Besides, it was a long and trying time at IKEA, and I feel like we came away as...not losers.
Though I did have initial reservations and some skepticism, I'm actually quite glad we bought the two cabinets at IKEA. I've long held an opinion of their snap and lock assembled pieces of furniture that sits somewhere between questionable quality and downright sacrilege for someone who appreciates old world craftsmanship. But truth be told, I think there's a time and place for it in many homes, including our own. For this reason, i'd like to share my general experience and opinion of the cabinets and their function now that our "build" is at least semi-complete.
We started our little adventure with boxes and bags of various cabinet, drawer, and door parts and pieces all over the place. I can easily see how this whole process could be overwhelming for people. Everything has seemingly random names all over them, like "Perfekt", "Akurum", or "Rational", and many pieces have the same name but a slightly different part number that determines a purpose. Before you tear into all of your boxes and bags, it's good to have an understanding of exactly what it is you're trying to build, and a good order of how it all goes together.
In our case, we had just two cabinets, a 30" and a 15", each with a few drawers. I can't imagine the number of boxes and packages necessary for a full kitchen. The guy at the register next to ours completed his purchase for $24,000!!! He's going to be getting a ton of boxes.
At least our install is simple enough, right? I figured I'd start with the cabinet boxes, then move into drawer assembly once the boxes were in place. My plan worked pretty well, and I started off using the extremely clear cartoon instructions.
Ok, let's see...
- A pile of boards and a hammer do not make good friends, and that makes you sad. Don't be a sad loner, get yourself a friend (preferably with a pencil behind his ear) and you'll be happy once again.
- If you happen to break a piece of your cabinet, a magic carpet will be along shortly to fix all of your problems and take you on a magical ride.
- If you can't understand cartoons, you should probably take everything back to IKEA and use one of their phones.
Got it! Let's get started!
Without much hesitation, and with the helpful drawings, I had the first box fully assembled in about 15-20 minutes. (Can you spot the error in my ways?)
We sped through the second and larger box in about 15 minutes, and as I was nailing the back onto that box, I realized my first mistake. I had applied the back piece of "wood" backwards, with the white side facing out. This simply meant the interior back would be brown instead of white. Since all of the nails were already in place when I (okay, so maybe it was Wendy) realized this issue, I decided to just leave it as is and hoped this would be the last and most major of my mistakes on this endeavor.
With that we began working to level the cabinets in place. Though IKEA assumes a somewhat level floor and plumb walls in their installation instructions, our home offers none of these such luxuries. Luckily, the bases of the cabinets sit on plastic feet that allow you to adjust the height of each one independently. This way we could ensure a perfectly level base from left to right and front to back, in spite of the fact our floor slopes and falls roughly 1 1/2" from left to right.
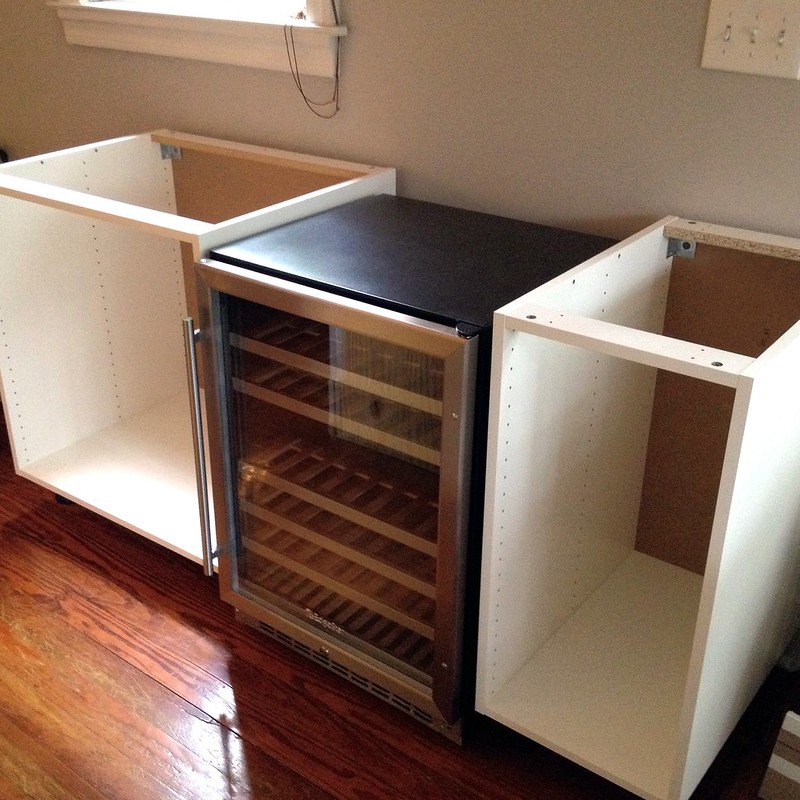
After establishing the locations of our cabinets and wine fridge...
...we placed the counter top on top of the area without securing it in place. We did this to ensure everything looked good, fit correctly, and would work given the available area.
With the counter top in place, we could see the new area in our kitchen beginning to take shape. Mel was also wasting no time in eyeing an area he's hoping to claim as his own. Sorry kiddo, no feline feet on the counters in this house. (Which is why he does his exploring and breaking of things at night when we're unable to stop him.)
Since we had all of the locations determined, we needed to be sure we could run the cord from the wine fridge to the outlet behind the right cabinet. To accomplish this task, I drilled a 1 1/2" hole in the bottom of the right cabinet and cut a rectangular opening in the rear of the cabinet to pass the cord through.
There was still quite a bit of work left to get this into a completed state, but all was really looking good.
Like the box assembly, the drawer install went very smoothly overall. It's quite literally as simple as screwing a few rails to the cabinet box using pre measured holes, snapping on the soft close device, snapping together the drawer sides, back, and base, then screwing on the drawer front and snapping it in place. You really can't get much more simple. Two of the large drawers are in front of Wendy, who was diligently working on the White Hutch face-lift painting project.
Each drawer probably took between 10-15 minutes to install. The only difficulty came with the larger drawer where you need to apply an additional screw to help support the extra potential weight, and a cross piece to support the weight of the long drawers. In both of these cases IKEA had (gasp) not drilled pilot holes. Though their diagram appears to indicate the use of an ice pick for this task, a rather odd set of pictures if you ask me, I used our drill and a small drill bit to provide pilot hole. Much more effective than an ice pick, I assure you.
We had knocked out quite a bit on our first day of working on this project, but we still had a fair amount left to complete. Still left to do:
- The wine fridge was sitting a few inches low and needs a platform to elevate it.
- The wall bows and leans, leaving a rather large gap behind the counter, and the tall baseboard needs to be cut so the left cabinet can sit further back to reduce the gap.
- The final pieces for the right cabinet is still en route from IKEA, and we'll need that so we can complete the project.
- We need to find hardware to match the other hardware in the kitchen.
- The kick plate/skirt board needs to be scribed to the slope of the floor, cut, and installed.
- And finally, we need to trim and affix the counter to the cabinet bases.
By no means was this a quick and simple, "just snap it together and be done," cabinet build. It's true that it is a far cry from the level of difficulty or time of a fully custom cabinet build, but it's still something that takes time, patience, and a willingness to figure out how best to approach each item. And can I tell you what a pain it is to move the wine fridge? Lots of unloading and reloading of this sweet nectar of the (mostly west coast) gods.
One more thing about the cartoons. I can say that they were spot on in the "how to correctly carry your ridiculously heavy butcher block counters" area.
Give me some action lines and a big "X" over what I'm doing and I've pretty much got the pose nailed.
We'll be back (hopefully early next week) to fill you in on all of the final nitty gritty details, and hopefully, eventually, some great "after" photos. But until then, let us know what you think about how it's coming together, or feel free to share a little about your furniture assembly experience. Have you had similar results, or are all of your projects like these simply child's play?