One thing's for sure here at Old Town Home -- we're dedicated to the detail work that often goes unnoticed. In my personal opinion, the detail work often makes the project a true success. Though the detail items that exist may not be so important for the casual observer, a missing or incorrect detail item may be the thing that actually ruins the end result.

Yesterday we wrapped up our vestibule project with a summary blog post that did a quick run down of the major elements of our project, but many of the tiny details we painstakingly implemented were omitted for the sake of time. One such detail is actually a tip I picked up several years ago when we first started installing salvaged hardware on our linen closet door.

Prior to living in our house I sort of felt that a screw was a screw, was a screw. Slot head or Philips, black, silver, or blue, they were all the same to me. But once I started to get into home restoration I began to notice the subtle but significant differences between the various types and styles of screws, and where it was or wasn't appropriate to use each one.

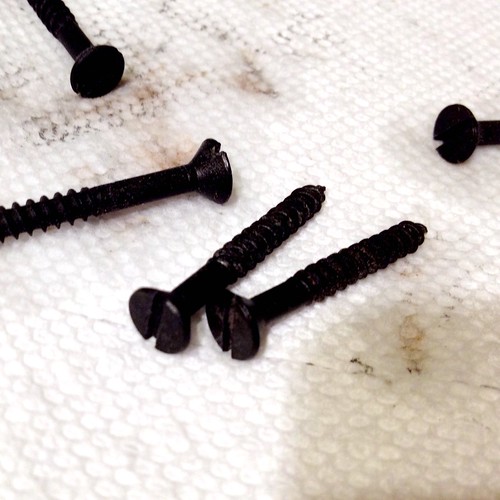
When it comes to salvaged hardware, the age and materials of the hardware dictate that it is important to use slot head black screws for almost all of our projects. My search for these elusive hardware supplies led me to the discovery that they weren't readily available for purchase. Left with no viable purchase options, I searched the internet and stumbled on a random message board post talking about a substance that darkens the steel barrel of the gun to restore its finish. With that I learned about this extremely simple process to essentially antique a steel (but not stainless) screw. Just look at this photo and you'll see how badly the wrong color screws stand out and ruin an otherwise nice looking project.

To remedy this issues, we needed to make a couple of screws for our French door hinges and lock set hardware look old, so I chronicled the process of darkening. Here are the simple steps I follow to antique screws for installation on salvaged hardware.

1. The secret to my success is something called Gun Blue. It's made for what it sounds like -- you put it on the steel barrel of a gun to turn the metal a dark black/blue. This solution turns the surface of the steel it touches blue and makes things like screws look very aged.

I bought a small container of this gun blue from a gun supply store nearly eight years ago, and I'm still using the same bottle. You can purchase the substance on Amazon or through a variety of other gun accessory dealers.

Beyond the gun blue you'll need some paper towels, a long magnetic bit or rod to grab the screws, and a few minutes of time.

2. This next step is super scientific, so try to stick with me. I take the screws I want to age and I drop them right into the gun blue bottle and swish them around. That's it, that's all there is to it. Super complex, I know!

3. After allowing the screws to sit in the gun blue for a couple of minutes (approximately three), I use a magnetized screwdriver drill bit to remove the screws from the bottle. But be sure to note that the drill bit will also darken from this removal.

4. After I remove them from the gun blue I drop them on a paper towel and rub them dry. What I'm left with is a couple of beautifully aged screws that look perfectly at home on 100+ year old salvaged hardware.

5. The final step is to actually install the screws on the hardware that needs them. Every time I install screws that I've darkened, I get a tremendous amount of gratification from it. It just feels like I'm doing the right thing and doing a service for our house.

Pretty easy, don't you think? A frequent blog commenter, JC, who also runs the blog "My 1923 Foursquare" was discussing this very topic with me a couple months ago. He has lots of tips and tricks for aging items and he suggested gun blue in a comment he left. I was quite happy to learn that I was doing it right. He also said that vinegar tends to work as well. Makes perfect sense since vinegar is an acid. I'll have to give it a try when I finally run out of my nearly decade bottle of gun blue.  

Do you have any hints, tips, or tricks you use to do something similar? Or perhaps you've been searching for a suggestion like this like I once was. If so, let us know where you're going to use them. 

Comments 30

Comments

2/24/2012 at 2:12 PM
I will NEED to remember this! I ruin my share of slotted screws trying to get them out of paint caked doors, so it's nice to know that if I have to get new ones, there's a solution so that they won't stick out and look ridiculous.
Alex
2/27/2012
It's such an easy trick, just keep a bottle on hand and you're all set.
bfish
2/24/2012 at 4:46 PM
Good tip. With a few-decades-newer house, getting the right patina on brass screws and hardware is a bigger issue here.

With a legislature faithfully devoted to ensuring that Virginians cannot be without adequate guns, you and I have the bonus of living in a state where gun shops, and their supplies, aren't a dying breed. (any puns or perceived political statements in the forgoing are wholly disavowed!)
Alex
2/27/2012
This is all very true, both the difficulty of brass and the VA gun laws ;-)
JC
2/24/2012 at 9:12 PM
Thanks for the shout-out, Alex! And yes, vinegar will work well (especially on zinc coated/galvanized modern screws) but it's slower. Gun blue tends to be nearly instant. Also, if you find that the gun blue is too dark, you can buff it slightly with fine steel wool.
Alex
2/27/2012
No problem. I have to believe you have some pretty awesome tips for all things like this. I ended up buffing it out a bit with steel wool and it gives it that good slightly silver but more black look. They look just like the old screws we've had in a few of our hinges. Perfect.
JC
2/27/2012 at 9:25 PM
Dunno if you were aware or not, but I actually do museum quality (or damn near close to it) restorations of antique clocks, so knowing how to properly antique things is pretty essential. I changed my usual URL in this comment for my clock collection website if you're curious. Those are just SOME of my clocks.
Alex
2/27/2012
I'll check it out. We're decidedly amateur when it comes to clocks, but we love them. The tall case clock we have is currently broken and we need to fix it/get it fixed. One of the cables broke at 4:35am (I love how you can tell when a clock stopped working) one morning and caused quite a loud noise. We didn't realize what it was until we noticed we weren't hearing our normal bell. We'll do a post on it at some point in the near future and give you a look at the Morbier movement we have.
Tee
2/25/2012 at 10:17 PM
Thanks for the reminder. We have known about gun blue for many years. A friend that worked in Colonial Williamsburg taught us about this trick. He made furniture that looked like 17th antiques. He also taught us we could age new hardware by put it in bleach, which will pit the metal and make it look old.
Alex
2/27/2012
That's cool, I'll have to give that bleach tip a shot and see how it works out.
JC
2/26/2012 at 6:13 PM
Unrelated to this post (and too lazy to back-track), but thanks to Wendy, I just had a wonderful plate full of delicious Brussels sprouts. They happened to be fresh (and not grubby looking) *and* on sale, so I grabbed 2 large handfulls' worth. I didn't do anything fancy. Boiled (steamed) in a pan, then tossed with butter, s&p and that's it. It was awesome, so thanks! :D
Alex
2/27/2012
I think we've made them three more times since that post. We're obsessed, and so is Lulu.
You just made my day! I've never heard of this technique before... so cool. :)
Alex
2/27/2012
That's what I like to hear!
JC
2/27/2012 at 9:55 PM
I know the type of clock it is (a rather good quality French clock) and if you want to give it a shot, you could probably replace the broken cord/rope without needing to disassemble the movement (this all depends how the rope is attached to the drum, but in most cases it can be done). I can also give you the name of a parts supplier that carries the necessary rope, which is rather inexpensive (I'm pretty sure it's under 15$ + shipping). Lemme know.
JC
2/27/2012 at 10:05 PM
*OR*, if you would rather have it serviced professionally, I could do that for you guys for free (minus shipping it back and forth + cost of new parts). I'd do it for free because: you guys rock, I love your blog, and I've never worked on one of these, so it would be a "treat" for me (since I'm such a dork). Weight driven clocks are rather simple to work on, and these larger ones are also more enjoyable to service. I'd only need the movement, dial, hands, and pendulum (no need for the weights since I could use similar ones I already have on hand). It's entirely up to you if you want to risk sending it by mail, since the postal service tends to be a bit rough, but with careful packing it should be fine. I just thought I would throw this out there.
Alex
3/1/2012
Thank you so much for offering this, we really appreciate it! We're a little uneasy about shipping it anywhere if we don't have to (I'm neirotic and just don't trust it), but we've been kicking around the idea of just fixing it ourselves if it isn't the hardest thing in the world. If you don't mind, we can take some photos of the interior of the movement and send them to you and you can give us your thoughts. Again, we'd greatly *GREATLY* appreciate the assistance.
JC
3/1/2012 at 7:07 PM
No problem. I also understand about the shipping issues. I can't tell you the number of horribly damaged items I've received either through bad (rough) handling, or exceedingly poor packing jobs.

Side note: my supplier carries 3 types of Morbier cord, and they are all around 9$/12 feet. I'm not sure if 12 feet does both trains (time side and strike side) or if it does only one. If I remember correctly, Morbier clocks use only a weight with no pulley, so I would think that 6' of rope per side would be more than enough (therefore new ropes would only set you back 9$+shipping).

You can e-mail photos,particularly of the drum (to see weather there is a hole straight through, or only one visible hole (meaning that the other one would be hidden inside), but I'd be curious o see the rest of the clock (dial, hands, pendulum, etc). [email protected]
JB
9/29/2013 at 8:32 PM
thanks, this is great. Looking forward to trying this.
Daryl
11/17/2013 at 7:46 AM

I'm trying the bluing for the first time. I have some shiny eyelet screws that I need to put on a vintage dresser. I heard I shouldn't touch the screws with my fingers because of oils, and then use alcohol to make sure oils are off of the screws. Was told that by doing that you'll get a more even color. Do I need to treat the screws after I blue them, with the Bluing companies Rust Protectant? If so, can't I just spray them with a clear Rustoleum?
Any suggestions are much appreciated!

Alex
11/17/2013

We don't do anything special with cleaning or careful handling, but we're not after a really uniform look, just older and a bit blackened. That being said, I have noticed some areas that take the color faster, or resist long, and it may be due to residue, dirt, or oils left on the screw from my hands or from others. If you're looking for that perfectly uniform look you may want to clean it with a little denatured alcohol or something similar. We also don't top coat with anything before using them, but this allows the color to rub off here and there. I'd say the clear spray, or even a brush and oil based poly might work out well. Good luck!

cb
6/15/2014 at 4:01 PM

Does the Gun Blue process work best on zinc plated steel screws?
Will it work on brass?

Thanks!

Chris
8/22/2014 at 10:45 AM

It looks like you painted your door knob. We have been updating our old door hardware but the paint always seems to chip off. I have tried everything from sanding and priming to just plain painting (plain painting didn't last long at all!). What are your tips/tricks and if you did paint, how are they holding up?

I think my next test is to use Brass Black (made by the same company as your gun blueing) and then lacquering them.

Wendy
8/22/2014

Hi Chris -- It looks like paint in the photo, but it's actually the original porcelain knob. No paint required.Alt smile

8/22/2014 at 10:50 AM

Oh, this is fabulous! Found via your transom post, this is exactly what I needed for some projects around the house & totally puts my "sharpie it darker" method to shame Alt wink

RICK
1/28/2015 at 11:40 AM

I think this will solve a my problem.
I make gun cases and trunks with leather over lay. They are always antiqued and need the screws to match.
antiqued upholstery tacks don't hold up to the every day use.

1/7/2016 at 2:21 PM

This is great advice -- I currently need some black #6 5/8" flat-head slotted wood screws for my Cunning Chronograph, but the only ones I could find were going to cost me $1 each!

One question -- you say to use "steel" screws (not stainless steel), but the only steel screws I can find are zinc-coated -- is that OK?

Donna
11/21/2016 at 7:38 PM

Restoring a old early 1900 Spanish house and thank you so much for this hint....I have been everywhere looking for missing screws for the front door plate. Can't wait to antiuqe the screws...Once again Thank You!

Frank
11/28/2018 at 3:34 PM

I think your project would have been looking better if you used oval head straight slot screws instead of using flat heads.

susan parisey
9/8/2019 at 1:12 PM

I didn’t get a chance to make my screws vintage before we had a bench redone. Can I just ‘paint’ on some of the blue stuff with the screws in place?

Since you've not signed in yet, you will need to fill in your name and email below. If you have a Facebook account, save yourself a step and use Connect to login.

Denotes a required field.

Please enter full URL, including http://

You can use Markdown syntax in your comment. And you can also use lots of Emoji!
  • Search

  • Login
  • Follow
  • Advertising

If you're looking for information on advertising and sponsorships, head on over to our sponsorships page. You can purchase site sponsorships in a few easy clicks. 

Toolbox Tuesday
Open Housing
  • We're Featured!

Old Town Home has been featured in the following places and publications:

The Washington Post
 
Washingtonian Magazine
 
Domino
 
Old House Journal
 
 
Apartment Therapy House Tour
 
Washington Post Express Feature
 
Home & Garden Blogs
 
© 2024 OldTownHome.com. - Privacy Policy
Login Below
or
Sign in with Facebook
Connect

Unexpected Error

Your submission caused an unexpected error. You can try your request again, but if you continue to experience problems, please contact the administrator.

Working...

Working...