Wendy and I have long dreamed of an intimate wine bar area somewhere in our house. While I have grand plans for a hidden and climate controlled wine storage area and tasting bar in the basement (many years down the road), the small area we've created in the kitchen will have to suffice until we can even begin to entertain grand plans similar to this.
To tell you the truth, we're thrilled with how the small "wine bar" area in the kitchen has turned out. We love the cabinets, fridge, and counter tops, but the addition of the shelves we built and installed last week really brought the whole space home. But one of the items I thought long and hard about building is now my favorite aspect of our shelves and wine bar -- the inverted wine glass storage solution.
As I mentioned, I've thought about how to build this aspect of our shelves for quite some time. I have high hopes of being able to construct row upon row of wine glass storage in a tasting room area of the house, so this first go of my idea is more of a proof of concept or prototype for what will eventually come.
The end result of our efforts were so successful, and the cost so reasonable, I want to share the process with you so that you may be able to do the same, if you're so inclined.
Before you get started you're going to need some basic supplies. I built our storage racks using some stock oak flooring threshold and some oak trim I picked up at our local big box. If you have it available, and you're painting the finished product as we did, you could also use pine threshold so you don't need to worry about the grain showing through when painted. You'll also need a few wood screws and some glue.
Start by laying out the glasses you have on the bottom of the shelf. This will help you to properly define how many rows of glasses will work, how many deep you can place in each row, and a rough idea of where the center of the whole contraption will sit. If you can't just flip your shelf over (if you're trying to mount this on the underside of a cabinet or something else), just create a mock up of the underside of where you plan on mounting the glass racks so that you may obtain proper sizing.
In our case, we established that we'd be able to accommodate five rows of glasses, each holding approximately three wine glasses or two martini glasses. You can see how we laid this out with the shelf flipped over.
After we determined just how many glasses the shelf could accommodate and where the glasses would reside on the shelf, I got to work on the actual glass holders. The key to these holders is the way they allow the glasses to slide into the supports, and once in, are ultimately supported by the top side of the threshold. The tapered edge of the threshold pieces allow the slanted edges of the foot of the glasses to rest comfortably and securely, but the key is slightly raising the threshold to allow the base of each glass to sit completely within the threshold without being pinched. It's a little difficult to describe, but a photo of one half of a support should help demonstrate what I'm talking about.
My first step in actual construction was something that is purely optional. The threshold is actually much thicker than it needs to be for our application. Rather than allow it to hang down further than it needed to, I opted to trim the bottom 1/8" form the bottom of the threshold using our table saw.
This not only reduced how substantial the threshold is, but it also trimmed off the grooves that are typically cut in the bottom of each threshold to prevent it from warping when it's used as an actual threshold. To trim this area I set the blade of the table saw to just over half the height of the threshold, then made two passes, one on each side. This took the bottom off rather nicely. I erred a bit on the side of caution and left a bit of the ridges on the bottom of the pieces and just figured I could sand them off later.
With the bottoms trimmed, I was able to cut the long lengths of threshold into individual pieces that are the correct size for the location where they will mount. We cut each into equal 11-1/2" lengths, the depth of each shelf.
I used lengths of 2" x 1/4" oak trim to support the threshold and allow it to sit off the shelf a sufficient amount. In order to make sure there would be enough room on either side of these oak spacers for additional glasses, I ripped the oak trim down to 3/4" widths on the table saw.
Based on my measurements, the gap between each piece of threshold needed to be roughly 3/4" to allow our the stems to easily fit in the openings. At first, I second guessed my measurement and made the gap 1/2". As it turned out, I should have stuck with 3/4". If you're doing this at home, stick with 3/4" and you'll be safe.
I decided to affix the spacer trim pieces to the tops of the threshold pieces with a few 5/8" brad nails and a bead of glue along each pieces.
This allowed me to make each threshold its own single piece so I could mount them more easily to the bottom of the shelf. It's very important to establish the center line of each piece of threshold and trim. You can see in the photo below that the center lines, marked in pencil, line up with each other. If this isn't done you might end up with glasses fitting fine into one area, then not fitting at all into another.
I also made up the two side pieces of threshold wine glass support from a single piece of threshold. Since the side pieces only need to support wine glasses on one side, I ripped the pieces of threshold and spacer trim in half and nailed the spacers to the threshold as I had with the full pieces.
With all of the wine glass supports made up, I laid them out so I could establish all measurements that I needed to transfer onto the shelf.
I planned on attaching the threshold pieces to the shelf using two wood screws on each one, but I wanted to make it as clean and nice looking as possible. To accomplish this I determined consistent measurements where the screws would be located on each threshold, then drilled pilot holes and countersink reliefs where the screws would be able to sit without sticking out from the bottom of the threshold pieces.
I established the center point of the shelf and then transferred the measurements of the first two threshold pieces onto the bottom of the shelf. Clamping them to the shelf I attached each threshold pieces using the two 1-1/4" wood screws.
After the first threshold was in place, I used a 1/2" piece of wood between each piece to ensure a consistent spacing. As I said earlier, I should have used a 3/4" stock piece, but I didn't. Oh well, live and learn for when I do our giant wine bar.
Once all the pieces I had made up were attached to the bottom of the shelf, I was able to look at the end result of my work.
This is where I realized I should have made the gap 3/4". When this clicked in my head, rather than throw things around the basement and stomp around the house swearing at everything, I stayed calm (a major step forward for me). I trimmed the edges of the threshold using the router and gave myself that 3/4" gap I should have used. You can see in the photo below that I used a 1/8" plastic guide on the out feed of the router table. This let me trim just a bit without the wood getting chewed up by the router at the very end of the cut when it's no longer supported by that 1/8" that had been trimmed off.
After the edges were trimmed I re-attached the threshold/wine glass holders to the bottom of the shelf and took it for a nice test spin.
Once we were happy with the way the wine glasses fit in their openings, we disassembled the whole thing and I gave the undersides of the pieces of threshold a pretty major sanding with 40, 80, 120, and 220 grit sandpaper to get rid of any saw marks or noticeable swirls. After the sanding, we applied a coat of primer and two coats of paint to all of the threshold pieces.
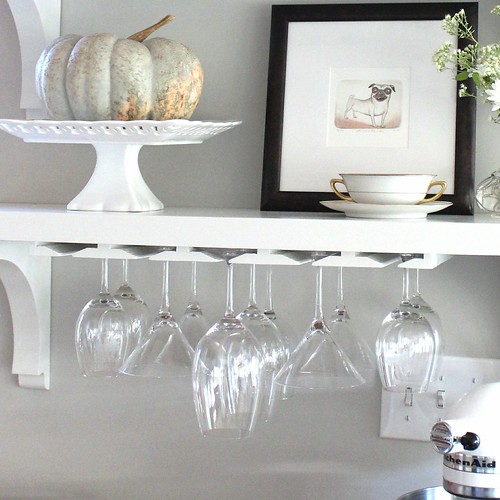
Reassembling the shelf after the paint dried gave us a great look at what we had built, and we were quite happy with the end results.
After hanging the shelf on the wall we were finally able to do something we've been waiting to do for several years. We loaded our handful of wine glasses into the storage I had built beneath the shelves we had just constructed. Shortly after, Wendy worked her magic on the styling of the shelves. It was a personally triumphant moment, I assure you.
The threshold pieces are low enough profile that they don't hang down too far to be noticeable but they provide plenty of room for each glass. In all, it holds about 15 glasses, not a tremendous amount, but enough to be effective. What I did learn is that we can use this same approach in the eventual big time wine room we will some day build in our house. I have no idea when or where that will be, but I see it happening, and I see it looking awesome.
What do you think, is this a good approach for wine glass storage? How do you store your stemware? Do you have a custom solution to a storage challenge in your home? If so, we'd love to hear all about it.
As seen on...