In previous posts we've covered our journey in our initial attempt to build our completely custom home office desk, the headache we endured in constructing the desk top, and the construction of the upper storage areas, bringing our project to the point where the desk was actually a desk. We had lower storage, upper storage, lighting, a workspace, and even an area to the right of the main workspace for shelving. The problem? We didn't have any shelving yet.

Doesn't it look so bare and lonely?

We had gone to such great lengths to make the various desk components work seamlessly with each other, hiding any fasteners and concealing any non-wood components. Everything had gone well but I was starting to turn into my normal neurotic self about how I would build the shelves. We had installed a single downlight above the shelf area, and I was concerned that solid wood shelves would block the downlight after the first shelf, leaving all but the top shelf totally in the dark.

We started playing around with the idea of doing tempered glass shelves instead of wood. We felt like a transparent shelf might work best by allowing the light to pass through, but it might look too contemporary against the backdrop of the exposed brick and the desk that I had built to mimic an 1850’s antique bookcase. We had worked too hard for the look we had achieved just to throw it away on the shelves.

So the more we talked, we came up with a hybrid approach to our dilemma. We figured we could build wood frames with tempered glass inlays. This would allow the shelves to look like they are wood at first glance, but the inlays would allow the light to pass through from the top on down to the bottom. It was the best of both worlds so we decided to go for it.

With the shelf decision made I turned my neurotic attention to also start worrying a lot about the method I would use to support the shelves. I had used a shelf support jig to drill peg holes in the bottom cabinet, but I felt like that was too modern of a solution for the upper portion of the desk. Instead I referred to the cabinet I was mimicking for my inspiration.

The antique bookcase uses a pretty classic method for shelf supports. Pieces of wood with triangle notches cut out at regular intervals are mounted in each corner, and movable supports sit beneath on either side of the shelves supported by the notches. It kind of looks like a saw tooth support when done. This seemed the best approach for our desk as well, so with the approach decided I could focus on building and installing the shelves.

The first step was to order the glass that would act as the inlays for the shelves. As it turns out, tempered glass isn’t the easiest thing to order online. Any custom sizes are expensive, and shipping is always a risk (since it’s glass). We used a company called Wilson Glass for our bathroom shower doors and they were great to work with. I went on their website to look into ordering glass from them for our shelves and realized they offered some standard size glass at very reasonable prices (about $25 per shelf plus shipping). We ordered four pieces in the smaller size that would work for our shelves and waited to receive them so we could properly size the shelves.

While we waited for the glass to arrive I started to work on the supports. For this component I ripped a few pieces of cherry down to 3/8” thick pieces of wood. I then cut the saw-toothed notches that would act as supports, and the cross pieces that would sit in those notches to support the shelf ends. It was also important to cut all of these pieces before building the shelves so that we would know exactly where to cut each shelf in the corners to accomodate the supports.

No sooner than we had finished up the supports, the glass arrived. I mean, it came within something like 45 minutes of when I stepped back and said “ok, the supports are done.” When the glass arrived we were able to take accurate measurements so that we could make the shelves with the perfect size cutouts for the inlays.

As I mentioned, I had this obsession with using as few fasteners as possible on the whole desk, and trying to hide the ones we had to use. The shelves were no different, so I decided to use a mortise and tenon approach to building the frames. Because of the notches, the inlays, and the mortise and tenon construction, the joints actually looked pretty complicated, but they all went together quite nicely.

In the photo you can see the rabbets for the glass inlay, the notch at the top to make room for the support, and the mortise and tenon in the corner.

After cutting everything and putting them together with a bit of glue, I clamped it all up in the basement and let them dry.

A complete sanding, some pre-stain treatment, a couple of coats of stain and polyurethane, and we had shelves and supports and were ready to go. You can see the supports in the top of the following photo.

We laid the glass into the shelves and positioned the supports where they needed to go and placed the shelves in their locations.

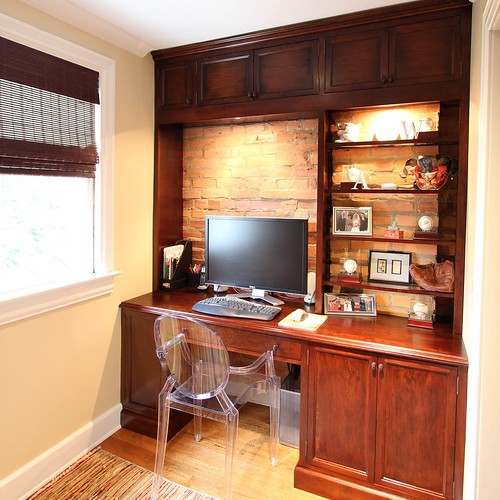
We put a few of our favorite photos and keepsake items in place, like a wedding photo, an old baseball glove, some souvenirs from vacations, and a few of my favorite baseballs I've caught at games over the years (like this one). We were finally able to stop and appreciate what we had accomplished.

On a side note, how do you like my desktop wallpaper? I took a photo of the wall then positioned it perfectly. I think I spent like an hour getting it just right and then Wendy walked in and said the monitor was too far to the left and moved it right...go figure.

Our desk had gone from a rough sketch on a couple pieces of paper to what you see in the photos with only a few headaches along the way.

To this day I’m still quite proud of what we accomplished with this desk. It was the first “real” piece of furniture I attempted with woodworking. I used a lot of techniques and approaches that were otherwise foreign to me, but with a little bit of patience the end result was almost exactly what we had envisioned when we first started talking about how to build the desk. Here's one more photo with the wide angle lens to get the whole desk in the shot. It distorts it a bit, but with such a small room it's the only way to do it.

Oh, and did I forget to mention how I built the desk to incorporate and hide all of my computer and electronics gear? No? Okay, I guess I’ll have to do that in one more post. But trust me, it’s worth its own post.

What do you think of the shelves? I know, they’re just shelves, so I’m not sure they deserved their own blog post, but I think I put as much thought into the construction of the shelves as I did with just about any other single item of the desk, and that’s saying a lot. Would you have gone to the extent I did, or would you have just used normal glass shelves with pin supports? Let me know.

If you liked this entry, be sure to check out our whole collection of desk building posts that recaps the adventure from concept to functional office furniture. 

Comments 29

Comments

1/20/2012 at 10:51 AM
So pretty! Great work, Alex!
Alex
1/20/2012
Thank you very much, Melissa!
1/20/2012 at 10:59 AM
Excellent work! I'm always impressed when people do their own woodwork; it's just so foreign to me but you really aced it. And yes, the computer wallpaper rocks. ;)
Alex
1/20/2012
I think I actually get more comments from friends on the wallpaper than the desk. They usually say "Hey, that desk is cool, but the wallpaper is awesome."
SpencerKoch
1/20/2012 at 11:01 AM
Cool project, as always. This Old House has been using a lot of LED strip lighting lately, and it would have been cool to use it to light each shelf independently had it been available when you built the desk. I like your idea of using the glass inset into the wood to let the light through. Seeing the wood from the front definitely ties the whole thing together.
Alex
1/20/2012
Just you wait, Spencer...just you wait ;-)
Sil
1/20/2012 at 11:54 AM
So great!! The desk is gorgeous and you guys made an excellent work. Congrats!
Sarah R
1/20/2012 at 12:21 PM
Beautiful desk! Nice work, as usual!
Tonya
1/20/2012 at 12:47 PM
You guys should seriously think about starting a furniture business. Craftsman of old would be proud to see the care you take with your work.
Alex
1/22/2012
Thanks for the vote of confidence, but I fear any business we would start might long go out of business before being able to complete the first piece. We're S-L-O-W (well, I'm slow) when it comes to making things. I think it's better I our client, I can only complain to myself about delays.
Kristin
1/20/2012 at 12:57 PM
beautiful!! looks like it was meant to be there all along.
Alex
1/20/2012
Thanks! That's the look we were going for. We hope anyone who comes into the house will just figure it's been there all along.
Monique
1/20/2012 at 7:30 PM
Alex, you are quite talented. Beautiful piece. I'm glad the wood wasn't painted white. Cherry wood is a rarity on blogs. Guess you used a few of your scraps, eh? :-)
Alex
1/21/2012
Thank you for the compliments! We chose the cherry for it's rich and deep color and really like the result. You're right about not often seeing cherry in the blogging world. It isn't an easy "run to Home Depot and pick some up" type of wood, so it makes sense you'd see it a bit less.

Actually, quite a few of the scraps in the basement are leftover from this desk project. I can throw out other wood, but not the leftover cherry.
Whitney
1/20/2012 at 7:55 PM
Again your (mutual) incredible attention to detail and patient contemplation of your desired style result in an amazing final product! I love it!! Beautiful.
As a (former? On hiatus?) woodworker myself, I have to say, for a *first* "real" project, outstanding. You both have a fantastic eye for beauty!
Alex
1/21/2012
As you know from the post, the process and project wasn't without it's headaches, that's for sure. But it has given us the confidence that we can pretty much build what we want to build. Overall, this project took us about five months to complete, start to finish, but there were lots of starts and stops in that five months.

Thank you for your kind words. We can't wait to get started on our next project so that we can share.
JC
1/20/2012 at 7:58 PM
Wow, nice job on the shelves. They're basically style and rail glass doors.

I've seen a very easy and lazy way to acheive the same look (wood/glass) but it's nowhere near as nice or as solid. Basically you'd just have your glass shelf cut to fit normally (with whatever mounting pins/pegs you want), and you would cut a 3/4 x 3/4 strip of wood with a 1/4" notch for the glass, and you can even route a profile on it if needed, and it's just stuck in place with silicone.

This trick was used on a client's shelves, which had curved fronts (so we cut curved strips of wood with a groove in them).

The advantages are that you get more glass/light, and it's much faster/easier, but the disadvantage is that the mounting method isn't as nice, and you have a 1/4" lip on the front edge of the shelves...

I really like the desk, BTW. You should be very proud of it.

Any thoughts about also building your kitchen cabinets? It's only about 100x more work, haha.
Alex
1/21/2012
That is a good quick approach to the same effect. It's amazing how well silicone holds things to glass (but not surprising given it is basically liquid glass).

We actually have thought about doing the kitchen cabinets. The whole idea, while appealing from the standpoint of cost savings and doing it ourselves, hits a few stumbling blocks when we realize just how long it may take. We're also probably going to do painted cabinets, so we'd probably have to get them sent out for that (unless we get our own sprayer like we talked about before). We'll see which way the wind blows when it comes time. Regardless, I think we'll be going the custom cabinet route, just not sure who will be the one building.
1/21/2012 at 9:59 AM
Wow! You guys are uber talented! It looks amazing! And the desktop wallpaper is a nice touch! I hope you have your feet up celebrating your hard work this weekend!
-Diana
Alex
1/21/2012
Why thank you! Sadly, we don't often put our feet up and celebrate our completed efforts for more than just a few minutes. There's always work to be done :-)
JC
1/21/2012 at 11:22 AM
I wish you guys were closer. I'd love to have a hand in redoing part of your beautiful house. The company I work for specializes in custom (and I mean TRUE custom) high-end kitchens. I don't know weather or not you had seen any of your stuff or not. We don't have a website, but I have some photos online here:

s271.photobucket.com/albums/jj152/sabourinwoodworks/

And a few here (though these are mostly shots of clients' houses and old house details) as well as a few commercial jobs:

s1018.photobucket.com/albums/af308/clockmaker15/Work/

Also a few here from some displays made for an 1850's fort (Fort Wellington in Prescott Ontario.) These were made to be "historically accurate" copies (like the slant bed, and musket crates):

smg.photobucket.com/albums/v473/sooth15/Work/#!cpZZ1QQtppZZ16

But yeah, we do anything from cheapie 5K$ "contractor kitchens" to extremely elaborate 50K$+ kitchens for rich clients. All depends what the client wants.
Wendy
1/22/2012
Wow, nice!

Gosh, wouldn't it be something to have $50k to spend on cabinets?
1/21/2012 at 4:13 PM
looks great! and smart solution with the glass/wood shelves.

so when do you start on redesigning/rebuilding your kitchen cabs as well? (hehe...

ps i really enjoy your blog! been follwing for about a month or so now.
(pps, if youre curious why, we're also renovating a 100-yr old townhome, here in holland.
Wendy
1/22/2012
Thanks Bethany, and we're so glad you've been following and enjoying the blog...all the way from Holland! Welcome and good luck with your renovation too!

And I think those kitchen cabinets are several years off still... :-)
Tee
1/21/2012 at 9:12 PM
Wow! The entire unit is absolutely beautiful. The shelves make it just perfect.
Wendy
1/22/2012
Thanks so much Tee!
Maggie
1/22/2012 at 10:48 AM
amazing job on the shelves! I think you aced the look. All glass would have definitely read more modern. The cherry trim is the cherry on top! Have you submitted any of your projects to Young House Love? If not, you should. I love that blog and I'm they would LOVE yours.
Wendy
1/22/2012
Wow, thanks Maggie! We're huge fans of YHL but haven't submitted any projects to them. Great idea, thanks! We'll have to think of something. :-)
threadbndr
1/23/2012 at 9:10 AM
Very cool. I love the lighted shelving and the old brick showing through.
Since you've not signed in yet, you will need to fill in your name and email below. If you have a Facebook account, save yourself a step and use Connect to login.

Denotes a required field.

Please enter full URL, including http://

You can use Markdown syntax in your comment. And you can also use lots of Emoji!
  • Search

  • Login
  • Follow
  • Advertising

If you're looking for information on advertising and sponsorships, head on over to our sponsorships page. You can purchase site sponsorships in a few easy clicks. 

Toolbox Tuesday
Open Housing
  • We're Featured!

Old Town Home has been featured in the following places and publications:

The Washington Post
 
Washingtonian Magazine
 
Domino
 
Old House Journal
 
 
Apartment Therapy House Tour
 
Washington Post Express Feature
 
Home & Garden Blogs
 
© 2024 OldTownHome.com. - Privacy Policy

Unexpected Error

Your submission caused an unexpected error. You can try your request again, but if you continue to experience problems, please contact the administrator.

Working...

Working...