Thus far we've kept you apprised of major and minor progress on our vestibule efforts. Though sometimes tedious or mundane, each task has taken us one step closer to the goal at hand -- a completely reconfigured front vestibule with a salvaged, shiny and high gloss inner door, and outer salvaged french doors with wavy glass. Sounds simple enough, but the whole process has been anything but.
This weekend, wisely using our Labor Day weekend to labor, we checked off a major component of our overall project. We finally took the significant step of removing our old front door and making our new, salvaged, front door the daily operational door. But before the grand reveal, let me get you up to speed with our checklist. We last left you with the following (pay no mind to the fact that some items were added since the last update. This sort of thing tends to happen on projects):
- Sand extension piece smooth
- Install molding
- Fill nail holes
- Fill old holes and gaps
- Fill old hinge locations on door jamb
- Sand door jamb
- Prime door jamb
- Paint door jamb
- Install weather stripping
- Transfer peephole
- Transfer knocker
- Transfer rim lock
- Buy and install deadbolt (Dont need this step)
- Complete/fix mail slot Grrrr... Purchase new mail slot
- Final sanding
- Prime door
- Paint (possibly multiple coats with wet sanding for high gloss) 1/2 way done, outside is painted
- Darken screws in hinges
- Install Rim Lock/Knob
- Install Peephole
- Install Knocker
- Install Mail Slot
- Install Mail Slot Backer
- Remove Old Door
The last task we talked about was the spring bronze weatherstripping install. Shortly after I drove the final nail in that task I moved our blue/turquoise door from the saw horses where it was being painted in the kitchen to it's rightful home hanging in the front. Since oil paint has an extended cure period, I was only able to paint the outside while the door sat it the kitchen. We allowed the door to cure for several days before laying the door flat on the painted side so that we could prime the back side.
The primer we used was a fast dry alkyd primer, so it was able to dry in about four hours. I kept checking the painted side of the door to make sure the wood and paper it was supported on wasn't getting damaged. It seemed okay for the most part, but I was beginning to see some loss of sheen. This was the last thing I wanted, so as soon as the primer dried we dragged the door back to the front and hung it once and for all.
Though hanging the door felt absolutely great, we still had a lot to do. I followed the same steps with painting as I had on the other side. We wet sanded the primer with a 600 grit sandpaper, then thoroughly wiped the door down. Next up, after the saga of buying paint we described in last week's paint sheen post, we opened our can of Benjamin Moore high gloss alkyd paint and got to work.
The absolute key to painting a door while it hangs in place is to ensure very thin and even coats. If anything is too thick, the paint will pool and end up dripping on your fresh surface. Nobody likes drip marks. I followed the same pattern of painting on this side, first the panels, then inner vertical and cross pieces, then the sides.
Allowing 24 hours dry time, I wet sanded the first coat with 1500 grit paper before applying the second coat. You can sort of tell that is really isn't that shiny in the following photo.
No sooner than the sanded door was wiped clean, I was applying the second coat. This paint goes on very smooth and actually achieves the best possible gloss and uniformity when applied with a high quality brush. The end result of my labors, a very high gloss and extremely shiny black door interior. It's so shiny that you can see yourself in it.
After a 48 hour dry time (since it was the final coat), we picked up work this past Saturday on the final steps of making this officially our new front door, installing and transferring all of the hardware.
The first major element was transferring the door's rim lock set to the new door. This was quite easy since I had pre-drilled all of the various holes before I ever started painting. This only took a few minutes and ended up looking quite good on the new door.
We also chose to clean up the lock's catch since it was covered in bits of errantly brushed paint, again using the wire wheel. Since the whole lock is brass, it came out looking pretty nice.
In a previous post we covered the mail slot and item we purchased from eBay that would protect the back of the door from peeping Merv the pervs. It is an antique mail shoot from an old building's letter drop, and it was covered with flecks of paint and rust. I know many people like this patina, but that isn't the look we are going for on this clean and shiny door. So I cleaned up the this item on the wire wheel. It really came out looking great. Very clean and polished. The very right of the cover has already been cleaned up in the following photo.
We also installed the antique mail slot we found on eBay. I'm still sad we could use the original one we had chosen, but it just wasn't in the cards. We already had the hole cut and ready to go, so the install of both items was very straight forward. Full disclosure, the mail slot is slightly crooked, but so is the rest of the house. I'm going to just chalk it up to "character" and call it a day.
And finally, we popped on the door knocker and put the peephole in place, and we were rounding 3rd and headed for home.
The final step was removal of our old front door. Due to the size, we enlisted the help of our neighbor and friend, Colin. We quickly removed the old screws (many of which were in wood so rotted that they just fell out), and before we knew it we were carrying the old door into the basement.
As with many projects, we were knocking out so many of the final detail steps one after another that it felt like it was all flying by. We had worked for so long and so hard on this project, and it was finally coming to fruition. It really felt great. After we took the door downstairs, I just wanted to get up to the new front door to see what it looked like in it's new (old) configuration.
As a reminder, the old setup looked like this shortly after we moved in:
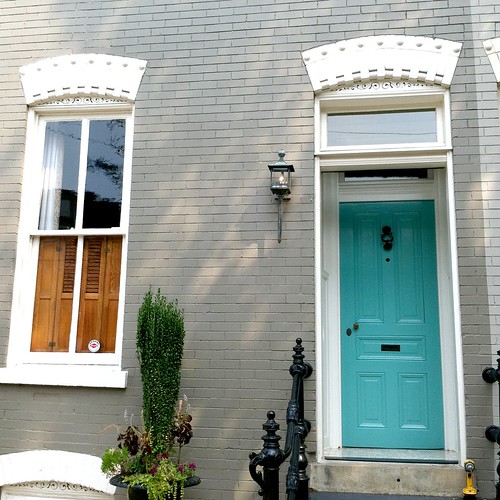
And our new front door configuration (National Lampoons Christmas Vacation drum roll please.... JOY TO THE WORLD):
What do you think? Curb appeal improvement?
This project has restored the entryway of our house back to the same configuration it originally possessed when it was built circa 1886. We once again have an entry vestibule where you can get in out of the rain or weather to unlock the front door. The old configuration was cramped, the front door never fully opened, and the setup just wasn't logical. This new configuration just feels right.
It was a whole ton of effort to get to this point, and obviously not a "knock you off of your feet" type of reveal, but I think it adds quite a bit of depth and interest to the front of an otherwise somewhat plain facade. We still have to add the french doors, which will add another element of visual interest, and we're already full speed ahead on that part of the project.
So our checklist on the new front door now looks like this:
- Sand extension piece smooth
- Install molding
- Fill nail holes
- Fill old holes and gaps
- Fill old hinge locations on door jamb
- Sand door jamb
- Prime door jamb
- Paint door jamb
- Install weather stripping
- Transfer peephole
- Transfer knocker
- Transfer rim lock
- Buy and install deadbolt (Dont need this step)
- Complete/fix mail slot Grrrr... Purchase new mail slot
- Final sanding
- Prime door
- Paint (possibly multiple coats with wet sanding for high gloss)
- Darken screws in hinges
- Install Rim Lock/Knob
- Install Peephole
- Install Knocker
- Install Mail Slot
- Install Mail Slot Backer
- Remove Old Door
Not too bad. The last step of darkening the screws will only take me a few minutes this evening. The whole project is getting close to completion, but we've got another large punch list like the one above for the french doors. Oy! I need to get to work this evening on that list.
I hope you enjoyed our "grand" reveal. It's hard to relay the level of effort we've put forward on this project. We could have just bought new doors, new hardware, new molding, and we would have been done a LONG time ago, but where's the fun in that? Instead we breathed new life into items that could have otherwise been discarded. We're now the proud owners of a period authentic and salvaged configuration in our home, and one that we've poured our heart into and can look at with pride.
What do you think, was it worth it? I know the camps on this are very divided. But just take a look at the before and after of our beautiful new front door.