When a newbie construction member joins a crew, the existing crew usually puts the new member through a bit of an initiation process. One of the construction rights of passage is when the crew tells the neophite to run to the hardware store and pick up a "board stretcher." The new crew member then usually goes on a wild goose chase from store to store looking for this mythical tool. Afterall, a board can't be stretched.
This weekend though, we really could have used a board stretcher, or better yet, a door stretcher. Instead, I needed to don my cap stethoscope as our neighborhood door surgeon to perform the delicate extension procedure. Think of it as plastic surgery for a door. I've been doing this for years and feel like I'm finally starting to hone my skills at this particular task.
Patient Door in May 2010 getting a few inches added to the top.
As our effort on the vestibule project marches on, we've turned the corner and have really started to see a light at the end of the tunnel. But before we get too close to that tunnel, we need to take on one of the more difficult of the final steps in our process to rectify an issue that cropped up early in the project. The salvaged front door we purchased had been shaved down near the top and was actually too narrow for the opening by about 1/2" - 3/4". We measured the door prior to purchasing it but apparently only measured the middle and bottom, not the top, so we missed the fact the door was too narrow. I decided that this weekend was as good as any to "grow" the door ever so slightly to fit the opening.
We had purchased two pieces of wood for this task a couple of weeks ago. Since the doors are 1 3/4" thick, we had to buy some rough sawn pine in true 7" x 2" for the french doors, and also a stock piece of fir 2" x 4" for the little extra necessary for the front door.
This weekend actually started off pretty rough. The first half of my Saturday consisted of several mistakes that kept taking me a step at a time away from my goals for the weekend. First, after carefully working for several hours to remove a huge piece of old and wavy glass I wanted to cut for various items, I broke it while setting it down to cut it. Strike one!
Then, after carefully measuring, calculating, and determining the correct length and size of wood necessary to expand the front door, I made the cut in the piece of fir only to realize that I hand't taken a rounded corner of the wood into account and had ruined the piece of wood. Strike two. This project is proving to be the bane of our existence.
After that, Wendy told me to take a break since I was making too many mistakes and she thought I just needed to take a breather. She was right. So after wasting much of my Saturday morning making mistakes, I took a brief intermission to collect my thoughts, then I got back on the horse. I was determined not to waste the weekend.
I figured out that the 2" x 7" of wood should be enough to add the necessary width to the french doors and have enough left over to use on the front door. I would need to stop making mistakes if this was going to happen, because it came down to a pretty close margin. I measured everything about five times, and then started making my cuts.
To cut the pine, I started with the door surgeon equivalent of a real doctor's 10 blade, my table saw. I ripped the wood to width on the table saw to give me the proper width for each door.
The next step was to cut it to the correct thickness. Sadly, I don't own a large planer or a jointer (not enough room in our basement), so I decided I would use the table saw and patience to get decent results. First, I used the blade to take off just the rough sawn surface on one side of the material. Then I set my fence to about 1/32" larger than the thickness of the door and once again ripped the piece to just about the correct thickness. This left me with a usable piece of lumber in the correct width. It just needs a good sanding with the belt sander once we've attached it to the door.
With the lumber cut, I turned my focus to the door. There were two issues I was taking care of this weekend. The first, the hinged side of the front door jamb had bowed slightly over the years. This caused the left side of the door to need a little bit of a trim in order to close fully without putting a lot of stress on the door or hinges. With the door in place, I used my hand planer to remove a little of material at a time until I felt like the door was able to close without issue. By the end, I was left with a mess on the floor, but a door that closed the way it was supposed to. Once the door was closing as expected, we removed it from the opening and took it out back to begin the growing process.
Similar to what we had done on the french doors, I planned to cut a tongue on the door and groove on the new piece of lumber, then join them together with copious amounts of glue. As with the french doors ,I first squared the edge of the door and gave it a nice clean cut with the circular saw.
I then put the router the work on each side to develop the tongue on the edge of the door. The tongue ended up a nice 1/2" deep and 3/4" thick. Looking good!
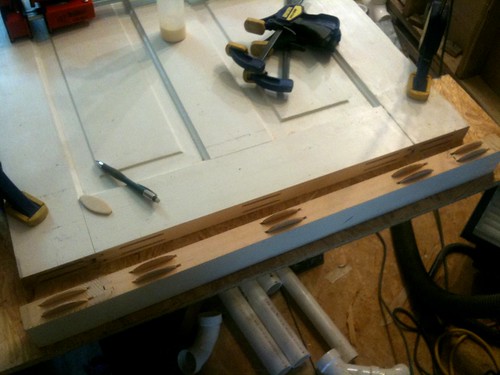
Next, I turned my attention back to the stock piece of lumber I prepared earlier. Knowing the exact size of the tongue that I had cut on the door, I was able to set my dado blade to the proper width and depth.
This took a lot of work and test cuts to get a setting that was the right thickness. The key here is not too snug and not too loose. If the dado is too loose, it will never really bond properly. If it is too tight, you run the risk of splitting the wood or not being able to fully clamp it down. So to make sure I was getting stuff just right, I used a bunch of test pieces that I had laying around. Here is one of the test pieces I was working with to ensure proper fit.
Once I was happy with that test pieces I had prepared, I cut the dado in the long piece that would eventually go onto the door. Then it was as easy as testing it out by putting it in place.
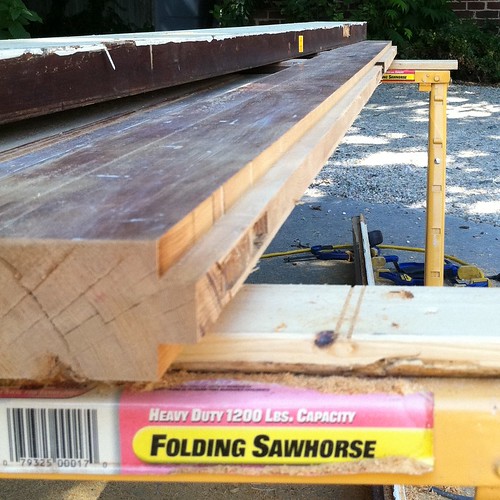
It fit perfectly (yes, still needs a trim on top, I just mean the joint was perfect)! You can see the extra width on the right of the door.
With everything looking good, I setup the saw horses in the sun porch, applied a ton of glue, and then clamped the door with my cabinet clamps to get a tight hold on it.
When the glue dries, we'll sand it all smooth with the belt sander. Then I'll use some marks I made on the door while it was hanging to trim the new piece to the correct width and test the door out. Assuming we can get it to hang properly, we'll install all of the molding, patch, paint, and finally, install the mail slot. This was a lot of work, it was HOT outside (I was sweating all over the door), and it took me the whole day to get this just right, but it felt nice to make some serious progress on the door. Ever since I realized the door was too narrow, I have been obsessing about how to do this in a correct manner. I had to make sure my solution would be one that would work well, not weaken the door, would stand up over time, and would not be very noticeable once the door was painted. I'm quite happy with our this turned out, and the door is as sturdy as ever with this little extension.
Do you have any experience in making a door slightly larger? Would you consider yourself a door surgeon, or maybe you're the Dr. Kevorkian of doors? Share some of your door successes and failures, I'd love to hear them.