A couple weeks ago we posted about starting work on our backyard vegetable garden. The project has been progressing nicely and it's about time we fill you in on what we've accomplished. We've read through our copy of Square Foot Gardening, got some great advice from friends and blog readers, and now we're inspired to make the garden grow! But before we could plant, we had to take the next, very important step in accomplishing our goal: finishing the bed to make the actual area to plant.
We selected the north wall in our backyard to ensure it receives as much sunlight as possible. The amount of light we get is going to be the big limiting factor in our garden. With our large tree at one end of the yard, and the house at the other, we get just a few hours of sunlight per day. This spot gives us our best chance at success.
With the location chosen, we pulled up all of the bricks and cleared the area of debris and stubborn obstructions.
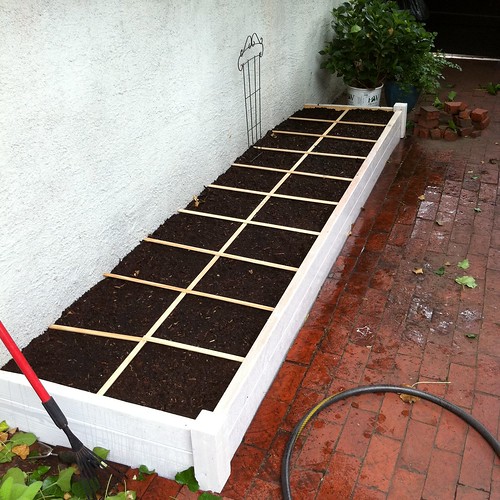
Once cleared, we felt good about our decision to go with the square foot garden method of planting. The space we selected is roughly 10'x2', which will give us 20 1'x1' areas to plant. The book outlines a 4'x4' square area as ideal, primarily because you can comfortably reach into the middle of your garden by about two feet from any side without losing your balance and falling in. Since our garden is against a wall, two feet deep is perfect.
After much research, we planned on building the box to be 9" deep (but it will appear only 7" deep when you consider the depth of the bricks). You can see the reveal of the border in the photo above. This depth will allow us about 7"-8" of soil to plant in without needing to overfill the bed.
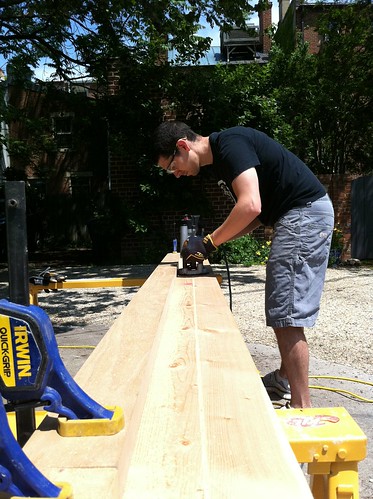
With everything planned out, we got started on the box construction. We're using standard 2x10 material for the border, but we don't really want it to look like we just stuck a couple of 2x10s on the ground. In order to provide a little decoration, we placed two small posts at the corners of the box. We also decided to make it appear as if the borders were several pieces of stacked wood.
To accomplish this look, we figured we could use our router to cut a V-groove. After getting everything setup in the back parking area, we set the depth of cut on the router to 1/4".
Once the router was set, I clamped a few boards to the top to use as a guide and got started cutting.
After all three border boards received their grooves, I sanded them with 120 grit sandpaper to get all of the ink and marks off of the boards, and also to smooth out the grooves that I had cut (soft wood usually "fuzzes" up when you cut it with the router). Then Wendy started to work on painting the exterior of the boards.
Wendy wanted to give the border a white washed look rather than a heavy painted finish. To accomplish this, she mixed a formula of equal parts white latex paint and water.
The slightly watered down paint let the grain of the wood faintly show through, so it looks just a little bit more natural. And to ensure paint residue is not leaching onto our veggies, she only painted the exterior and top of the boards and posts.
After the paint dried (it took about 10 minutes on this particularly beautiful and sunny day), we placed the posts and border and screwed the corners together using a few exterior grade decking screws.
The bed was just about ready for soil, we were finally making some progress. The ground below the bed is thick with tree and ivy roots, so we opted to lay a fabric weed stop mat on the bottom of the bed before we placed any soil. Hopefully this step will keep the roots at bay and away from choking out our veggies. Worst case, we can remove the dirt next summer to clear the roots and implement a more permanent solution. What that may be...I have no idea.
As you can see from the photo, I had quite a bit of help placing the fabric. Every time it wasn't quite right, Lulu would make sure I didn't leave well enough alone and would run through the blocker and mess it up completely. It was very, um, helpful. Once I had the weed block in place, it was time to start dumping the soil.
Again...lots of help. We ended up using bags of "Organic Choice" soil rather than mixing up our own. We did a bit of research and determined that this soil mixture was comprised of the essential items that were outlined in "Mel's Mixture" form our book and also of the items that were outlined through the various pieces of advice we've received along the way.
With the soil in place, the final step to building our square foot vegetable garden was our square foot grid. The grid is an important part of the garden as it defines how many items you plant and where you plant them. Our next post will go into much greater depth on this aspect of the garden, but for now, I'm just building.
You can use a lot of different things to make the grid. From twine, to wire to a pre-made grid. But as luck would have it, I'm a borderline wood hoarder (you should see our disaster of a basement) so we had some leftover molding from a previous project that I was able to dig up for use as our grid. Whenever this sort of thing happens we feel great. Wendy loves it because we save a few dollars by reusing something most would have thrown away. I love it because it gives justification and purpose to my inability to throw away wood that "I might eventually have a use for." To each their own, right?
To lay out the border, we cut the wood to make 20 one square foot boxes. These are rough square feet because the border isn't quite a consistent depth. The bricks are not parallel with the wall so we opted to follow the line of the bricks so your attention wouldn't be drawn to how out of square everything is. This complicated the grid a little, but it just meant we would need to cut each individual cross piece a little different size.
After all of the pieces were cut, we just needed to nail it all together. I used my super awesome pancake compressor and brad nailer with 5/8" nails at each cross point. I also used a carpenter's square to ensure the box was actually a box and not a triangle, and a small pressure clamp to keep the grid where it needed to stay while I nailed each section.
The end result was pretty nice. It may not be the single most aesthetically pleasing item in our backyard, but we're hoping that it's a fair trade off for the enjoyment we'll get from eating our first item from the garden.
So there you have it, our vegetable garden bed has been constructed, filled with soil, and fitted with its square foot grid. Our little garden was just waiting for veggies, but we'll cover that tomorrow.
Have you built a raised garden or vegetable garden that you're quite proud of? Any vegetables that seem to do well in an urban environment with limited sun? Please, share with us. We'd love to see the experiences others have had.
Be sure to also check out: