It feels like it's been forever since we had a good progress-related post. With all of our chores, parties, vacations and work, we've not had a lot of time to get crackin' on the last few steps of the french doors. Well, today I'm glad to report that has all changed.
I've been working here and there on some of the smaller items on the doors. Primarily I was wrapping up the tedious process of glazing then allowing the doors to sit for about a week or two to let the glazing begin to cure. After that, it was on to applying the first coat of primer.
With the glass installed, I turned my attention to the final two items we would need to attach to the door: the astragal and the drip edge.
I know you may be thinking, "Astragal? What's an astragal?" Well, you know that little piece of wood that sits on the fixed side of a french door that keeps the other door from closing too far? You know, the little bridge piece of wood that covers the gap between the doors? Yeah, that thing is generically called an astragal (and I'm not talking about the bone in your ankle with the same name). Who knew?
astragal ['æstr?g?l]
n
1. (Fine Arts & Visual Arts / Architecture)
Architect
a. Also called bead a small convex moulding, usually with a semicircular cross section
b. a moulding having the form of a string of beads
2. (Fine Arts & Visual Arts / Furniture) Furniture a glazing bar, esp in a bookcase
3. (Life Sciences & Allied Applications / Anatomy)
Anatomy the ankle or anklebone
[from Latin astragalus, from Greek astragalos anklebone, hence, small round moulding]
Well, apparently a lot of people who aren't me knew that. When my Google searches of "little thing that goes on one side of double doors that makes it so the other door closes right" yielded few useful results, I turned to the catalog of one of my favorite mills with an Internet presence, Mad River Woodworks. I looked through the pages of their catalog and BAM! There it was, an astragal.
In this case, I'm generically referring to the piece of molding on the door as an astragal, but it is actually a far more generic term to refer to anything that is a piece of bead molding. You can see the shocking lack of astragal in the basic fitting of the door. Note the visible gap between the doors.
Ok, so I knew what it was called, that was step one, but that didn't help me to have one to install. We looked at the various doors all over Old Town to figure out what we wanted ours to look like, and we noticed a trend.
Most astragals (or astragali?) seemed to be ones with a cove of 1/4" to 1/2" on either side with a 1/2" bead in the middle. There were also a smattering of flat astragals or ones with minimal detail, but they were far less attractive. With the design in our minds, I could move onto the next step of actually making it.
Yes, I know I could probably buy one from our local lumber yard or mill shop, but where's the fun in that?
Cutting the Astragal
Actually, since this is an outdoor item, and potentially exposed to the elements, I wanted to use some good wood that we already had in the basement, rather than some stock finger jointed pine. This would help it last longer and avoid the dreaded risk of rot. So I got to work cutting it from a piece of 1 1/2" x 1 1/2" fir that I had left over from an earlier door widening project.
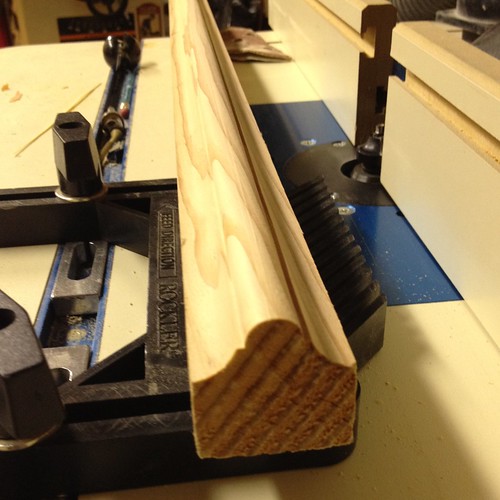
To start I used the 1/2" cove bit on our router to cut the cove detail on either side. I knew I would need the flat base as the project moved along, so I didn't rip the piece to size just yet.
With the coves cut I changed the router bit to the 1/4" round over detail. Cutting with two passes would provide me with the bead that runs along the center of the astragal. This was delicate work given the way the material rested, but I was able to knock it out without much effort.
The final step in the astragal creation was ripping it for proper thickness. I set the fence and cut with the detail to the left of the blade and was left with my own custom astragal.
Once I cut it to the proper length we were ready to go. I did cut the bottom with a slight pitch to keep water from finding its way back into he door. Maybe a 4 degree angle.
Cutting the Drip Edge
After I had my astragal in hand I turned my attention to the drip edge. A blog commenter left a note recommending that we should absolutely install a drip edge. I'm so glad he did as this is actually a prime location for potential water infiltration. I saw this first hand with our old door. (Thanks JC!)
Even though I wanted a drip edge, I wanted to make sure it worked with the doors. I decided that the only style that would maintain the look was to use a wood drip edge. So once again, I got to work.
We had a leftover piece if 100+ year old tight grain pine that would work well. The old growth lumber is great for this type of thing because it is far less likely to suck up the water. I just needed to turn it into something usable.
I started out by turning the piece of scrap rough sawn lumber into a nice piece of wood. We don't have a planer or jointer, so this is done using the table saw. It works well enough, but I would love a planer.
After I had the wood cut into a usable block, I continued by ripping the piece into a few very small pieces of wood that was wider than we needed, but the correct thickness. I was then able to run the pieces through the router using the 1/4" router bit to give the edge detail I was looking for.
With the edge detail cut, I then ripped the small piece into an even smaller piece to get the final drip edge trim.
The last step on a drip edge is to cut a small groove in the underside to ensure any water that wraps over the edge drops off before making it to the door.
I'm pretty happy with how they turned out. And Wendy is really happy that I was able to use an old piece of scrap wood I had laying around. I love it when a plan comes together.
Priming and Assembly
After cutting the drip edges to length and a little bit of priming with a good oil based primer on all of the pieces...
...I glued and nailed them to the door along with the astragal. With the final nail, the major work associated with this months long work was officially complete...almost. I test hung the doors to appreciate our handiwork.
If you're wondering, the glass is weird looking because I haven't cleaned all of the fingerprints from the glazing process yet. It is old wavy glass, but it isn't that wavy! You may also be able to see that Lulu was inspecting the effort from the bottom left window.
We still need to paint the doors, find some very specific hardware, install that hardware, and hang the doors in their opening once and for all, so maybe we're not totally close to being done, but we're "close." At least the major construction elements are complete, glass is installed, doors are primed and hanging the doors is all settled.
What do you think? I know it's a bit tough to see, but how do you think the astragal and drip edge worked out? Not bad for a bit of improvisation.